Showing posts with label receipts. Show all posts

November 13, 2019

WW1 Recipes to Help Rebuild France: Serbian Sarma


This recipe is from the book Allied Cookery (1916), a book written to raise funds to support World War 1 victims in France. It contains recipes from the allied nations. It was the work of Gertrude Clergue and her sister Grace Harrison who were born of a French father and American mother.  Clergue, was awarded the Medal of French Gratitude in 1920 fr her efforts. The funds would help rebuild farms and eventually the food supply in the war torn areas:

Unfortunately the list of calamities that have melted on France does not do not stop there: all the territory invaded by the German troops, from which they have been driven, which goes from the Marne to the Aisne, and that covered hundreds of prosperous villages in one of the regions the most fertile and richest in France, was ravaged by enemy troops. The owners of these thousands of farms - old men, women and children - have returned to their homes destroyed to raise their houses and have the land produced food they need. They lost everything: houses, furniture, clothes, animals, farm implements.

The book was reprinted in 1917 and 1936. I'm not an authority on Serbian cooking and I can't claim that this recipe is the most "authentic one." The book was published in mostly English and intended for American and Canadian audiences but looking at the recipes they do seem to match up on a basic level with foreign foods at the time. Some recipes use picked cabbage instead of relying on sauerkraut for the kick.

It is delicious and I can't wait to make this again. I walked in with the cabbage and my Grandma told me to bring down the extra because she would make stuffed cabbage. I said I was making stuffed cabbage and she was way more interested in having me do it. :)


WW1 Serbian Sarma


Ingredients:

- 1 Head of Cabbage
- 1 Cup of Rice
- 2 Pounds of Ground Beef
- 2 Pounds of Ground Pork
- 5 Onions, chopped
- 4 Egg, beaten
- Sauerkraut
- Salt
- Pepper
- Spoonful of Flour
- Spoonful of Paprika
- Lard/ shortening


Instructions:

Boil a pot of water,remove from heat and carefully add your cabbage.  Fry your onions in a large frying pan in a spoonful of lard/shortening. (Remove one onion's worth to a separate bowl to use for the sauce.) Mix in the beef, pork, eggs, salt, pepper and uncooked rice until well combined. Set aside.

Carefully remove your cabbage from the water. Pat dry and remove the leaves.

Fill each cabbage leaf with two spoonfuls of filling and fold in the two sides and the top and bottom to form a little packet.

Fill the bottom of a deep casserole dish with some sauerkraut and the juice. Place the filled cabbage leaves in the dish, layering sauerkraut and cabbage leaves. Cover and bake for 45 minutes at 325.

Put the remaining onion into a frying pan on medium heat. Saute the onions in a spoonful of lard and add a spoonful of flour, a spoonful of paprika, and a cup of water. Cook until it thickens. Pour over the cabbage leaves and bake for another 15 minutes. Top with sour cream when serving, if desired.


***I used Impossible Burger meatless and Vegan Field Roast Frankfurters for this. I also halved the "meat" in the recipe, used vegetable shortening instead of lard and smoked paprika. You certainly could bake or cook it on the stove for the full two hours.***


Here's a video if you want to see the "pot" sarma is supposed to be baked in. I didn't have one so had to make do with a good ol' casserole dish.


Harrison, Grace Clergue, and Gertrude Clergue. Allied Cookery, British, French, Italian, Belgian, Russian. New York: G.P. Putnams Sons, 1916.


September 25, 2019

Colonial Era Cold Remedy That Actually Works: 18th Century Elderberry Syrup


1700s Remedies Elderberry Syrup

It's the middle of September in 1774, your mother is sick and has sent you out to collect elderberries to make syrup. You know just where to find them as you have a favorite spot. You fill your basket and turn to leave but eye up a particularly nice stalk that you can hollow out later.

By the 1700s, Elderberry (Sambucus) was a well known plant. Herbal manuals from the 1600s include it, and it was a favorite plant among young boys for making, of all things, popguns. The berries were also used for making wine. Elderberry wine was a main ingredient in a remedy printed in The Family Physitian (1696) to help treat scurvy in the winter when "herbs are scarce." Elderberry wine and honey make a very simple cough suppressant if you didn't feel like making elderberry syrup.   


You could use sugar instead of honey in this but I prefered to have the extra antibacterial properties of honey. Elderberry is still being studied but there have been a lot of promising studies that support  the healing properties of elderberry in shortening the duration of cold and flu symptoms.

18th Century Herbal Remedy: Elderberry Syrup


Ingredients:

- 1/4 Cup Elderberry Extract
- 3/4 Cup Honey
- 3 Cups of Water

Or

- 2/3 of a cup of berries (fresh or frozen and defrosted)
- 3/4 Cup of Honey
- 3 Cups of Water

Optional Ingredients:

Ginger, cinnamon, and cloves.

Instructions:

Mix all ingredients together and bring to a boil, reduce heat and simmer until the mixture is reduced by half. Pour into a bottle and let cool. If you used whole berries, crush them with a spoon, and strain into a bottle, let cool before use.  Take a Tablespoonful by mouth 3 times a day or mix the syrup into tea. You can refrigerate the syrup for up to 3 months or freeze them into cubes and use as needed.

For those of you asking if you can just buy it ( I get it, you're sick) I have used and recommend this brand: Gaia Black Elderberry 

If you are planning on buying I would greatly appreciate if you would use the affiliate links above. It doesn't cost you any more but helps me keep the website running.


DISCLAIMER: All information contained in this site is provided for informational purposes only, and should not be construed as medical advice or take the place of a doctor. Use at your own risk. For further research please check: Web MD.

~~~~~~~~~~~~~~~~~~~~~~~~~~~~~~~~~~~~

Colonial Popguns 


If you've found your way to this page I'm assuming you're sick and since you're sick anyway I thought you might have fun passing the time reading about popguns. I have always been curious about what they would look like in the 18th century and how they would work. Making popguns has been a children's pastime for hundreds of years, only to be lost recently. The popguns in the 18th century likely looked and functioned something like this:


Be sure to watch this video of this gentleman having some fun with his homemade, elder popgun and apple chunks. Hope you feel better soon! Have you tried Elderberry Syrup? How did it work for you? Be sure to leave a comment with any elderberry tips you have. 


August 27, 2019

18th Century Lemon Cheese Recipe from The Cookbook of Unknown Ladies

18th Century Lemon Cheese Forgotten Recipe

I was excited to try this recipe. I have yet to see anyone else attempt it and it is from a handwritten recipe book in Westminster City Archives in London known as the Cookbook of Unknown Ladies. Little is known about the recipe book or the women who contributed to it only that it was written by "various unknown women about the year 1761," as is printed on a title page.  Be sure to check out all of the recipes from The Cookbook of Unknown Ladies.

This was a mystery recipe.  I can generally read and approximate what the finished product of a recipe will be. For this recipe I didn't have a clue. I thought it sounded most like a cream cheese but it was whipped before being hung to separate the whey out. Would that make a difference? My grandma and I kept testing it throughout the process to try and get an idea of what it would turn into.

I was very afraid that the minute I added lemon to the cream that it would separate the way it does when making cheese but it didn't. I waited until the cream was whipped then quickly stirred in the juice and the rind.

It turned out that this makes a spread that tastes like a delicious lemon cheesecake. It was delicious on the 1796 pound cake I happened to make the same night. It would also be good on scones or toast.

Excerpt from The Cookbook of Unknown Ladies:


Lemmon Cheese
A qurt of good thick sweet creame. Put to it the juce of four lemons as as mutch peel as well give it an agreeable flavour. Sweeten it to your taste & add a littile peach or orange flower water if you like it. Whip it up as you would for sellabubs but very solid. If you have a tin vat, put a thin cloath in it & pour in your cream. If not, put it in a napkin and tye it pritty close. Hang it up to let the whey run from it. Make it the night be fore you use it. Garnish it with currant jelliy or candied oranges.


Ingredients:

- 16 ounces Heavy Whipping Cream
- 2 Lemons (Juice and Peel)
- 1 Tablespoon  Orange Flower Water
- 2+/- Tablespoons sweetener (Sugar, Honey, Molasses, )

Instructions:

Zest and juice your lemons. Put cream in large bowl, add sugar and orange flower water and whisk until you have whipped cream. Stir in lemon juice and peel gently to avoid over whipping. Pour into doubled cheese cloth and tie it up. Hang it overnight. In the morning press all the remaining juice out with your hands, make into a ball or press into a mold and serve with jelly or candied oranges.


I had this hanging over a bowl in my living room and my puppy was terrified of it.

If you haven't used cheesecloth before, I recommend paying a little extra to get the kind that you can wash and reuse: Cheesecloth. 


My site uses affiliate links. If you are planning on making a purchase, I would greatly appreciate if you would use the affiliate links above. It doesn't cost you any more but it does help me keep the website running. Thanks!

December 12, 2018

Civil War Era Orange Nuts Recipe

Civil War Era Cookie Recipe Orange Nuts 1865


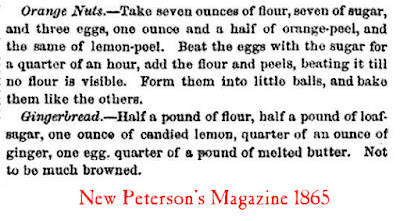
The holidays are coming and that means acres of oranges will enter our homes to grace tables, bob in punches and add tang to cider.  Orange Nuts, hard biscuits with a strong citrus flavor are the perfect, Civil War Era thing to compliment gingerbread, cider or tea. They are also a great way to use up all of those otherwise wasted peels.

Orange Nuts are a variety of Ginger Nuts, a recipe still popular today. Click the link to see the ginger nuts recipe I made last Christmas!  This recipe was also printed in Godey's Lady's Book and Peterson's Magazine in 1865 and was still being published verbatim in 1883.

Civil War Era Orange Nuts Recipe


Civil War Era Cookie Recipe Orange Nuts 1865

Ingredients

- 1 1/2 Cups Flour
- 1 Cup Sugar
- 3 Eggs
- 2-4 Orange Peels, zested
- 2-4 Lemons Peels, zested

Instructions:

Preheat oven to 350 degrees. Mix sugar and eggs in a large bowl and beat for 15 minutes. Add flour and zest and mix until fully combined. Add flour until your dough is stiff enough that it can be rolled in your hands without sticking. Roll into one inch balls. Place on baking sheet.  Bake for 15 minutes.


Civil War Era Cookie Recipe Orange Nuts 1865

I hope everyone has a safe holiday season! I'm going to try and blog all of the different things I bake this year and would love to hear and see pictures of what you are baking!
  

December 8, 2017

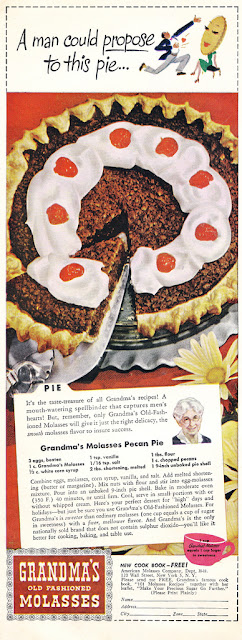
"A Man Could Propose to This Pie" WWII Era Recipe: Pecan Pie

WWII Era Recipe: Pecan Pie

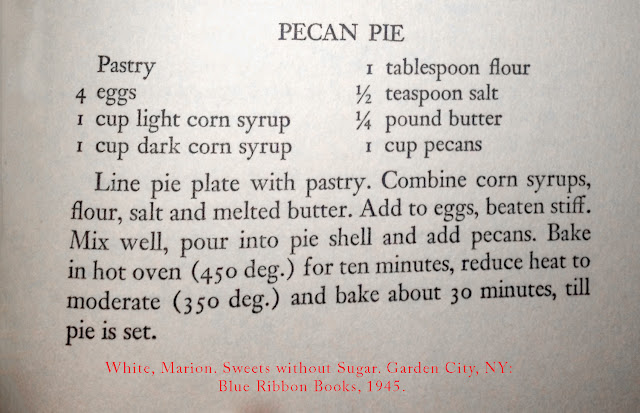
Recipes for the earliest versions of pecan pie date back to the 1880s but the dish didn't reach its height of popularity until the 1940s when sugar rationing made this sugarless dish a good alternative to other pies. Older recipes tend to favor molasses while newer ones tend to favor corn syrup. The Karo corn syrup company helped popularize it in the 30s and 40s. 

Pecan pie has strong southern associations due to the cultivation of pecan trees there. It is currently the official dessert of the state of Texas, which is fitting, because the earliest recipes that are most similar to pecan pie today started popping up in the 1880s in Texas.   

I chose to make the Grandma's Old Fashioned Molasses version because, ahem, I'm giving it to a man--I mean--because molasses is the best nutritional substitute for sugar according to Sweets Without Sugar (1945), a book dedicated to wartime sweetener substitutes. (We'll see.)  I also used margarine as my shortening to keep in theme with WWII era substitutions. 


WWII Era Recipe: Pecan Pie WW2


WWII Era Recipe: Pecan Pie WW2

Ingredients:

- 2 Eggs, Beaten
- 1/2 Cup light Corn Syrup
- 1 teaspoon Vanilla Extract
- 1/16 teaspoon Salt
- 2 Tablespoons Shortening, melted
- 1 Tablespoon Flour
- 1 Cup Chopped Pecans
-  1, 9 inch unbaked Pie Shell

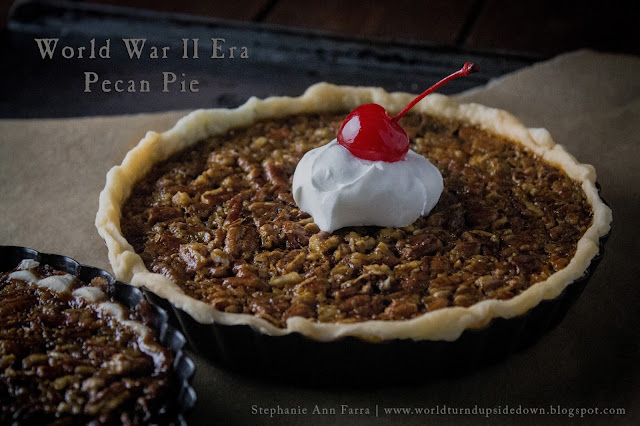
Preheat your oven to 350 degrees. Line your pie pan with crust, a little on the thicker side. Mix eggs, corn syrup, molasses, vanilla and salt. Add melted, but cool-to-the-touch, shortening. (Or else you'll have omelette in your pie.) Mix in your nuts and pour the mixture into your pie crust. Bake for 40 minutes. Let cool completely, then serve with whipped cream and cherries.


WWII Era Recipe: Pecan Pie  World War Two

October 25, 2017

WWI Era Turkish Delight Recipe

"I am now on a hospital ship bound for somewhere, and I don’t know where...I have been wounded in the foot, but not seriously. You know what things are on an hospital ship, plenty of everything. I shall have a good yarn to tell you when I come home, and I don’t think it will be long. It isn’t half hot our here, and it doesn’t half make you stare to see a seven foot Turk in front of you. It makes you think you are going to have Turkish delight for supper..." -Private Charlie Cox in a letter to his parents Sept. 28, 1915


WWI Recipes Candy Turkish Delight


I'm very happy I had a chance to make this. I was hoping I could make something delicious to send on over to Newville but it's been quite the week. I found this recipe while researching Trench Cake and ending up finding a recipe for "Trench Fudge" (apparently there's no information anywhere about what trench fudge is) above this deliciousness.

Turkish Delight, also known as, Lokum, Lumps of Delight or Turkish Paste was created in the late 1700s in Turkey. According to the Arabic name, rāḥat al-ḥulqūm, they were likely developed as a throat soother. The candy became very popular in the West during the 1860s. Popular flavors included rose water, lemon, orange, honey, and molasses. The oldest recipes rely on the sugar and fruit Pectin to gel. The addition of gelatin is very typical of the time period. Gelatin was made for centuries as a result of boiling bones but gelatin desserts became very popular at the end of the 19th century. It was at this time Jell-o appeared.

No post on Turkish Delight would be complete without mention of C.S. Lewis and Lion the Witch and the Wardrobe. There's a really good article on the popularity of Turkish Delight during the time period and how the difficulty of the recipe and the amount of sugar involved made Turkish Delight seem like a ridiculous luxury during the food rationing of WWII.

The Recipe:   


WWI Recipe Candy Turkish Delight
World War 1 I Recipe Turkish Delight Candy

Notes:

The result ended up being better than expected. I was afraid it wouldn't gel but in the morning it was perfectly solid. The gelatin flavor is a little strong. Other contemporary recipes call for the addition of lemon or orange oil and I think that would be a good addition. This recipe can also be made with vegetarian gelatin.
I used a greased 9 x 6 " loaf pan. If I was to make this again I would probably use whole nuts so that they don't all float to the top. The times I used were very approximate as I was cooking in between calling a tow truck andwaiting for it. :) I might have done around 7 minutes for each boil. I was worried it might not gel but I had no issues. I covered it with a cloth when I left it to set over night in in the refrigerator to try to keep some of the moisture off.  Once cut, I made sure they were well coated in powdered sugar which dulled the candy to a peachy-orange color. 

I've read conflicting advice from "keep in an airtight container" to "keep in a paper bag," and read storage estimates from 3 days to 3 months. I put 1/2 in an airtight container, the other half I wrapped individually in little bits of parchment paper.  If either method keeps them good by next week, I'll be sure to send them on to the event and leave an update here on which method is better.

Hope you enjoy!  

March 3, 2017

Civil War Era Bubble and Squeak


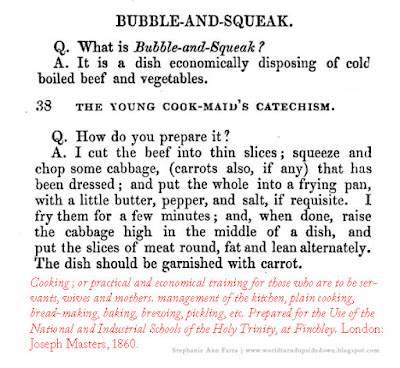
Bubble and Squeak was a popular, economic meal using up leftovers. The name comes from the sound the cabbage makes while cooking.  It was often served with a side of sausages or other meat or mashed potatoes. It was sometimes referenced as an Irish dish although there are recipes for it, and references to it, in British, Scottish and American books. It's origin is British although the dish is similar to Irish Colcannon.

There were many recipes for it in the early 1800s but by the 1860s it was ubiquitous enough of a dish that publications refer to it as if it was commonplace. Godey's Lady's Book published a recipe in 1862 for Buttered Cabbage "Boil the cabage with a quantity of onions, then chop them together, season with pepper and salt, and fry them in butter. It is rather a homely, but savory dish, and frequently used either with fried sausages laid over it or as an accompaniment to roast beef, and forms part of bubble and squeak."

James M. Sanderson listed a recipe for Bubble and Squeak in his Camp Fires and Camp Cooking, or; Culinary Hints for the Soldier, a book intended for Union soldiers

This is an old and favorite mode of getting rid of bits of corned beef among good housewives at home and can be advantageously introduced into camp. Any pieces of cold corned or salt beef that may be on hand should be cut into slices and sprinkled with pepper; then put them in a pan, with a little grease or fat, and fry them slightly. Boil some cabbage, and squeeze it quite dry; then cut it up very fine, and serve a piece of beef with a spoonful of cabbage, first seasoning it with pepper, salt, and vinegar.

Ingredients:

- 1/2 head of Cabbage (endive, or savoy recommended)
- Leftover Beef, sliced (steak or salt beef)
- 1 Onion
- 1 Carrot
- 1 Tablespoon Butter
- Salt and Pepper

Instructions:

Wash and chop the cabbage, onion and carrot. In a medium pot, boil the vegetable mixture until soft. Drain. Put a pat of butter in a skillet on medium heat and fry the cabbage, onion, carrot and meat until the edges are slightly browned. Salt and pepper to taste. Serve with mashed potatoes and sausages.

Civil War Recipes Bubble and Squeak 1860s


Civil War Recipes Bubble and Squeak 1860s


Civil War Recipes Bubble and Squeak 1860s

Civil War Recipes Bubble and Squeak 1860s

December 12, 2016

18th Century Syringe Biscuits


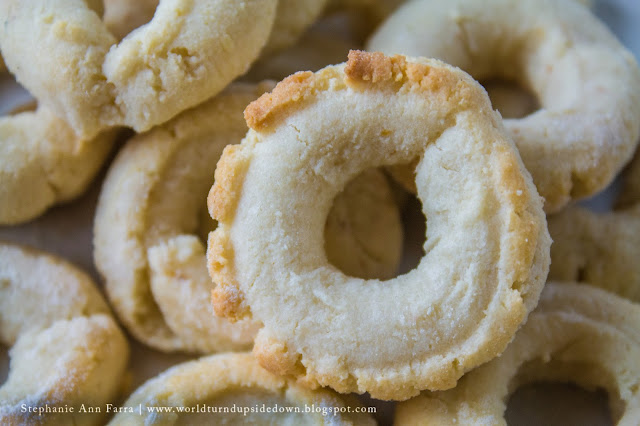
This is a great recipe to break your mom's ancient syringe cookie maker from the cabinet! The taste, and recipe is almost identical to modern Italian Almond Cookies or marzipan and would be a fun, historical recipe to add to the list of Christmas cookies this year.

This recipe is essentially marzipan and is very similar to one used today in Denmark for Marzipan ring cakes or kransekage. Kransekage are a traditional Danish New Year's and wedding treat. They make each ring slightly bigger than the one before and after they are baked, stack them to form a tree and drizzle icing on top. It's a wedding tradition to let the couple remove the top layer of the ring cake together. While no one knows the origin of marzipan almost every European country has a form of it and in many countries it has a romantic implication. In Italian, the word for marzipan itself has romantic connotations. It was even featured in Romeo and Juliet.


18th Century Syringe Biscuits

Ingredients:

- 2 Cups pounded, blanched Almonds
- 2 Cups Powdered Sugar
- Egg Whites
- Lemon Peel

Instructions:

Preheat your oven to 400 degrees. Pound your blanched almonds until they are smooth, add the powdered sugar and the lemon peel. Mix in egg whites little by little until it forms a smooth, easily malleable paste. Put your paste into your syringe and squeeze one long line on a floured surface and cut it into 3 inch sections. Connect the ends of each section to form loops. Line a baking sheet with parchment paper place biscuits on the baking sheet and bake for 10-11 minutes. Watch closely as these don't brown like most baked goods. Let cool and enjoy!

*For this recipe you need a homemade syringe like the one pictured, a churro maker, or an old-fashioned cookie syringe that lets you choose the amount of dough on release. If none of these are available you can roll the dough "snake" style on a floured surface.

**To speed things up you can use store bought almond flour and powdered sugar. You can make period powdered sugar by pulverizing granulated sugar in a food processor. Period powdered sugar did not have cornstarch it in as most commercial powdered sugars have today.

Colonial marzipan almond paste cookie recipe


July 17, 2016

Civil War Era Recipe: Preserved Watermelon Rind


As you know, watermelon rind is poisonous.

I'm just kidding but a surprising number of people believe that it is true. It follows the theory that bitter tastes are a marker for things that can hurt you such as bitter almonds and poison ivy, but it is just a rumor and watermelon rind has a surprising amount of uses. It can be preserved and eaten as pieces, candied, pickled, and even be turned into jelly or preserves.

This recipe was cooked for the Historical Food Fortnightly. A yearly challenge that encourages bloggers to cook a historical food every two weeks as part of the challenge "Waste not, Want not" and what gets wasted more than watermelon rinds?

The Challenge: Waste Not, Want Not (July 1 - July 14)
Good housekeeping in any historic era included making the most of your food items. Pick a recipe that involves avoiding waste (maybe reusing leftovers, or utilizing things commonly thrown out) and show us how historically-green you can be!

The Recipe:


The Date/Year and Region: 1850s-60s, United States

Ingredients:

- Watermelon Rind, cut into pieces or shapes
- Alum or Salt
- Lemon Peel
- Ginger
- Sugar, pound for pound to the rinds
- Cabbage Leaves for coloring

Instructions:


Cut out the inside of the watermelon. Pare the skin off the rind and cut the rind into small, thin pieces. Soak the pieces in a mixture of alum water for 3 days and plan water for 3 days, changing the water each day. Drain the pieces and boil in a sauce pan on medium heat in new water until the pieces are translucent and a fork can pass through easily. Drain the pieces and return to saucepan. Add the lemon peel, ginger and sugar and boil until the sugar forms a thick syrup. Let cool and eat or can for future use. If the sugar does not form quickly enough, remove the pieces and boil the sugar mixture until a syrup is formed then pour it over the pieces.  


How Did You Make It: 

Godey's Lady's Book in 1858 suggested soaking the pieces for 3 days in salt water, 3 days in alum water and 3 days in plain water (changing the water each day) to remove any alum flavor before preserving the rinds.

Time to Complete: Days to soak it but actual prepare time 30 mins to 1 hour.

Total Cost: $3.00 for the watermelon.

How Successful Was It?: I admit I was afraid to taste it. Something about the rind just sounds unappealing. But I forced myself too and it was delicious. If you didn't tell someone this was the rind of a watermelon, they'd think it was crisp, flavored, honeydew. The pieces aren't quite so toxic looking when light isn't shining through them. These would be a nice treat if made in different colors and flavors. The rind itself has a very neutral flavor good for absorbing other flavors.  


How Accurate Is It?: I dyed with spinach instead of cabbage leaves. The first receipt I found said to layer in ivy leaves, but I did not feel confident in the safety of it. 

April 17, 2016

How Did they Get Hair Smooth in the 1860s? Civil War Era Hair Oil Recipe

Civil War Era Macassar Oil Recipe for Hair

Macassar Oil was popular in the 1800s as a way to strengthen and smooth hair. It is a simple concoction typically made of scented olive or castor oil. The most popular kind was Rowland's Macassar Oil. Alexander Rowland, a fashionable hair dresser in the late 1700s, popularized the oil to the point that it was a household name all the way through the 20th century.

The oil was so popular that antimacassars, removable washable cloths were invented to protect furniture from hair oil. Antimacassars were woven, tatted and crocheted and many patterns were printed for them in the mid-1800s. They were even on the chairs in theaters. The recipe is very simple!


Macassar Oil


Materials

- 1 Cup Olive Oil
- 2/4 teaspoon Oil of Oregano**
- 3/4 teaspoon Oil of Rosemary
- 1/2 Cup Alkanet (optional for coloring)
- Muslin
- String
- Bottles

Pour olive oil into bowl, add the oil of rosemary and the oil of oregano. If you want it a red color, tie the Alkanet in the muslin so it forms a bag. Soak the Alkanet bag in the Olive Oil. You can cook this on low heat or in a crock pot for about an hour or until the color and scent infuse the main oil. Or you can combine and let sit for a few weeks.

**To create scent oils, put your scent in a small saucepan. Cover in olive oil. Heat on medium for 10 minutes. Let cool and bottle. Let the bottle sit for a week. You can alternatively just put the scent and oil in a jar and let it sit for more than 2 weeks. Rosemary, Oregano, Orange Flower, Cloves, Rose, Jessamine, Cinnamon, and Bergamot were common scents. To use the oil, place a small amount in a saucer or small bowl and rub it through the hair with your fingers.  


 I thought I'd be the guinea pig and let you all see the result. Please don't mind the grainy cell phone picture and forgive me for being dressed for the 18th century I had just got home from work.

 First rule of hair oil is a little oil goes a long way. The oil acted as you would expect. It did give some texture and body to my hair and did smooth out the curls. It felt like I hadn't washed my hair in a few days and was slightly greasy to the touch but not terrible. It was really good on the ends of my hair that don't generally get a lot of natural oil and made my hair shiny. It did get rid of most of the frizz and made period styles more obtainable.

However, I tried the scents authentic to the recipe. It smelled like a pizza shop! And while smoked bacon is my normal smell I thought smelling like a wood fired, artisanal, bake oven deep dish was a bit much. Even for me. I ended up scenting the rest with rose oil for my sanity. I know that people in the 1860s would not have associated those smells in the same way but there's only so long I can smell olive oil and rosemary before having to visit my grandma.


----------

1 Hale, Sarah Josepha Buell. The New Household Receipt-book: Containing Maxims, Directions, and Specifics for Promoting Health, Comfort, and Improvement in the Home of the People: Compiled from the Best Authorities, with Many Receipts Never before Collected. New York: Long, 1853.

2 Leslie, Eliza. Miss Leslie's Lady's New Receipt-book: A Useful Guide for Large or Small Families: Containing Directions for Cooking, Preserving, Pickling. Philadelphia: A. Hart, Late Carey & Hart, 1850.

February 19, 2013

The Supersizers Go...

Book of Household Management, 1861
I know I am routinely behind on all things television and movie related but I can't help but point out this interesting series for historical foodies called "The Supersizers Go." It's a BBC series from 2007 in which the hosts spend time eating in ways of the past.  I was introduced to the series through another blog that I can't for the life of me find right now. (If it's you, leave a comment. :) )


Everyone into history has at least wondered what would happen if we ate like our forefathers for an extended period of time. Would we be healthy? Would it taste good? Would we gain weight? Would we lose weight? Would our teeth fall out?


This is a great series because it answers those questions and you don't even have to be the human guinea pig.

During the series the "supersizers" go: Elizabethan, Regency, Restoration, Victorian,WWII, and the 1970s. Even though some things in the series are a bit (or a lot) questionable, it's still a very fun watch. If you like the series, they've also made a second called "The Supersizers Eat," but I have yet to get around to that one.   

The good thing about being so behind on TV is that the series is so old, you can find it all online.

March 6, 2012

Homemade Pierogi Recipe

Yesterday, Andy and I got really ambitious and made homemade pierogi! I wish I could say that this is a family recipe but my grandma never makes pierogi from scratch, although her mother, who was Lithuanian, did. 
Up near Andy's, pierogi are served, baked as a side dish. I was astonished the first time we went to the Allentown Zoo and there were containers of pierogi lines up next to the containers of fries at the concession stand there.   

Pierogi Recipe

Mix eggs and sour cream.
Dough:

- 3 cups flour (1 cup whole wheat if preferred)
- 1/4 teaspoon Salt
- 1 tablespoon Baking Powder
- 3 Eggs
-  8 ounces Sour Cream (1 small container)

Filling:
Clean, peel, boil and mash potatoes.

- 2 large potatoes, peeled, boiled and mashed
- 3 Tablespoons Butter
- ½ cup chopped onion (you can use frozen onion)
- Salt and White Pepper to taste
- ½ teaspoon Garlic Powder
- Extra Butter and Onions needed for frying


**For an even quicker meal, you can make these using pre-made wonton wrappers. Alternatively you can make the filling a day in advance.**  

Add Flour, salt and baking powder.
Instructions:

Make into pierogi.
Wash, peel, chop and boil the potatoes until soft. Mash the potatoes in a medium-sized bowl. Set aside the potatoes. Melt the butter in a skillet on medium heat, add the onions and cook until see-through. Add the potatoes, salt, pepper, and garlic powder and mix thoroughly. Remove from heat and let cool.  

Mix the sour cream and eggs together in a medium-sized mixing bowl. Sift together the baking powder, salt and baking powder. Mix flour mixture into egg mixture until it forms a nonsticky dough.  Roll out to 1/8” thick on a lightly floured surface.  Cut dough using a round 3 inch cutter.

Fry in butter and onions.
Pick up a dough cut out and stretch it a little bit in each direction with your fingers. Place dough round on a plate and add a spoonful of filling to the middle of the dough. Wet your finger and moisten the circumference of the dough round. Fold the round over and press the sides together. Press down the edges with a fork. Boil the assembled pierogi in water for about five minutes, remove to a colander. Be sure to only put in a few to avoid sticking. Once finished boiling, add 2 tablespoons of butter fry some onions and fry the pirogi until lightly browned. 


Lithuanian pierogis contain meat and the oldest recipes don’t contain sour cream. Below is a recipe from The Settlement Cookbook written in 1901 which includes meat. “The Settlement” was a social settlement in Milwaukee that offered vocational instruction and education in an attempt to help immigrant girls assimilate into American society. The recipes are from the 1921 edition of the book.  


These were surprisingly delicious! We thought they might taste differently as we used whole wheat flour but they still tasted good. If you won't be eating them right away, stop after boiling and fry shortly before serving. These can also be frozen after boiling if brushed with butter to prevent sticking. Hope you enjoy!

Copyright © 2008-2020 Stephanie Ann Farra. All rights reserved.

All materials posted on this site are subject to copyrights owned by Stephanie Ann Farra. Any reproduction, retransmissions, or republication of all or part of any document found on this site is expressly prohibited, unless the author has explicitly granted its prior written consent to so reproduce, retransmit, or republish the material. All other rights reserved.