Showing posts with label Sewing. Show all posts

June 23, 2017

Easy WW2 1940s Dress Pattern Review: Butterick B5209

WWII Dress Sewing Pattern B5209

I made this dress what feels like forever ago and am only now getting to review the pattern. A few months ago I had the chance to see some old friends that would be coming out my way for the WWII Weekend at Valley Forge (formerly Graeme Park.) I thought it would be fun to hang out with them for more than a day trip since I hadn't seen them in awhile and one of my local friends wanted to meet them so about 2 weeks before, we were convinced to stay for the dance. Now, I know what you're thinking: 2 weeks is not enough time for two girls to prepare for a dance. It wasn't.

We originally thought that this dress would be simple enough for us both to make one in time but it took a long time to find any fabric I remotely liked. Then the pattern wouldn't work for both of us and we didn't have time to do mock ups. My friend amazingly fit into the WWII Dress that I made a few years ago and looked fantastic so I only had to make the one dress. I've been working a lot and it was tough to find sewing time while everyone in the house was awake so I sewed all the way up to the minute I left, as per usual. :D


This patterns on the 40s to 50s cusp. It's easy in terms of historical clothing but 1940s stuff is always deceptively a bit difficult due to high end finishing techniques, small details or odd seams. The pattern itself is a little late for WWII but not excessively so. Similar patterns were popular in the 30s as well as after the war.

I was originally hoping to make the dress out of a light linen from my stash but I was a little short and after a voracious search I settled on this cotton fabric. I was hoping for something with a Hawaiian feel as I wanted to wear it as a sundress this summer.


If I was to make it again, I would probably insist on a lightweight linen or satin and I would definitely take the time to make sure it was properly fitted. It ended up being a little big but there wasn't much I could do about it during the time crunch. We never actually got a picture of me wearing the finished dress but I hope this picture of us having fun in the car on the way will suffice.

The dress is not too difficult and can be sewn in a few days. Just be sure that you are following the correct instructions if you want to make the dress with sleeves. So many people I know have accidentally followed the sleeveless version. I've made this dress a second time in a slightly smaller size and it fits much better.


We had a great night and have both been having fun learning to dance to Swing since.  I later made this headband out of the fabric scraps. Haven't worn them together yet but I think it will be cute.

Forgive the frizzy hair the humidity here is crazy!
WWII Dress Sewing Pattern B5209

Hope everyone is having an awesome summer and I hope to be posting more soon!

June 24, 2015

Colonial Shortgown Sewing Pattern

American Revolution Reenactor Bedgown Pattern
Shortgown Front
"[She had] a short gown, with some red and white stripes and sprigs through it, a good deal worn, and pieced under the arms with check linen, the colour much faded;"

I finally finished a new shortgown/bedgown. It's about time. It's an easy pattern but finishing the edges by hand took forever.  I find it really hard to get excited about "work clothes." Most notably because they get ripped up and dirty so quickly, especially while cooking. I'm sure only one trip to the hearth will have the kids asking "Why are you so dirty!?"


Shortgowns are unfitted or loosely fitted, work garments. Extant garments show that most were pinned shut but some have a few ties or even drawstrings at the neck and waist.  

 There had been a lot of debate among reenactors and historians about what a shortgown is versus a bedgown and whether or not these were considered appropriate public wear. Evidence points to these being casual or work wear. A 1793 version of the Shakespeare play Henry IV is annotated that "A half kirtle was perhaps the same kind of thing as we call at present a short gown or a bed gown," indicating that they were similar garments if not the same thing. Below are some great 18th century images of people wearing shortgowns outside or with visitors. 

Colonial Shortgown
The Abusive Fruitwoman, 1773, Courtesy of the LOC.
18th century shortgown pattern
Jean-Baptiste Greuze, 1761
Shortgown long sleeves 1700s
John Collet, 1764

1700s Colonial Reenactor Bedgown Pattern Free
Shortgown back

1700s Bedgown Shortgown reenactor pattern

18th Century Shortgown Sewing Pattern:


18th century Shortgown Bedgown Pattern Free
Right click and choose "open in new window" to see larger view.

I folded the fabric horizontally and then again vertically so that I only had to cut the pattern out once. Good seamstresses will cringe. If you wish you can fold the fabric horizontally and trace the pattern a second time mirrored vertically.

Cut out the back neck hole first. Open up the fabric,  then cut a vertical line down the center of the front. Adjust the neckline as you like, being sure to leave room for hemming. With right sides of the fabric together, sew under the arm and down the sides. Hem all loose ends. If you wish to have cuffs, fold the cuffs in half horizontally with right sides together. Fold 1/2 in up on the front and back of the cuff and sew the sides. Turn the cuff right side out and attach to sleeve. Fold the cuff up on the sleeve and secure it with a few stitches.   

I ended up sewing a pleat under each arm as well as three in the back, all ending at the waist to make the garment a little more fitted. It's not necessary if you use an apron to give the fitted look or if you are a beginner and just want something easy to work on.

Other Patterns and Info:

- MaraRiley.net: Shortgowns
- Making The Manteau de Lit

If you are trying this and need help, don't hesitate to comment or email.  

September 9, 2013

Peterson Magazine's Princess Capote Hood Pattern from 1862

This hood is a pretty alternative to the Red Riding Hood that I posted last Friday. Both hoods were published in Peterson's Magazine in 1862 and are constructed similarly.

The ruffles, braid and tassel make this hood an intricate and pretty accessory.

Of course, I am very interested in any headwear that allows me to lay down while wearing it. Farby, I know. But there's nothing like walking a few miles in your corset and heavy dress and sneaking into your tent for a few minutes of temporary relief. You fluff up your blankets and try to lay down for a few minutes, and your bonnet or hat are in the way, making laying down impossible. By the time you get your bonnet or hat off, it's generally time to start cooking. :) 


This is a pretty hood and would be a nice thing to have come the colder events. Enjoy the nice cool weather we've been having. 

September 6, 2013

Red Riding Hood from Peterson's Magazine 1862

One can imagine the fashionable lady, walking down the street, a bright red rose in the bleak, snowy streets.   

This pretty little hood was published in Peterson's Magazine in 1862. This hood was meant to make a statement. The instructions directed fashionable ladies to procure the most brilliant scarlet that could be had. It also touted the ease of make and the prettiness of finished hood.

While not the typical riding cloak we think of when we hear the term "riding hood," this hood evokes the headwear of  François Fleury-Richard's "Red Riding Hood" from 1820.


Similar hoods were already popular in the 1860s, this particular style was an imaginative twist to a winter wardrobe staple. It seems like a good weekend project, just in time for the colder events to come.  

 
François Fleury-Richard


Some very pretty examples of this hood made up:


February 1, 2013

1859 Sewn and Embroidered Reticule Pattern

This is a very labor intensive sewn reticule from Arthur's Home Magazine, from 1859. The instructions recommend velvet fabric, embroidered with red roses and white Fleurs-de-lis separated by gold flat braid. Each of the roses contains 5 gold beads.    

The instructions give an alternative pattern of gold flat braid on purple velvet with embroidered red roses and green shamrocks. 

It is a nice pattern because the purse is a little more substantial than a crocheted or knit bag and it is of a pretty decent size, especially for those of us accustomed to modern purses. In the mid-1800s, a reticule only held a few coins and a handkerchief, although a sewing machine company in 1862 advertised that they has a machine "so light and portable (weighing less than one pound) that it can be conveniently carried in the pocket or reticule."

Add caption
The top of the fabric is 5 inches at the top, 9 1/2 on the bottom and 7 1/2 inches long. The pattern recommends leaving the velvet 1 inch longer all around. This purse should be stiffened with a stiff muslin or buckram and lined with silk. This could be sewn plain, without embroidery. If you plain to embroider, do so before you cut out the fabric to save a lot of frustration from frayed edges.

As fabric is easily damaged, many original metal purse fasteners can be found online or at antique shops. If you do your research into what kind of styles and fasteners were available, you may even be able to find some modern bags with clasps at thrift stores that can be repurposed. But make sure you really research, you don't save any money if you end up buying something you can't use. 

Purse closing example from the Met.
Screw closing example from the Met.
Another Example.

For some purse  inspiration, check out this awesome Pinterest board by Muriel.

January 15, 2013

The Dressmaker's Guide 1840-1865: A Review

I have been meaning to review the Dressmaker's Guide 1840-1865 by Elizabeth Stewart Clark since I got it last year at the Cedar Creek reenactment. I had been meaning to buy it for ages, but with the little time I had for sewing and reading this past year, it had to be put off. I was really looking forward to getting a hold of a copy because the writings of Elizabeth Stewart Clark and the Sewing Academy are very helpful.

The biggest reason that I am reviewing this book is the price. Like with many books written for a niche, the price is a little steep and at $30 I was hesitant to buy a copy until I had one in my hands to look at. It only took a 30 second look over before I was checking out with it, purely for the patterns contained therein, if nothing else.


Patterns in the Book include:

-Basic Chemise
-Corset
-Split Drawers
-Varying Petticoats
-Corded Petticoats
-Simple Cage
-Bodices and bodice variations
-Skirts
 
Pretty much a full wardrobe! 

Not only are there patterns but tips for fitting and measuring. I have never attempted to draft complicated patterns but this book gives you all the necessary information to do so. The patterns are tailored to your measurements and not the "small size pattern, enlarge it yourself" kind. This has actually become more important to me. When I started reenacting, I could make those small, teenage sized garments with few adjustments but as I got curvier, those patterns started needing more and more adjusting to the point that the patterns were virtually useless. Many women can attest to this same problem. If you've had some sewing experience, the patterns in this book are not out of your reach.

The Dressmaker's Guide is also full of textile and fashion knowledge. Clark breaks down different types of fabric and their appropriate uses as well as covers tools, techniques and clothing related aspects of 19th century living.  

 I had high expectations of this book, but the book surpassed even my highest expectations. Very rarely am I completely happy with an expensive book purchase because I am very frugal by nature, but this book is completely worth it. There's nothing worse than buying a book only to realize that it has nothing new to add that your current book collection doesn't already offer.

This book should be on bookshelf of every lady reenactor.    

October 4, 2012

1850s Civil War Men's Shirt Pattern


This pattern is from 1852 and was published in a guide meant to teach sewing skills to ladies who might live "humble lives." It teaches the most economical ways to cut out multiple shirts so as not to waste any fabric.
 The book has basic instructions on how to assemble the shirt but only the basics. It does not include the front pleats which were a matter of personal taste.

Like many shirts of the period, this shirt is cut out of mostly rectangles and squares, using gussets instead of sloped shoulder holes to make the shirt comfortable in the underarm. The book suggests using linen fabric and the age-old technique of taking apart a shirt that the man likes and using it as a template for his new shirts.   

I've charted out the pattern but will assume that only seamstresses and tailors with some experience will be attempting it. For one, seam allowance is not included in my chart and you have to pay special attention to the seams that need a little bit of extra to sew without leaving an exposed edge.

Shirts aren't terribly hard once you make one. It is much easier to size when you do have a shirt from the person you'll be sewing for. 

There is a lovely tutorial for sewing a similar shirt (an earlier style but the basics are the same) at MY Mr. Knightley: Making a Shirt 

May 23, 2012

Pocketbook Pattern from Godey's Lady's Book, 1862

Uh oh! I have seen to have hit my image max on my blogger account and I can't add anymore photos until I upgrade to a paid account which would cost $30 per year. I love blogging, but it is just a hobby for me. I am certainly not willing to pay money for a blog that makes me $0.00 in profit. I won't be going anywhere, but I'm experimenting with different, free ways to get my photos up here.

In the meantime, please take a look at this tiny pocketbook from Godey's Lady's Book. A the image suggests, it is to be made in velvet or leather and includes two small pockets and a change pouch. The total pocketbook only measures 5 x 8cm when it is completed.

I can't for the life of me figure out what the middle "holder" and "strap is for. My best guess is a skeleton key possibly. Maybe one of my readers knows or has a different guess. If I made this, I would probably put a few pencil ends in there, so I have them when I need them.

This could easily be enlarged or adapted to make a "housewife," or sewing kit for soldiers. I diagrammed the pocketbook out below. It's a pretty straightforward pattern. I recommend using some thick fabric and stiffener under the "fashion fabric" to give it a sturdy shape and a good base for embroidery or beading.


The pieces are cut out and the raw edges are bound with tape. These were popular embroidery items due to their small size. A great collection of purses for inspiration can be found at the Museum of Fine Arts, Boston. Most of these purses are from the 1700s but they are so gorgeous!

August 5, 2011

Andy's New Civil War Trousers

 Andy needed some new pants this reenacting season after another soldier exclaimed that the patches on his old pants "drew the eye places he shouldn't be looking at." :D

I like to sew but I do not sew that often because of the cost. I also can't rationalize having a wardrobe of clothing devoted to reenacting. So Andy and I wear our stuff until we really can't anymore. Then I get to sewing. I do have to admit, I do not have problems sewing dresses, but trousers really like to torment me.


 Maybe my next pair will actually have a watch pocket. Every time I attempt to sew one, I spend many hours and  waste a lot of fabric before I let him know that there "will be no watch pocket."

 I used a mix of antique buttons and new bone buttons. I would have used all new buttons but I had a lot of antique ones in my sewing box.
 I kind of wish I just left the lining white. This was a scrap of left over fabric from the very first reenacting shirt I made him. The shirt matched the lining of his hat and he liked it a lot. Recently he lost his hat and had to buy a new one and caught on fire while wearing the shirt. (He was okay, but there's a funny story there you should ask him about if you see him.)

 
 I tend to like trousers with buckles on the back and haven't decided if I am going to add a piece to the back yet. The buckle look nice but is not as comfortable to sleep on. I still have to put on the buttons for the braces but I need him to model them for me to do so.
This is a pretty lightweight wool that I originally purchased to make a sack coat out of. It is a little thin for pants but he will be wearing them in the summer and they are civilian pants and not standard  military.


 I was really excited to get this fabric because the weight is much more similar to what museum sack coats are made out of rather than blanket wool which some people mistakenly use.


Sometime this year, I hope to get a new dress that is a little nicer than the two I have now. Both my dresses are dirty old work dresses and I'd like something to be able to wear to nicer events.

March 30, 2011

Civil War Era Apron Pattern

My dirty apron.The stains are from the ashy pots.
 Nothing is so helpful at a reenactment than a good apron. Aprons function as napkins, drying cloths, extra warmth and protection against various "wardrobe malfunctions."

 During the war, it is said, that a few ladies who dressed like soldiers and joined the army were caught when another soldier tossed them some apples and they attempted to catch them in their nonexistent aprons.

I've been using the same 2 aprons for at least 3 years and think it's time for some new ones. I thought I'd include my sketchbook diagrams for anyone wanting to make their own.

To find the waistband length, take you waist measurement on top of the dress you will be wearing it with and add 5 inches for overlap. If you want to make an apron that ties, use at least an extra 12 inches on both sides.

For waistband stiffeners, buckram and stiff muslin were used in the 1860s. I will be using buckram for mine. If you are a beginner, buckram can normally be bought at the cutting counter, you just need to ask for it. The size should fit a teenager or an adult, the only thing that really changes is the size of the waistband. Cut two apron bibs along the fold of the fabric, cut 2 waistbands of fabric and 2 of stiffener, and cut one apron skirt, hem the skirt with a plain hem. Alternatively, you could make a apron with no bib. They were just as popular and are quicker to make if you need one in a hurry.

Diagram from my sketchbook.

A note for beginning sewers: If you make a pattern that you know you will use frequently, such as an apron pattern or a bodice pattern, make it easy on yourself and glue the flimsy pattern pieces to poster board. The next time you use it, you will not need to use pins or weights and it will trace very quickly. You also won't have to waste time ironing pattern pieces or repairing damaged ones. They are bulkier to keep around but it really does save a lot of time. You can use a hole bunch and a piece of ribbon to keep the pieces together so you don't lose them.   

1. With right sides together sew around the sides and the top of the apron bib.

2. Turn the apron bib right side out and iron it. Gather the bottom edge (by hand or with a long machine stitch.)

3.  Stitch a piece of interfacing to the wrong sides of each of the waistbands. With right sides together, sew between the stars indicated on the diagram. (8 inches from the center at the top, 16 inches from the center on the bottom. Clip the excess fabric, turn right side out and iron.

4. Insert the bib into the 8 inch open space left in the waistband. Stitch across. (There are nicer ways to do this that would be too difficult for me to explain. If you know the nicer way, do it that way.)

5. Hem the apron skirt on three sides. Gather the rough edge. Insert the gathered edge into the 16 inch gap left in the waistband and sew across the waistband.

6. Add a button (or 2 if you fluctuate frequently) to one end of the waistband and a buttonhole to the other. 

****Ironing is very important when sewing. Many people, myself included, don't want to stop sewing to iron each piece but it really makes the garment look more professional and fit better.*****

January 3, 2011

Sick Day with a Good Book

Ugh! I've been so sick! Luckily I've been in bed with a really awesome book: Fashion : A History from the 18th to the 20th Century. It is a photograph rich book detailing dresses from the Kyoto Costume Institute. It's normally a pretty expensive book but it is currently on sale in store at Barnes and Noble for $10.00 in their 50% off section. :D

I normally do not buy new books but I really couldn't pass this one up. You can read a preview of it here. Be prepared to drool and have your "To Sew" list expand by 100 garments.


Hope you enjoy!


December 3, 2010

You Have My Permission...

My Unfinished Projects: 1. Pink and white Civil War Era knitted headdress(as seen on my sister's blue wig from a costume), 2. Green and black "Dark Mark" scarf (lost a knitting needle), 3. Peach, Colonial Era Jacket, 4. Purple, Civil War Era knitted suspenders, 5. Pink and white Colonial Era pockets. Notable projects not pictured: 1. Civil War Sontag (ran out of yarn), 2. Civil War Era Quilt, 3. Blue and white, handsewn Colonial Era Jacket. 


 To stop working on that project.

I constantly work on more projects than anyone could finish in a lifetime. Frequently, I have so many that I half finish them and forget about them until I am rummaging through my stuff looking for some material for yet another project. I used to think I had to finish every project I started, just as I used to think that I had to finish every book I started reading.

As I have gotten older, I realize that I don't have time to read books that aren't good and I don't have to finish every project I start. I frequently find that I will discover an abandoned project months later and no longer have a need for it anyway which makes it useless to finish. 

So for everyone who was sitting around like me, waiting for someone's permission to stop reading a bad book, or to stop sewing a garment that wouldn't fit you anyway, I give you my permission to stop and you don't have to feel the least bit bad about doing so. We are all very busy and all more productive than we think. Less projects and less guilt equal less clutter and more time to focus on what is important.


What to do with those abandoned projects?

Give them to someone else. I have Civil War Era dress patterns new in their packages that I know I will never get around to making. I also have half finished jackets and things that I know someone else could finish up quickly and use. Sometimes we stop projects when they get to a tedious point--it may be easier for fresh hands to finish up.
Recycle the Materials. You can always recycle the materials into something more useful to yourself at this point in time. Half done sewing projects can become raw materials for new ones. (Imagine my surprise when my boyfriend told me that he could use a bit of a half-done leather project for his uilleann pipes.)
Find someone willing to finish them for you. Sometimes my sister just wants to sew something and she doesn't have a project in the works or doesn't have money to finish the project she is working on and she'll help me sew. 
Put them on hold. Put the project on hold for a period of time until you might need it again. Working on knitting mittens in the summer might be less important at the time than sewing summer clothes. Just remember to give yourself time to finish the project before you need it.  

When I look at all of these unfinished projects I feel guilty. I am working on all of them slowly and most have to do with me needing more materials and refusing to buy them until I have a coupon. Surprisingly these are nowhere near all of my projects and they are always changing. I also have numerous unfinished writing projects, drawing projects, music projects. I am kind of surprised at myself that I take on so many projects. This seems crazy especially with all of my schoolwork but  I am one of those people that always have to be creating something or I go crazy. I guess I never really look at all of the things that get finished, in proportion, I guess the unfinished projects shouldn't make me feel guilty. 

I know I have a lot of really creative people who read my blog, is there any project you just want to scrap but feel guilty doing so?

November 27, 2010

1855 Quilt Pattern

Civil War Quilt Pattern
I can't quilt. I am practicing on the simplest of Civil War quilt patterns the one that is used for Sanitary Commission "comforts." You can see that simple pattern at The Home of the Brave Quilt Project.  The Sanitary Commission was a group of Civilians during the Civil War who worked together to bring sanitary conditions to union camps. They also held fundraisers and made supplies to send to the Union Army. Of these supplies they sent thousands of quilts. They tended to use simple quilt patterns because quantity and functionality was more important than beauty.

My attempts with that simple pattern have left me with uneven quilt pieces, pieces that don't line up and fabric that frays until it is nonexistent. That being said, if I could quilt, I would make this pretty quilt pattern from 1855.


It will never happen as the pattern calls for silk and the black cross outlines are made from velvet sewn on top of the finished quilt. How pretty would that be? I don't think I've ever seen a silk quilt, but I imagine it would be very smooth to the touch and the velvet would be soft.I also like the colors that the pattern calls for, they really weren't afraid of contrasting color, were they?   I have always really loved quilts but I just don't have the ability to piece all those pieces together properly. But for those you who can quilt and would enjoy sleeping under a piece of art, this pattern would be lovely and I would love to see the finished product.    


***The Home of the Brave quilt project is actually really interesting. The organization collects quilts made by civilians and sends them to families who have had a loved one die in combat. It is a cool project to be involved with if you can quilt.***

August 30, 2010

Corset Pattern from The Lady's Home Magazine and Godey's Lady's Book

Corsets or stays were worn in the 19th century by nearly all women of all classes. They were used to move the bust line upwards in a high position and to create a smooth line at the waist. They also had the more practical application of helping support the back when lifting and to support the weight of the clothing. During the Civil War Era, it was not common for women to drastically alter their waist. Small waists were created during this time period by lower shoulder seams, which visually enlarged the shoulders and by the large skirts. In comparison to the wide looking shoulders and large skirts, waists looked a lot smaller.   

It is very obvious when someone in Civil War Era clothing is not wearing a corset. Almost all women wore corsets, even when they were pregnant. There were specially designed corsets which allowed for a protruding belly. You can see a nicely reproduced maternity corset at A Day in 1862.
 

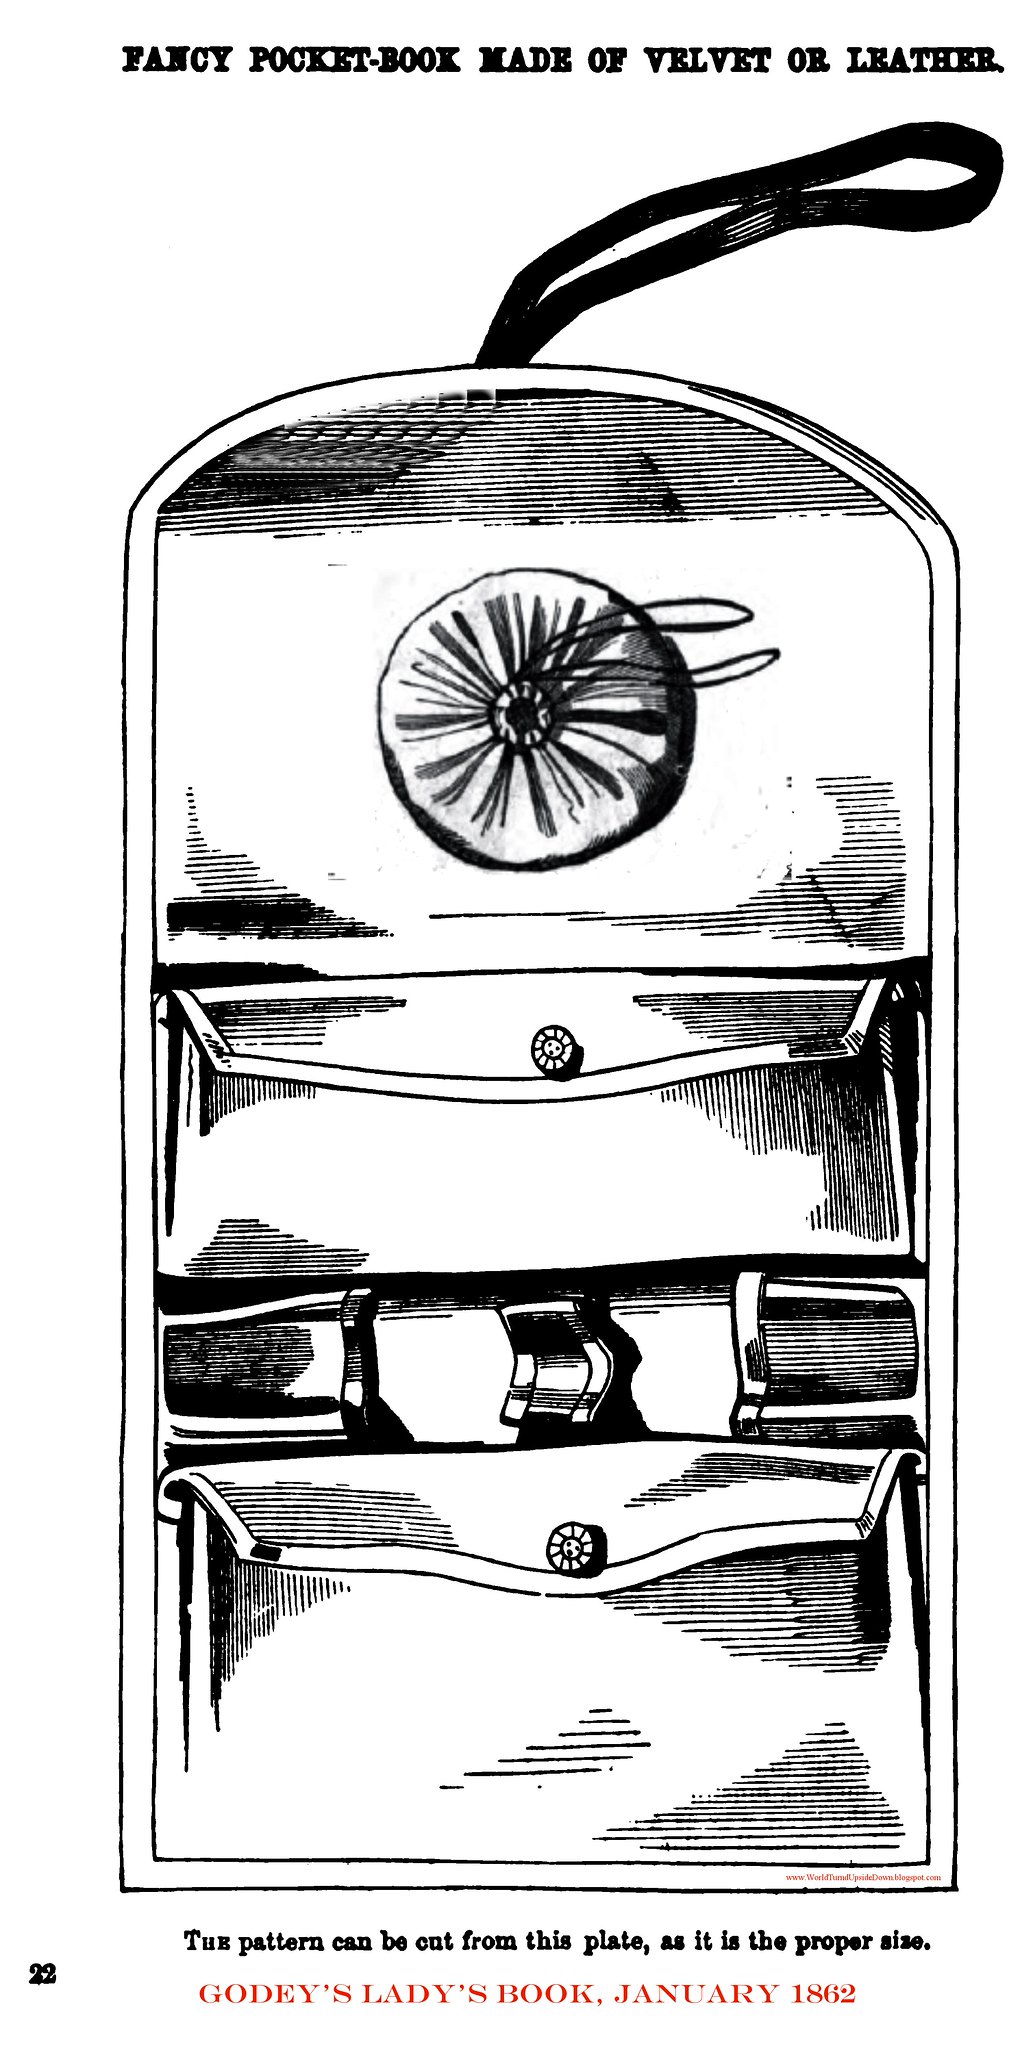
 These instructions and this pattern were printed in both Godey's Lady's Book (1857) and Arthur's Home Magazine (1858.) It was a common practice at the time to share material between magazines which were likely to have a different readership, frequently being from different countries or regions. In this case, Arthur's Home Magazine was a magazine also based in Philadelphia and the editor also wrote stories for Godey's Lady's Book.  The instructions call for whalebone but most "boning" was actually baleen (the filtering keratin) from baleen whales. Today many people use metal boning, plastic boning and sometimes even "zip ties," due to their cheap cost.   

The Instructions:

"Materials necessary for making a pair of Stays.— Half a yard of Coutille; a piece of stay tape for casing ; some whalebone, either ready prepared or in strips to be split and shaved to size ; a steel busk; wash-leather sufficient to cover it, and webbing to case it; a paper of 8-between needles ; a reel of 28-cotton ; a box of French holes; and a punch for putting them in.*


DIRECTIONS FOR TAKING THE MEASURE.
Measure round the waist as tightly as possible, noticing the number of inches; deduct two as an allowance for the clothes. Next take the measure of the bust, by placing the measure in the middle of the chest, at No. 1, (see engraving,) and pass it over the bosom to No. 8, not tightly, and no allowance here to be made for the clothes.
Then, from No. 8, passing the measure closely under the arm, to No. 1 of the back, which is not to reach the middle of the back by an inch and a half. Next, place the measure at the bottom of the busk, and pass round stomach and hips, allowing about four inches for clothes, and then take the length of the busk.


It will be found to simplify the directions very much, if a form similar to the following be first prepared, and the number of inches written against each as the part is measured, and then no confusion can possibly take place in the cutting out:
Waist,
Bust,
Back,
Hips,
Length of Busk.
* If preferred, any stay-maker will put them in at a trifling expense.


DIRECTIONS FOR CUTTING OUT.
A pattern must now be prepared according to the directions given in the engraving, which can easily be done by enlarging the design, and adding the requisite number of inches between each figure.


The Back.—Double the Coutille sufficiently wide to take two whalebones, the holes, and to turn in for felling down, as marked in the engraving ; then lay on the pattern, and cut out the two parts of the back together, allowing, for turnings-in, about half an inch at the seam under the arm.
The Front is cut out by placing the pattern so that the straight way comes in the direction of the little bones up the bosom, leaving a good turning-in up the front seam, which crease off in pattern on the double Coutille, as it is better to cut out every part in the double, that you may have each side exactly alike.
Should you desire to increase the size of the stays, it must always be done by allowing the required additional size on the front and back at the seam under the arm, and by proportioning the armhole to the increased size.
When the bosom gores are to be put in, the Coutille is merely cut from No. 2 to No. 3, and from No. 5 to No. 6, in a direct line, cutting none away. In cutting places for stomach and hip-gores, in front and back, cut straight up, and then from No. 7 to No. 8 in back, and from No. 13 to No. 14 in front. Then cut out all the gores as directed in the engraving.


DIRECTIONS FOR MAKING.
1st.—Stitch a place for the first bone at back, and for the holes, the width of half an inch, keeping the line perfectly even by the rays in the Coutille, and fell down a place for the second bone on the wrong side.
2dly.—Fit the bosom gores by making a narrow turning-in from No. 2 to No. 3, and from No. 3 to No. 4; fix the gore at 3, the straight side of the gore next the busk, tacking it very closely up to No. 2; then fix the other gore in like manner at No. 6, the straight side next the arm-hole, tacking up to No. 7.
3dly.—With a measure, make the required size across the bust, by increasing or diminishing the gores at the top; tack the other sides very firmly from No. 3 to No. 4, and from No. 6 to No. 5, shaping them prettily, narrow at the bottom, and of a rounded form towards the top; then stitch them very neatly, and cutting away superfluous stuff on the wrong side, hem down, beginning each side from No. 3 to No. 6.
4thly.—Hem a piece of stay-tape at the back, for little bones, and stitch down the middle of it on the right side.The other half front to be done in a similar manner.
5thly.—Put in the stomach gores, turning in from 14 to 15, and tacking the straight side of the gore under it, and fix the hip gores in the back in like manner, the straight side to the holes.
6thly—Join the seams under the arm, by pinning No. 10 of half-front to No. 11 of half-back, to half the size of waist required, wrapping the front on to the back. Everywhere face each piece to its fellow piece, and crease it, that it may be exactly the same size and shape. Then do the other half in the same way.
7thly.—Having closed the seam, finish the stomach and hip gore, by measuring and making to the size required round the hip, by letting out or taking in, rounding them to fit the hip; face and crease the gores for the other half, which is to be finished in the same manner.
8thly.—Take a piece of webbing wide enough to case the busk when covered with wash-leather; double it exactly, and tack down the half-front, the double edge being scrupulously down the centre of the stays ; fell it on very closely. Then stitch the two halves together at the crease down the middle ; turn the other half of the webbing on to the unfinished side, and fell it down as before, turning in a little piece top and bottom, and finish.
9thly.—Bind the stays very neatly at top and bottom.
10thly.—Put in the holes, two near each other at the top of the right side, and two near each other at the bottom of the left side; the rest at equal distances.


Proceed now to the boning, which do by scraping them to fit nicely ; then, having covered them with a piece of glazed calico, cut at the bottom of each bone place a hole, like a buttonhole, and work it round like one. Put the bones in, and drill a hole through the stays and the bone, about an inch and a half from the top and bottom of each bone, and fasten them in with silk, by bringing the needle through the hole to the right side, and passing it over the top of the bone, as marked at No. 12. Then put in the busk, and if a hook is required at the bottom, put that in before the busk, which is best done by leaving a short hole in the seam, and passing the hook through, fastening it securely at the back. The busk must be stitched in very firmly top and bottom.


Should the stays have become soiled in the process of making, they are easily cleaned with bread, inside and out, and when cleaned, must be nicely pressed, taking care to make no creases anywhere.*
If these simple directions be strictly adhered to in the making up, a pair of well-fitting stays, at a trifling cost, will reward the pains of the worker, and which could not be obtained ready made under one guinea."


* It was common to remove a stain by cutting a slice off of a loaf of stale bread to expose the inside. The inside was rubbed against the stain until the bread absorbed some of the stain. Once the bread was too dirty to absorbed any more, a new slice was cut of and the process continued.

May 11, 2010

My New Colonial Outfit

Revolutionary War Reenactor
I have been working on hand-sewing a new Colonial jacket, shift and petticoat. It has been moving very slow. The shift is completely sewn other than the two armbands at the bottom of the sleeves and my jacket is about halfway done. The jacket is taking a long time because the fabric and the lining are sewn separately so it is like sewing two jackets and putting them together. I am still not sure what color petticoat I should make. I originally thought that a nice checkered linen pattern would be pretty, but I ended up having blue and white linen fabric for my jacket, I now need a plainer petticoat. Above is a sketch of what I hope the finished dress will look like. (Sorry it is really not a good drawing, I was really just trying to see how it looked all put together. You'd never know I was an artist!) I am not sure about the maroon skirt, yet.

My shift is very plain, there is a diagram for a shift on A Stitch in Time at Home that is very easy to use. Linen wrinkles like crazy, sorry about the picture.

Revolutionary War Reenactor sewing pattern
This is the the detail of the hand sewing on my shift. I very much like the look of hand-sewing. It is definitely not the best but it does make a prettier looking garment. I used to be afraid of hand-sewing. It really isn't that hard and you have a larger selection of stitches to choose from.

This is my jacket fabric. It is linen but was too thin so I have been lining it with a linen tablecloth. The fabric is pretty, but I think I will feel like a china plate wearing it. It was the only stamped, linen I could find, though.

So, will the maroon petticoat look nice or will it look to "old timesy patriotic?" The other option I have been thinking about is possible blue and white stripes (run vertically.) Any other ideas? I am hoping to finish the outfit in time for reenacting season.

March 15, 2010

Civil War Era Civilian Vest

This is a civilian vest that I sewed for Andy, so he could have something kind of nice to wear to the balls over his muddy soldier clothes. I sewed this a long, long time ago and never finished sewing the button holes.

I don't know why I have such an aversion to buttonholes, they aren't particularly difficult and it is the only thing preventing this vest from being wearable.  

The vest is made of a heavy patterned tapestry cotton with a white cotton lining. The buttons are original bone buttons.  I'm pretty sure this vest really isn't for dancing but to forward Andy's secret desire to be Sherlock Holmes (the original one of course!) :D He is currently reading to me the Adventures of Sherlock Holmes. I am enjoying it very much. He is very good at reading and uses different voices and accents for each character. It's a real treat.   
 During the mid 1800s, no gentleman would be without a vest and a coat. Working class men and many soldiers did not adhere to the normal rules of society and many are photographed in just their shirts.
Sarah Morgan, a proper young lady, who was 18 years old when the war broke out, visited sailors in the South and remarked in her diary "He, the doctor and the Captain, were the only ones who possessed a coat in the whole crowd, the few who saved theirs, carrying them over their arms. Mr Read more than once blushingly remarked that they were prepared to fight, and hardly expected to meet us; but we pretended to think there was nothing unusual in his dress. I can understand though, that he should feel rather awkward; I would not like to meet him, if I was in the same costume."

The vest itself was not hard to sew and sewed up rather quickly. This was my first time sewing a nice lining and not one just to add body to a garment. I think it turned out rather nicely. Hopefully, I will finish this soon to keep Andy from going around in just his shirt. The horror! :D If anyone is interested in learning how to hand sew buttonholes, there is a really good tutorial on the blog: Art, Beauty and Well-Ordered Chaos.   
Enter text here. Enter text here.Enter text here.

Copyright © 2008-2020 Stephanie Ann Farra. All rights reserved.

All materials posted on this site are subject to copyrights owned by Stephanie Ann Farra. Any reproduction, retransmissions, or republication of all or part of any document found on this site is expressly prohibited, unless the author has explicitly granted its prior written consent to so reproduce, retransmit, or republish the material. All other rights reserved.