Showing posts with label Revolutionary War. Show all posts

September 23, 2020

18th Century Wash-Balls: Scented Body Soap | How To

Colonial Era Wash-Balls Soap


Bathing in colonial times evokes images of dirty rags and lard soap. In reality is there were many scented, colored, and augmented soaps available at perfumers and many receipts (recipes) to scent pre-made soap at home. 

I made these wash-balls with castile soap that I made over a full year ago so it has had plenty of time to cure. If you're interested in knowing more about castile soap, I've written quite a bit about it here.  All you need to know for this is that castile is an olive oil based soap, used in the 18th century for shaving and washing as is has a decent lather (for the time period.)

Castile soap can be bought online or in grocery stores. You can also use whatever you have lying around. They did have different color wash-balls but the coloring agents are not something I feel safe putting on my skin in modern times.  I'll update this post with how to color your wash-balls in a safe manner. I'm thinking "melt and pour colorant" is the best bet. 

Other recipes of the time called for rice flour, starch, or hair powder in 1/2 proportion to the soap to stretch it and to add color and extra scents. Hair powders came in white, orange, brown, gray, pink, red, blue and lavender. 


Colonial Era Wash-Balls Soap


18th Century Wash-Balls


Ingredients:

- Pre-made Soap
- Rose or other Flower Water (Other recipes from the time period suggest lavender, coriander, cloves, jasmine, cinnamon, nutmeg, lemon peel, lemon juice, orange flower water, musk.)

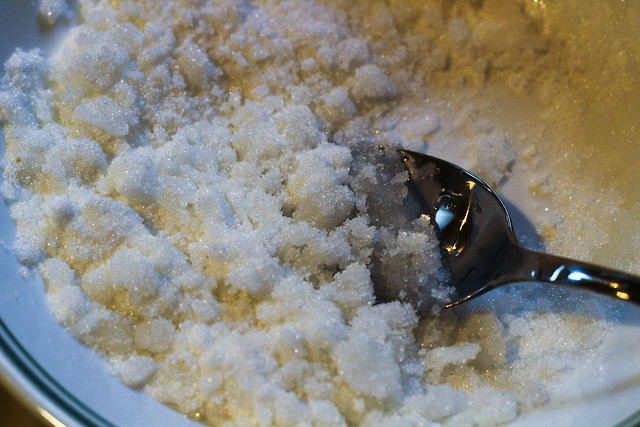
1. Shred, grate, bash, crush, buy pre-masticated or take up the relaxing art of soap shaving. A large mortar and pestle would work best.

Colonial Era Wash-Balls Soap

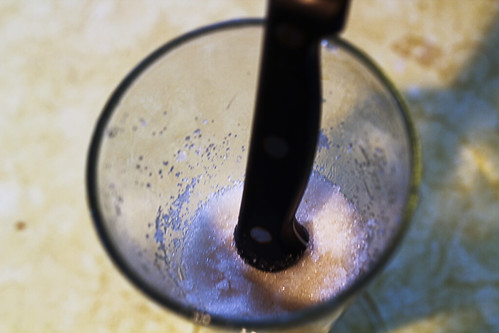
3. Heat up your soap in a double boiler, in the hot sun or just use the heat from your hands. You want the soap soft but not melted.  Add your scent liquid or water if you don't want to add a scent. (Don't do this with essential oils they will burn your skin.) Stir until well mixed. I did not heat mine, but heated up my rose water. 

Colonial Era Wash-Balls Soap

4. Wet your hands and grab a handful and squeeze it into a ball. Add as much liquid as you need to get it to stick together. You want the balls as compacted as possible. 

Colonial Era Wash-Balls Soap


Colonial Era Wash-Balls Soap

5. Let them dry in ball form for a week. You can scrape the outsides with a knife or peeler to make them smoother.

Castile really is great for shaving. I'm excited to try it out now that it's scented. This is a great activity to do with kids, unlike soapmaking which can be dangerous.

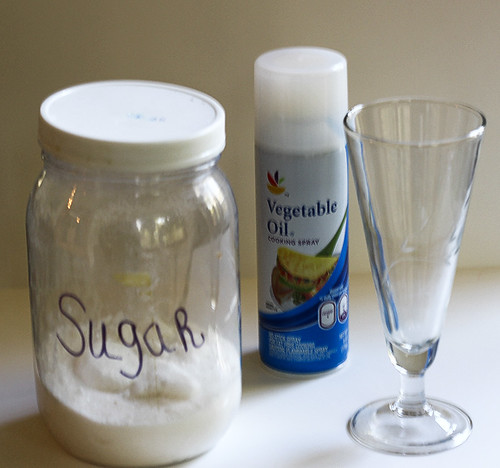
If you want to buy premade soap flakes and waters I recommend the products below:


This site uses affiliate links. If you are planning on making a purchase, I would greatly appreciate if you would use the affiliate links above. It doesn't cost you any more but it does help me keep the website running. Thanks!


August 27, 2019

18th Century Lemon Cheese Recipe from The Cookbook of Unknown Ladies

18th Century Lemon Cheese Forgotten Recipe

I was excited to try this recipe. I have yet to see anyone else attempt it and it is from a handwritten recipe book in Westminster City Archives in London known as the Cookbook of Unknown Ladies. Little is known about the recipe book or the women who contributed to it only that it was written by "various unknown women about the year 1761," as is printed on a title page.  Be sure to check out all of the recipes from The Cookbook of Unknown Ladies.

This was a mystery recipe.  I can generally read and approximate what the finished product of a recipe will be. For this recipe I didn't have a clue. I thought it sounded most like a cream cheese but it was whipped before being hung to separate the whey out. Would that make a difference? My grandma and I kept testing it throughout the process to try and get an idea of what it would turn into.

I was very afraid that the minute I added lemon to the cream that it would separate the way it does when making cheese but it didn't. I waited until the cream was whipped then quickly stirred in the juice and the rind.

It turned out that this makes a spread that tastes like a delicious lemon cheesecake. It was delicious on the 1796 pound cake I happened to make the same night. It would also be good on scones or toast.

Excerpt from The Cookbook of Unknown Ladies:


Lemmon Cheese
A qurt of good thick sweet creame. Put to it the juce of four lemons as as mutch peel as well give it an agreeable flavour. Sweeten it to your taste & add a littile peach or orange flower water if you like it. Whip it up as you would for sellabubs but very solid. If you have a tin vat, put a thin cloath in it & pour in your cream. If not, put it in a napkin and tye it pritty close. Hang it up to let the whey run from it. Make it the night be fore you use it. Garnish it with currant jelliy or candied oranges.


Ingredients:

- 16 ounces Heavy Whipping Cream
- 2 Lemons (Juice and Peel)
- 1 Tablespoon  Orange Flower Water
- 2+/- Tablespoons sweetener (Sugar, Honey, Molasses, )

Instructions:

Zest and juice your lemons. Put cream in large bowl, add sugar and orange flower water and whisk until you have whipped cream. Stir in lemon juice and peel gently to avoid over whipping. Pour into doubled cheese cloth and tie it up. Hang it overnight. In the morning press all the remaining juice out with your hands, make into a ball or press into a mold and serve with jelly or candied oranges.


I had this hanging over a bowl in my living room and my puppy was terrified of it.

If you haven't used cheesecloth before, I recommend paying a little extra to get the kind that you can wash and reuse: Cheesecloth. 


My site uses affiliate links. If you are planning on making a purchase, I would greatly appreciate if you would use the affiliate links above. It doesn't cost you any more but it does help me keep the website running. Thanks!

August 20, 2019

Amelia Simmons' 18th Century Pound Cake Recipe


We had a little teaser of fall over the last few days but that light breeze has been replaced with an Indian monsoon season. Again. I haven't wanted to look at the oven, let alone turn it on. I took advantage of the nice weekend weather to get a little baking done.

This recipe is from Amelia Simmons' cookbook American Cookery, famous for being the first American written cookbook intended for American cooks utilizing the ingredients local to them.

This is a true pound cake recipe. A true pound cake is a cake made from a pound of flour, a pound of butter, a pound of sugar and a pound of eggs. Traditional pound cakes do not use any additional leavening agents and rely on the eggs to puff them up a bit. This recipe gives the vague "spice to taste" so I had to do a little rummaging to see what spices were popular in cakes like this and settled on cinnamon, nutmeg and carraway.


18th Century Pound Cake 


Ingredients:

- 2 Sticks Butter (1/2 Pound)
- 1 Cup Sugar
- 2 Cups Flour (3+ if you you don't have small tins and want to bake them "cookie" style)
- 1/3 Cup (2 ounces) Rosewater
- 4 Eggs
- 1 Teaspoon Cinnamon
- 1/4 teaspoon Nutmeg
- Caraway Seeds

Instructions:


This is only half the recipe which made about 20, 3 inch cakes.

Preheat oven to 350 °F. Cream the butter, add the sugar, rosewater, cinnamon and nutmeg and mix well. Crack the eggs in a separate bowl and whisk 10-15 minutes by hand. Add eggs to the butter mixture and mix until well combined. Slowly mix in the flour.

If using small tins, grease the tins and fill with batter. Add carrayway on top.

If using cookie cutters, add enough flour to create a dough you can roll out. I kneaded it with my hands a little bit. This made a very light dough. Place cakes on parchment paper on a cookie sheet. Sprinkle carraway over the cakes.

Bake cakes for 15 minutes. They won't brown more than a slight orange at the rim on the base of the cakes.


The first thing I noticed about this cake was that it tasted good soft but probably tastes even better crunchy which is probably the point. These probably get better over time which is good because if you made a whole batch you'd have around 40 small cakes on your hands.  

December 12, 2016

18th Century Syringe Biscuits


This is a great recipe to break your mom's ancient syringe cookie maker from the cabinet! The taste, and recipe is almost identical to modern Italian Almond Cookies or marzipan and would be a fun, historical recipe to add to the list of Christmas cookies this year.

This recipe is essentially marzipan and is very similar to one used today in Denmark for Marzipan ring cakes or kransekage. Kransekage are a traditional Danish New Year's and wedding treat. They make each ring slightly bigger than the one before and after they are baked, stack them to form a tree and drizzle icing on top. It's a wedding tradition to let the couple remove the top layer of the ring cake together. While no one knows the origin of marzipan almost every European country has a form of it and in many countries it has a romantic implication. In Italian, the word for marzipan itself has romantic connotations. It was even featured in Romeo and Juliet.


18th Century Syringe Biscuits

Ingredients:

- 2 Cups pounded, blanched Almonds
- 2 Cups Powdered Sugar
- Egg Whites
- Lemon Peel

Instructions:

Preheat your oven to 400 degrees. Pound your blanched almonds until they are smooth, add the powdered sugar and the lemon peel. Mix in egg whites little by little until it forms a smooth, easily malleable paste. Put your paste into your syringe and squeeze one long line on a floured surface and cut it into 3 inch sections. Connect the ends of each section to form loops. Line a baking sheet with parchment paper place biscuits on the baking sheet and bake for 10-11 minutes. Watch closely as these don't brown like most baked goods. Let cool and enjoy!

*For this recipe you need a homemade syringe like the one pictured, a churro maker, or an old-fashioned cookie syringe that lets you choose the amount of dough on release. If none of these are available you can roll the dough "snake" style on a floured surface.

**To speed things up you can use store bought almond flour and powdered sugar. You can make period powdered sugar by pulverizing granulated sugar in a food processor. Period powdered sugar did not have cornstarch it in as most commercial powdered sugars have today.

Colonial marzipan almond paste cookie recipe


August 26, 2016

WARNING:PHOTO HEAVY POST- The Mercer Museum and Early American Tools

I went to the place where they send good historians when they die.

As you all know, and pretty much anyone who knows me knows, one of my biggest passions in life is how people lived and prospered in the Early American, pre-industrial age. I don't know why it fascinates me so much in this age of "buy everything at a mega-store and hire a professional to do it," but it does. I feel like people have become so reliant on corporations for even the bare necessities of life.

Very few people can service any of the items we use on a daily basis, let alone, build one of these themselves. More often than not, the cry you hear when something breaks is "I'll have to buy a new one." So I am forever amazed at the ingenuity and usefulness of people in a time before industrial machinery was king. Seeing everyday tools and materials from hundreds of years ago just makes me giddy. So you can't imagine the brain explosion I had when I entered the Mercer Museum in Bucks County, Pennsylvania.

Henry Chapman Mercer was a wealthy eccentric who became very interested in pre-industrial tools and trades. He was fascinated by tools of the past he had heard of but never seen before and became a voracious collector of all things that related to Early American trades. He thought these forgotten, everyday objects were the real story of human progress and he used avant garde methods to display what was essentially trash when he was collecting in around the turn of the century. (If you aren't already packing for your visit to this museum, you should be. There's plenty of time to read this post when you get back.)

The collection currently contains over 40,000 artifacts, only 20,000 of which are on display. The museum is jammed packed with artifacts that relate to over 60 Early American trades, such as farming, textile production, glass making, coopering, shoe making, basket weaving, and ceramics making. Full disclosure: I spent most of the time looking right to left and up and down like a dog when someone is waving bacon in front of its face.      

Mercer Museum

Of course, the only way to display a collection like this is to house it in a seven story, fireproof cement castle, right?


Mercer Museum Cradles

A lot of the collection is suspended from the ceilings, like these cradles and chairs but you can even see a whaleboat from the perspective of the marine life.

Mercer Museum Plows and Mortars

Plows and enormous mortars for grinding.

Mercer Museum Terrapin Tortoise Shell

Tortoise shell and horn item tools.  

Mercer Museum Terrapin Tortoise Shell

Mercer Museum Terrapin Tortoise Shell

Mercer Museum Redware

This is nowhere near all of the redware pottery and slipware on display.

Mercer Museum Glass

Mercer Museum Glass

Mercer Museum General Store

A stocked, early 19th century general store.

Mercer Museum Textile

Wooden textile printing blocks.

Mercer Museum Yokes

Livestock and farming equipment.

Mercer Museum Shoemakers tools

Shoemakers tools.

Mercer Museum Lighting

Oil lamp collection, the oldest of which is about 2,000 years old.

Mercer Museum  Medicine

Early medical equipment.

Mercer Museum Weaving Spinning Wheels

A whole room dedicated to spinning and weaving!

Mercer Museum Muskets

Early guns and gunpowder horns. 

Mercer Museum Powder Horns


Mercer Museum  Carriage

Carriages and bicycles.

Mercer Museum Baskets

Baskets and a miniature wagon.

Mercer Museum instruments

Musical instruments.

Mercer Museum Fireplace Backs

Fireplace backs, many of which dated to the 1700s.

Mercer Museum Gallows

The gallows used in the last hanging in Bucks County in 1914.

Mercer Museum Noose shackes

Mercer Museum Native American

Pre-historic Native American tools.


This is a beautiful, beaded Native American bag, from the temporary exhibit "Long May She Wave: A Graphic History of the American Flag." Forgive me for the upside down photo, I had to take it at an odd angle but the beading was too lovely to pass up.

Apparently, I'm the last one to know about this museum and heard lovely things from people on Facebook about just how awesome it is. It is definitely not one to miss if you are visiting the Philadelphia or Allentown areas. Have you been to the museum? What did you think? 

June 16, 2014

Historical Food Fortnightly: 1700s Mushroom Ketchup

1700s Ketchup Recipe. In the 1700s tomatoes were eaten infrequently, ketchup was made from walnuts or mushrooms! Click for the colonial recipe: http://worldturndupsidedown.blogspot.com/2014/06/historical-food-fortnightly-1700s.html | World Turn'd Upside Down

I'm very excited for challenge 2 of the Historical Food Fortnightly. It was so much fun seeing all of the delicious dishes from the first challenge. If you haven't seen them, there's an awesome facebook group where all of the photos are posted. 


The Challenge: Soups and Sauces June 15 - June 28
Soups, stews, sauces, gravies! Make a soup or a sauce from a historical recipe.


The Recipe:

Colonial Recipe Mushroom Ketchup

Mushroom ketchup was something I've been wanting to make for a long time. I love the fact that this was a common sauce so different from the ketchup we use today. In the early 1700s, ketchup was introduced to English explorers by the people of Singapore and Malaysia. Originally a sauce for fish, ketchup was made out of walnuts, oysters or mushrooms and was similar to soy sauce. The English expanded the use of the sauce and it became popular for fish and meat dishes. 

The Date/Year and Region: 1796 London

Historic Foodways

How Did You Make It:


 Ingredients:

- 16 oz Mushrooms, chopped
- Handful of Salt
- 5 Shallots, chopped in large pieces, stuck with cloves
- Small knot of Fresh Ginger, chopped
- 2 Garclic cloves, chopped
- Few pieces of Mace
- Bay Leaf

Instructions:

Clean mushrooms by wiping the tops with a cloth, rinsing them will dilute the ketchup. Place in a stewpan on low heat with the salt until there is a good deal of liquid, be sure to cover the pan. Remove from heat, let cool and strain the mushrooms using a cloth. Squeeze out the remaining juice. Put the juice back on the burner and add the shallots, garlic, mace, bay leaf, ginger  and boil the mixture for a minute and then turn down the heat and let simmer for 15 minutes. Drain again and bottle.  

Time to Complete: 

About an hour. If I was to do this again I would let the mushrooms steep before cooking for a night or two like some other recipes suggest.  

Total Cost: About $8.00 but would have been much cheaper if I had had time to go to the produce market instead of the grocery store.


How Successful Was It?: This tasted much better than I thought it would. I'm actually confused as to why this went out of style. It's delicious. 

How Accurate Is It?:  Fairly accurate. I ended up just adding all of the ingredients at the beginning and stewed and strained them together. I also covered the pot although the instructions didn't specify so this may be thinner than intended, although when checked with other sources and recipes, it seems that mushroom ketchup was liquidy and mushroom gravy was thicker.

Colonial Recipe Mushroom Ketchup

May 3, 2013

How to Make a Colonial Era Sugar Cone or Sugar Loaf

During the Colonial period, refined white sugar was commercially available in the shape of cones, or loafs because of the processing technique used to refine the sugar. Sugar during this period came primarily from the Caribbean and was typically the product of slave labor.

In simplistic terms raw sugar from sugar cane was boiled and filtered a number of times, then poured into cone-shaped molds. Once in the mold, sugar water or other solution was poured over the sugar to remove the excess cane molasses. The sugar loaves were then removed from the molds and dried. Many loaves during the period were wrapped in blue paper for shipping. 


Fine sugar came in smaller cones and cheaper sugar came in bigger cones as lower quality sugar was more difficult to crystallize and worked better in bigger molds.     


Sugar Cone Prop Recipe

Things you'll need:

- Sugar (white)
- Mold or glass
- Cooking Spray
- Water


Things you will need.
Spray mold with cooking spray. Add water to sugar. There is no real formula for how much water should be added. Just add a few teaspoons at a time until your sugar sticks to itself but not so much that it is "slushy." It should have the consistency of brown sugar. Add sugar slowly into the mold, being sure to pack it down every few spoonfuls. Let sugar dry in mold for a few days. Tap out the sugar and feel for any softness, if still soft, let dry out of the mold for another day. 


Sugar "slush."

Pack it down.

Let it dry.

Enjoy your sugar! Sugar cones had to be broken with sugar nippers before use. (Pictured in top image.)

I've had some questions about brown sugar cones, as many Mexican grocery stores still sell brown sugar cones. I have not come across evidence of brown sugar cones during this period as the cone shape came from the refining process. If anyone has evidence to the contrary, I would love to know of it. As of right now, brown sugar cones don't seem to belong to the 13 colonies during the Colonial period. 

September 28, 2010

Brandywine Revolutionary War Reenactment

 The Brandywine Reenactment last weekend was great! There were over 700 soldiers. It was definitely one of the bigger reenactments. We met a lot of people who flew over from Britain just to be a part of it. The leader of the Crown Forces was a Scotsmen, I heard some reenactors saying they couldn't understand a word he was saying. :D There were tons of sutlers, a lot of cavalry and even a bagpiper!


The first day was really hot but still lovely and the next day it was cloudy and rained a little bit. The humidity in the air kept the smoke from the muskets close to the ground. It was very neat to see. We even saw smoke rings being blown from the muskets and huge smoke rings blown from the cannon.


The rain didn't deter people. There were tons of spectators and reenactors. 


We had fun, although we got lost on the way there and almost lost a tire (long story, that has something do do with only half of the roads having roadsigns and many others having repeat names.) We didn't end up sleeping over, I was feeling sick. We still had a great time and the battlefield was great, it was a huge field with a big stone wall and a little bit of forest.

**Please remember to enter my contest, the drawing will be held on October 5th!**

Copyright © 2008-2020 Stephanie Ann Farra. All rights reserved.

All materials posted on this site are subject to copyrights owned by Stephanie Ann Farra. Any reproduction, retransmissions, or republication of all or part of any document found on this site is expressly prohibited, unless the author has explicitly granted its prior written consent to so reproduce, retransmit, or republish the material. All other rights reserved.