Showing posts with label Reenacting. Show all posts

December 12, 2021

"Mostly Dutch" | Civil War Era Sauerkraut Recipe

 Jun 27. Marched today by the following name towns 1stWaynesboro, 2ndDunoy, 3rd Funkstown 4th Fayettsville & stopped at Greenwood for the night. Hard looking crowd in this country, mostly dutch. Cloudy this afternoon.

- R.T. Douglass, Co. F, 47th Va.


The Wisconsin Farmer, 1863
In the 1860s, sauerkraut was known to prevent scurvy and was seen as a necessary component of the diet of soldiers. Sartain's Union Magazine of Literature and Art (1852) claimed it was a "certain cure for cholera," although we know this is not true.2  There was a call in newspapers for women at home to can sauerkraut to send to the soldiers to prevent diseases. Typical recipes from the time call for sauerkraut to be boiled with beef or other cuts of meat. 

Sauerkraut held strong associations with Germany as it still does today.  Although no official count exists, it is estimated that 216,000 union soldiers were German immigrants and another 250,000 were first-generation immigrants from Germany. There were even a number of German-Americans fighting in the Confederate army. They were frequently referred to as "Dutch".


If you want to make this 100% authentic, there are a variety of heirloom cabbage seeds you can still get today that were grown in the 1860s. The Late Flat Dutch variety is dated back before the 1830s and is valued for sauerkraut. The Brunswick is another early variety that is suitable. I had a lot of fun trying to make this the period way (using leaves to keep air out). This is a fun recipe to make with kids because there's plenty of mashing. It tastes significantly better than store-bought. My family enjoyed this batch at Thanksgiving.

Peasant Life in Germany, 1858


Civil War Era Sauerkraut 


Ingredients:

- Cabbage (2.5 pounds)
- 1.5 Tablespoons Salt
- 2 teaspoons Cumin
- 2 teaspoons Tumeric or Saffron


Instructions:

Wash the cabbages and remove the tough outer leaves and set them aside. 

Remove the thick veins and shred the cabbage as thin as possible.

 In a large crock, knead the salt into the cabbage by hand.

Use a wood pestle to pound the cabbage and salt mixture until enough liquid forms to cover the cabbage.*

Mix in the spices.

Cover with the outer leaves and place weight on them until all of the cabbage is submerged in the liquid.

Sit in a cool spot for 2 weeks. After the 2 week fermentation period, sauerkraut can be kept in the refrigerator for months or canned. 


------------------

* If liquid does not form, wait 30 minutes to see if enough liquid forms. If enough liquid never forms, 1/2 a cup of water with a teaspoon of salt can be added. 

At 70-75 degrees, fermentation should be complete after 2-4 weeks. At 60-65 degrees, fermentation may take 4-6 weeks. 


Notes

1 Hammond, William A. A Treatise on Hygiene: With Special Reference to the Military Service. Philadelphia, PA: J.B. Lippincott & Co., 1863.

2 Sartain, John, ed. Sartain's Union Magazine of Literature and Art. Plates. 10. Vol. 10. Philadelphia, PA: John Sartain & Co., 1852.

September 27, 2021

A Tale of Two Viruses: Historical Negationism in the Historical Community


I have taken a step back from all things historical, not only because of Covid-19 but also because of the alarming frequency in which history is being used maliciously, especially among the historical community. I thought that they of all people would know the harms of historical negationism and how important it is to prevent the spread of it.


Historical Negationism is a kind of illegitimate historical revisionism (typically done by non-historians) created to support a particular political or ideological agenda. It's has been heavily featured in the past 5 years in fake news, memes, and on social media. 

These might look familiar:


Click Here and Here to read why this is not true. 

Click Here to read why this is not okay.

News Flash:

They are also just the tip of the iceberg of the rampant historical negationism that is occurring.  Holocaust denial, "Lost Cause" Rhetoric, and "Clean Wehrmacht" myths are prevalent examples of historical negationism and how harmful historical negationism is. 

When I first saw these misconstrued historical "facts" I assumed it was a limitation of the medium. Memes can't fit a lot of text, so the whole story would never fit. My first instinct was to try and combat misinformation. Surely people wanted to know the truth and would not want to knowingly share harmful misinformation. I was wrong. 

Throughout the 16 years that I've been blogging, there has been a shift in information pathways. In college, professors would badger us that we, as future historians, would not have the issue of piecing together what happened using scant fragments but would be overloaded with primary sources. We were being trained for an entirely new problem in history: How to sift through and find truth and relevance in the overload of records left behind. This is the way I approach information.
 
What I thought was an information sorting problem is actually part of a much bigger propaganda campaign designed to confuse, cause chaos, and promote malicious causes.  Researchers have dubbed this "The Firehose of Falsehood Propaganda Model". This model uses large amounts of repetitive information to take advantage of the human subconscious, most notably, the Illusory Truth Effect, and the Continued Influence Effect
  
The Illusory Truth Effect - The more times you hear or see something repeated it is easier for your brain to process and thus prefer that information making it seem more credible. 

The Continued Influence Effect- What people hear first has a lasting influence on how people think about a subject, even if the first information they heard has been debunked. 
Memes are a great medium for historical negationism because they are inherently meant to be repeated often. 


"18th-century women caught on fire on a regular basis, due to working around fires in long skirts." "George Washington had wooden teeth." "Quilts helped slaves escape on the Underground Railroad." As historians, we get frustrated that these myths won't die. Historical myths are the Continued Influence Effect and the Illusory Truth Effect at work. Should you repeat myths to debunk them? That is still up for debate. Ultimately, these myths don't hurt people and our time should be focused on stopping history from being used maliciously.   

What Living Historians Can Do To Help

Share Responsibly. 

You do not have time to fact-check everything you share. Make an effort to fact-check things that make you upset and things that can impact people's lives. I don't expect anyone to fact-check cute cat stories but you should fact-check anything that might be using history with a social or political agenda to see if the entirety of the occurrence is present. If you don't have time to check, it's better to just not share it. 

- Share the Real Story. 

If you see historical negationism, take some time to share the real story. Remember, the Illusory Truth effect works both ways. There is evidence that you should not repeat falsehoods unnecessarily but can mention them when debunking.  

-Report to the platform.

If you see something harmful, report it. No, this is not censorship, this is moderation. If you see something harmful at historically themed events, it should be reported to the event organizers.        

-Teach Real History. Many of us get monomaniacal with clothing and small details that we often forget to teach the history and culture part of history. This is where having nonpersonal interpretation can be helpful and necessary. You may not get a chance to tell spectators the whole story but posters, pamphlets, displays, and books can help give the proper context for what people see at historically themed events. Your information can be the information that sticks which allows people the ability to think more critically about new information they encounter about a topic. 

- Teach Critical Thinking in History- Many people have a poor understanding of history and historiography. Be sure to let people see how history is formed and why critical thinking and legitimate revisionism in history are important. These teachings can prevent the Illusory Truth Effect.         

- Include Reminders- Studies show that a simple reminder that all of the information that a person will be encountering should be taken with a grain of salt is effective at minimizing the Illusory Truth Effect, even if the reminder is given a few days in advance. Historically themed events should come with a disclaimer that contextualizes who the people are that are presenting information to the public and where this information comes from. 

As a living historian, it's your job to tell spectators about yourself. Are you a trained historian, public historian, research assistant, or someone who is very interested in history? All are welcome and valuable but that information should be offered upfront.  


Thank you for reading to the end. If you think this post is useful, please share! 

November 11, 2020

Civil War Cider Cake Recipe


Clifton, Va
Sept. 18, 1864

[79th Regiment, New York Infantry] Dear Mother;
Punch would find rare pickings in the army. The everyday jokes and incidents of campaign life are rich enough. The other day in a cavalry charge the enemy broke and a rebel soldier was chased into a fence corner whence he could not escape. "I surrender! I surrender!" he cried to the pursuing trooper. "What do you think of the old flag now!" replied the soldier aiming a cut at him. The men in the ranks get off many a good thing. It is curious to see what a zest some of them take in man hunting, skirmishing, scouting and the like. They are as much pleased when they bring down an opponent as a successful sportsman with his bird. Everything has remained in its usual quiet since I last wrote. We have a most beautiful little camp for Headquarters, and are quite comfortable. I have gone to the length of building a stable for my horses, and if we don't move soon shall think about building a chimney for my tent. We have plenty of grapes peaches and apples and I found some sweet cider a few days ago. So you see we are very well off, as fare as physical comfort goes. General Grant, U. S. is here, which looks like action. Probably to see what is doing and whether any force can be spared to reinforce his army at Petersburg. As for McClellan, he will make a worse failure as a politician than as a soldier. I think his army strength is all gone. Few are left of his old army and they have changed in their feelings towards him to some extent. Nowadays they are making everybody Brevent Major General.


Tit-Bits (Boston) 1864


Civil War Cider Cake Recipe

Ingredients:

- 5 Cups Flour
- 3 Cups Sugar
- 1 Cup Butter (2 Sticks)
- 5 Eggs
- 2 teaspoons Baking Soda (2 Tablespoons Baking Powder) 
- 2 Cups Cider 
- Cinnamon, Nutmeg, Cloves, Ginger (To Taste) 

Instructions:

Preheat your oven to 350°F. Cream 1 cup of butter with 3 cups of sugar. Beat in your eggs. Dissolve the baking soda in the cider and add to the mixture. Pour the liquid ingredients on the dry ingredients and spice to taste. Bake in a greased pan until a toothpick comes out clean (30-60 minutes.)   


This recipe makes enough for two 8 inch cake pans. 

October 8, 2020

Civil War Era Honey Soap | Tutorial | How To

Civil War Soap Recipe

Honey soap was a popular soap before and after the war. It was known for and its supposed "skin whitening" properties. This recipe contains honey but at the time, writings suggest that some honey soaps didn't contain honey at all. 

 I found this recipe in The Confederate Receipt Book; however, the recipe was printed almost verbatim from The New Household Receipt Book, (1853) by Sarah Josepha Hale, the editor of Godey's Lady's Book. I am always interested in the ingenuity of humans in reduced circumstances and was curious if this recipe made a decent soap or was a war-time, makeshift recipe. 


Civil War Soap Civil War Soap Recipe


Other recipes of the time mention annatto for coloring so I added a bit to give it a nice honey color.  I also chose bergamot as the scent as the recipe for Honey Soap from The Druggist's General Receipt Book (1853) called for Windsor soap which was frequently scented with bergamot and caraway. Another contemporary recipe called for cinnamon oil. The 1866 printing of the Druggist's General Receipt Book changed the scent in their recipe for honey soap to oil of citronella. 


Civil War Era Honey Soap Recipe 


Ingredients:

- 2 Pounds White or Yellow Soap (Castile, Tallow, Lard)
- Water
- 1/4 Cups Honey
- Essential Oil ( Read the warnings on your oil.) 

Instructions:

Shred, chop or grind your soap. Add the soap and a little water in a double boiler (or straight over the heat making sure you keep it below 230 degrees F until melted or in "mashed potato" form). Add the honey, colorant, and essential oil and stir until combined. Pour or scoop into a silicone mold or any container lined with waxed paper. Let cool until hard. Slice the soap to the size you want and let cure in a warm dry place for at least a week.   

Civil War Soap Recipe
The Manchester Journal (Vermont) 25 Jun 1861


Affiliate Links:

Soap Flakes : If it's your first time melting soap, soap flakes make it easy.

Annatto:  If you want to use annatto, make sure to place it in a coffee filter and into the honey overnight and remove before using, unless you want flakes like my soap. 

Soap Colorant: If you want to use a modern colorant. 

Bergamot Oil: Cinnamon oil, Citronella, Bergamot, Rose were common soap scents during the war but in modern times, cinnamon oil can be an irritant so I would not recommend it for beginners. 

September 23, 2020

18th Century Wash-Balls: Scented Body Soap | How To

Colonial Era Wash-Balls Soap


Bathing in colonial times evokes images of dirty rags and lard soap. In reality is there were many scented, colored, and augmented soaps available at perfumers and many receipts (recipes) to scent pre-made soap at home. 

I made these wash-balls with castile soap that I made over a full year ago so it has had plenty of time to cure. If you're interested in knowing more about castile soap, I've written quite a bit about it here.  All you need to know for this is that castile is an olive oil based soap, used in the 18th century for shaving and washing as is has a decent lather (for the time period.)

Castile soap can be bought online or in grocery stores. You can also use whatever you have lying around. They did have different color wash-balls but the coloring agents are not something I feel safe putting on my skin in modern times.  I'll update this post with how to color your wash-balls in a safe manner. I'm thinking "melt and pour colorant" is the best bet. 

Other recipes of the time called for rice flour, starch, or hair powder in 1/2 proportion to the soap to stretch it and to add color and extra scents. Hair powders came in white, orange, brown, gray, pink, red, blue and lavender. 


Colonial Era Wash-Balls Soap


18th Century Wash-Balls


Ingredients:

- Pre-made Soap
- Rose or other Flower Water (Other recipes from the time period suggest lavender, coriander, cloves, jasmine, cinnamon, nutmeg, lemon peel, lemon juice, orange flower water, musk.)

1. Shred, grate, bash, crush, buy pre-masticated or take up the relaxing art of soap shaving. A large mortar and pestle would work best.

Colonial Era Wash-Balls Soap

3. Heat up your soap in a double boiler, in the hot sun or just use the heat from your hands. You want the soap soft but not melted.  Add your scent liquid or water if you don't want to add a scent. (Don't do this with essential oils they will burn your skin.) Stir until well mixed. I did not heat mine, but heated up my rose water. 

Colonial Era Wash-Balls Soap

4. Wet your hands and grab a handful and squeeze it into a ball. Add as much liquid as you need to get it to stick together. You want the balls as compacted as possible. 

Colonial Era Wash-Balls Soap


Colonial Era Wash-Balls Soap

5. Let them dry in ball form for a week. You can scrape the outsides with a knife or peeler to make them smoother.

Castile really is great for shaving. I'm excited to try it out now that it's scented. This is a great activity to do with kids, unlike soapmaking which can be dangerous.

If you want to buy premade soap flakes and waters I recommend the products below:


This site uses affiliate links. If you are planning on making a purchase, I would greatly appreciate if you would use the affiliate links above. It doesn't cost you any more but it does help me keep the website running. Thanks!


July 22, 2020

Civil War Era Popover Recipe for Breakfast


Popovers are an egg-based, hollow roll that is shaped like a muffin. Due to its hollow nature, it is perfect for filling with butter, cheese or meat. It is an especially easy way to fix breakfast or to send the men "off to battle" with a snack. Popovers also have the added benefit bread-like but not requiring any leavening agent other than the egg.

 By the 1870s, Popovers were popular enough to have been included in Annie Frost's "The Godey's Lady's Book Receipts and Household Hints," as well as many other publications. They are like individual Yorkshire Puddings. 


Below is Mrs. Hooper's Popover recipe from "Tit-Bits or How to Prepare a Dish at a Moderate Expense," a publication printed in 1864 in both Boston and New York. Other, similar recipes were printed from 1859. The cookbook emphasized plain, everyday cooking using simple ingredients.

In the video I cut the recipe by 1/4 but you can half it, double or even triple it if necessary.


Mrs. Hooper's Civil War Pop-Overs

Ingredients:

- 4 Cups Milk, room temperature
- 4 Tablespoon Butter, melted
- 4 Eggs, room temperature
- 1 teaspoon Salt
- 4 Cups Flour

Makes 24 Popovers. This recipe can be easily halved or doubled. The general recipe for popovers calls for 1 Egg and 1 Cup of Milk for every Cup of Flour.

Instructions:

Preheat oven to 425 degrees. Preheat your popover or muffin pans.

In a mixing bowl whisk together your milk, eggs, melted butter, and salt. Slowly add the flour. Do not over mix, a few clumps are okay. Remove your pans from the oven and carefully grease them. Fill the pans up 3/4 of the way. Bake for 30- 40 minutes. Once they are done baking, transfer them to a cooling rack or plate. Carefully, (they are hot) poke a hole in them to allow them to keep their shape. Eat warm with butter or jelly. 


February 5, 2020

Who Decides What History to Tell and Who Gets to Tell It?

It's a rumor that I hate "Progressives." I have a deep respect for reenactors and their craft. I ogle over the small details people put into their impressions. I gush over the sewing projects. I squeal over their pictures. I have my own standards for myself, higher than some reenactor's standards and lower than other's. The standards I hold for myself are not the standards I hold for others.

Everyone is free to have their own standards but I am appalled at the people who take their standard as a reason to harass others. Yes, it is harassment. Yes, it's real harassment even if it's "just online."

Reenacting, is experiencing a common museum problem. Who decides what history to tell and who gets to tell it? For a long time, museums were by the wealthy, for the wealthy. Later, museums started to cater to the middle class and explored the lifestyle of the "common man." But something was still missing. Museums have started exploring untold history- history from the perspective of the previously unrepresented. How to represent all voices in a respectful and meaningful way is complex problem in many museums. Many are asking "How do we decolonize this?"


Who has the privilege of telling our history at events?


People who:  


- Have or can get weekends off from work/family duties.
- Can afford to work for free. 
- Have vehicles and gas money to get to and from events.
- Have money for expensive gear.
I'm not interested in anyone's opinions about what is "affordable" as that is highly individual. The truth is, we all know that handmade, bespoke garments are pricier than a lot of our regular clothes. Yes there are ways to make it cheaper if you have the good fortune to be able to sew and have the time and resources to do so.)
- Are physically capable. Reenacting is demanding, and many historical sites and event spaces are not designed to host a variety of needs.
I could dedicate a whole blog post just to this and might in the future. I have seen people harassed for their age, size, and physical limitations. I've seen people mocked for their walker, wheelchair, glasses, their inability to walk long distances or sleep on the ground etc.   
- Are accepted by peers. Antisocial behavior should not be accepted. Discrimination is not acceptable.

- Feel safe. 
You might laugh at this but I know people who stopped coming to events because they encountered harassment, physical/ sexual assault, and stalking. There are also many disenfranchised people who are bullied out of sharing their viewpoints or personal experiences.

There are many people who are excluded. How can high standards be bad? The higher the standards, the higher the barrier to entry for disenfranchised people. The higher the barriers to entry the better chance we will end up with an old fashioned, one perspective, "by the wealthy for the wealthy" display and that is a disservice to everyone.

I am not a proponent of "bad history" and believe me, I've seen a lot of bad history. I only ask that people live and let live on things that are not a safety issue or life and death matter. Your standards are your standards and their standards are theirs. Teach from your example. Be passionate about accessible history. Recognize the privilege you have to be able to tell history.

We should not be working to silence people, we should be working to help people better interpret history. We should be teaching others how to research. We should be talking more about what an interpretation is and what it isn't. We should be refining the other areas of our craft that go beyond the material.   


September 18, 2019

Civil War Pumpkin Bread Recipe from the Confederate Receipt Book

Civil War Recipes Bread Substitute Confederate 1863


The blockade hit hard. Wheat prices rose fast. Speculators hoarded flour. By 1863, women were rioting in the streets of the South because they couldn't buy bread. The Richmond Examiner (1865) reported that shops were selling bread in 3 sizes: "The first is only visible by microscopick aid; the second can be discerned with the naked eye, and the third can be seen with outline and shape distinct."

Southerners rushed to show off their ingenuity by using substitutes for wheat and relied heavily on cornmeal but people soon tired of substitutes and worked to try to figure out more complex substitutes that better mimicked the real articles. Soldiers and civilians alike wrote about being sick of corn bread.

Sarah Morgan, expressed her joy of having received real bread in New Orleans in 1863:

One woman who has recently joined us has nothing except a matress... But then, we got bread! Real, pure wheat bread! And coffee! None of your potato, burnt sugar, and parched corn abomination, but the unadulterated berry! I cant enjoy it fully though; every mouthful is cloyed with the recollection that Lilly and her children have none.

This recipe is from The Confederate Receipt Book (1863.) The pumpkin in this recipe is used as a substitute for milk, eggs and butter and to help mask the taste of cornmeal. It has a slight taste of pumpkin but you might not even realize there is cornmeal in it. Topped with a little butter and molasses, it does taste surprisingly like regular wheat bread.

Civil War Recipes Bread Substitute Confederate 1863

Civil War Pumpkin Bread Recipe


- 1 Cup Pumpkin Puree (fresh or canned)
- 1 Cup Cornmeal
- 2 Cups Bread Flour
- 1 Package of Yeast dissolved in 1/4 cup of warm water (105°F-110°F)
- 1 Tablespoon Molasses
- 1 Teaspoon Salt

In a medium sized bowl, mix the dry ingredients then add the wet ingredients. Knead on a floured surface for 6-8 minutes adding flour to make a soft dough. Place in a greased bowl and cover with a warm, wet cloth and set in a warm spot for 30 minutes to let it rise. Punch down the dough. Grease your bread pan(s) and form a loaf in it. Let it rise in a warm spot, covered with a wet cloth for an hour. Preheat oven to 375°F and bake for 20-30 minutes. Remove from pan and cool on a cooling rack.

 **I made 3 small loaves which baked fully in 20 minutes.

Civil War Recipes Bread Substitute Confederate 1863


My site uses affiliate links. If you are planning on making a purchase, I would greatly appreciate if you would use the affiliate links above. It doesn't cost you any more but it does help me keep the website running. Thanks!

September 5, 2019

Civil War Era Cheesikins Recipe, What?


Yes, I made this recipe just because of the name, and yes, it's an early cheese-based nibble snack. This recipe if from Cre-Fydd's Family Fare (1864.) A very similar recipe for cheesikins was printed in Godey's Lady's Book in 1865 as well.

The book gives a suggestion about how to serve the cheesikins, as a side dish to lamb and veal. They have a strong flavor from the mustard and pepper. I can't see eating a ton of these in one sitting but they are a nice change of pace that could be used to make an otherwise bland meal a bit more exciting  while using up stale bread.


Civil War Era Cheesikins Recipe


Ingredients:

- 4 ounces (1 cup) Parmesan Cheese (freshly grated)
- 3 ounces (3/4 cup) Breadcrumbs
- 4 Tablespoons Butter
- 2 Eggs, beaten
- 1/4 teaspoon Cayenne Pepper
- 1 teaspoon Ground Mustard
- 1/4 teaspoon White Pepper


Instructions: 

Mix all ingredients in a mixing bowl, cover bowl with a cloth and let it sit for an hour.  Preheat oven to 400°F.  Knead the dough, roll out to 1/8 inch and cut into triangles. Bake on a cookie sheet for 16-18 minutes.  

August 27, 2019

18th Century Lemon Cheese Recipe from The Cookbook of Unknown Ladies

18th Century Lemon Cheese Forgotten Recipe

I was excited to try this recipe. I have yet to see anyone else attempt it and it is from a handwritten recipe book in Westminster City Archives in London known as the Cookbook of Unknown Ladies. Little is known about the recipe book or the women who contributed to it only that it was written by "various unknown women about the year 1761," as is printed on a title page.  Be sure to check out all of the recipes from The Cookbook of Unknown Ladies.

This was a mystery recipe.  I can generally read and approximate what the finished product of a recipe will be. For this recipe I didn't have a clue. I thought it sounded most like a cream cheese but it was whipped before being hung to separate the whey out. Would that make a difference? My grandma and I kept testing it throughout the process to try and get an idea of what it would turn into.

I was very afraid that the minute I added lemon to the cream that it would separate the way it does when making cheese but it didn't. I waited until the cream was whipped then quickly stirred in the juice and the rind.

It turned out that this makes a spread that tastes like a delicious lemon cheesecake. It was delicious on the 1796 pound cake I happened to make the same night. It would also be good on scones or toast.

Excerpt from The Cookbook of Unknown Ladies:


Lemmon Cheese
A qurt of good thick sweet creame. Put to it the juce of four lemons as as mutch peel as well give it an agreeable flavour. Sweeten it to your taste & add a littile peach or orange flower water if you like it. Whip it up as you would for sellabubs but very solid. If you have a tin vat, put a thin cloath in it & pour in your cream. If not, put it in a napkin and tye it pritty close. Hang it up to let the whey run from it. Make it the night be fore you use it. Garnish it with currant jelliy or candied oranges.


Ingredients:

- 16 ounces Heavy Whipping Cream
- 2 Lemons (Juice and Peel)
- 1 Tablespoon  Orange Flower Water
- 2+/- Tablespoons sweetener (Sugar, Honey, Molasses, )

Instructions:

Zest and juice your lemons. Put cream in large bowl, add sugar and orange flower water and whisk until you have whipped cream. Stir in lemon juice and peel gently to avoid over whipping. Pour into doubled cheese cloth and tie it up. Hang it overnight. In the morning press all the remaining juice out with your hands, make into a ball or press into a mold and serve with jelly or candied oranges.


I had this hanging over a bowl in my living room and my puppy was terrified of it.

If you haven't used cheesecloth before, I recommend paying a little extra to get the kind that you can wash and reuse: Cheesecloth. 


My site uses affiliate links. If you are planning on making a purchase, I would greatly appreciate if you would use the affiliate links above. It doesn't cost you any more but it does help me keep the website running. Thanks!

August 15, 2019

1920s Sealing Wax Art Jewelry


Over the weekend we went antiquing and I found this really pretty booklet on sealing wax art. Sealing wax art involves melting sealing wax, originally used to seal letters, and shaping the softened wax into different beads and pendant shapes. I had seen wax flowers and pearls before but this was new and I never thought to try and make some myself.

DIY Your Own Vintage Style Jewelry with the whole book here: Sealing Wax Art


1920s Sealing-Wax Art Jewelry

Some of my friends and I have been mailing each other letters with wax seals so I already had the materials and thought I might as well try and get some practice in before all those Roaring '20s parties start happening. I still need a lot of practice but it was fun to do. The book shows some very pretty, intricate examples. 


1920s Sealing-Wax Art Jewelry


1920s Sealing-Wax Art Jewelry
My attempt. I still need more practice!

The only advice I can give so far is that the harder, wax pellets that are melted in a spoon were giving me better results than the sticks with the wicks in them.

1920s Sealing-Wax Art Jewelry

1920s Sealing-Wax Art Jewelry

1920s Sealing-Wax Art Jewelry

1920s Sealing-Wax Art Jewelry
Advertisement from 1924

You can read the whole book here: Sealing Wax Art


If you try it out, I'd love to see photos of what you come up with!

August 4, 2019

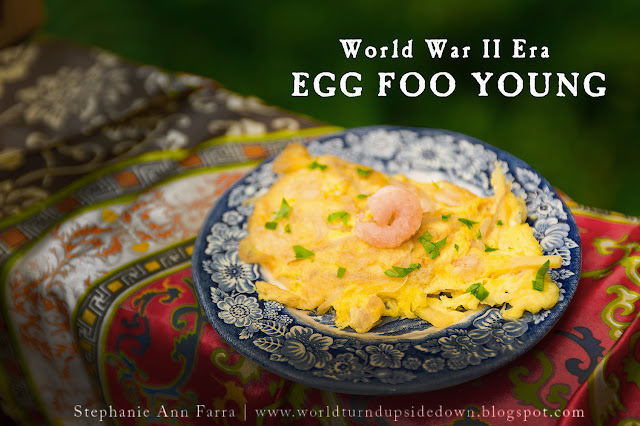
WWII Era Egg Foo Young Recipe

Egg Foo Young World War II Recipe


This is another recipe from The Chinese Cook Book (1936.) You can see the Shrimp Fried Rice I made from this book here. This was a cookbook by a Chinese-American woman meant for American cooks wishing to recreate the dishes they were eating in popular "Chop Suey" Houses. Chop Suey Houses were popular for their cheap and delicious food, elegant decor and live music.

You might ask why Chinese food would be popular during a time of war that emphasised nationalism. In the early 1900s, labor unions felt that nonunion Chop Suey houses were bad for business and pushed for laws that would shut them down. Many of these laws focused on disallowing live music and not allowing young people to enter them late at night. We know how well that works. Chop Suey Houses gained a reputation for being exotic and a part of a wild lifestyle. By the 1940s they were still fashionable places to see and be seen. It's interesting to note how the dish, Chop Suey has fallen out of fashion so much that few people have ever tried it.       

Egg Foo Young is another great way to use up leftover vegetables and protein. Celery, green onions, carrots and any sort of leftover meat would be delicious in this. In modern times it is served with a gravy but the Chinese Cook Book emphasised Soy Sauce, which was then called "Chinese Sauce" due to its ubiquity in Chinese American dishes. 


Egg Foo Young


Ingredients:

- 5 Eggs
-1/2 Cup Chopped Shrimp
- 1/2 Cup Onion, shredded
- 1 Cup Bean Sprouts
- Bamboo Shoots (cut in matchsticks)
- 1/4 Cup Water Chestnuts, chopped
- 5 Tablespoons Peanut Oil or Vegetable Oil

Beat eggs together and mix in chopped vegetables and shredded onions . Pour some oil in a large wok or frying pan and heat to medium-high heat. Using a ladle, scoop out one patty's worth of mixture in the hot oil. Create as many of these "patties" as can fit in the pan without touching. Fry until you it is lightly browned on one side, then flip and fry on the other side until lightly browned.


In modern times, Egg Foo Young is deep fried and foodies scoff at the idea of pan frying. You can deep fry this is about 2 inches of oil. Make sure to use a metal ladle and hold it in the oil in the ladle for a few seconds before pouring it in. Frying takes about 5 minutes and you'll have to flip it.   


April 17, 2019

WWI Era Maple Fudge Recipe 1905, 1916


This morning my friend Eva sent me this video, from Imbrandonferris on Youtube called "Making Fudge from the 1900's!" with the caption "I started a fire!"


Sometimes I get distraught that no one reads my posts or that no one cooks anything I post. I wonder why I bother. Old recipes and foodways are so important to me and I believe it's a skill that needs to be passed onto future generations, especially in an era where meals come frozen and vegetables are unrecognizable to many.

 I started posting when I was young as a way to share the things I was learning. Every dish I cooked was an experiment. Maybe it would come out, maybe it wouldn't. I had a heck of a time transcribing measurements that sounded ridiculous. Pick the walnuts when they're the size of a squirrel's ear? Okay.

So many of the ingredients were foreign and needed research to decipher and effort to obtain. But now that I've been over 10 years into it, am a buttload of books more familiar with foodways over last 300 years and have studied under some of the best, some of that excitement when trying a new recipe has waned.     


This video made me laugh so much. It brought me right back to the days when I didn't have any clue. It's a great reminder of why I started cooking old recipes in the first place. I made a lot of friends along the way and I love running into people who love reading my blog.

So without further ado, here is "Fudge from the 1900s"  The recipe from a book called "A Little Cookbook for a Little Girl." First published in 1905, it was reprinted in 1916 and still being advertised in newspapers in 1921.


WWI Era Maple Fudge Recipe 1905, 1916


Ingredients:

- 3 Cups Brown Sugar
- 2 Cups 100% Maple Syrup
- 1 cup Whole Milk
- 1/2 cup water
- 4 Tablespoons Butter (the size of an egg which is actually a very common measurement)
- 1 Cup Walnuts or Hickory nuts, chopped

Instructions:

In a large pot, combine brown sugar and maple syrup. You can stir it at this stage. Heat until boiling. Once boiling add the milk and water. Boil for 2 minutes with the lid on.

Do not stir. Butter your thermometer and stick in the mixture, making sure it is not touching the bottom of the pan. Keep the mixture boiling until it reaches the soft ball stage (112 to 116 °C (234 to 241 °F). This will take about 10 minutes but can be longer.

Take an 8 x 8" pan and line with aluminum foil. Grease the foil with butter.

Do not stir. Remove from the heat. Add the butter. Let sit until it cools down to 230°C, 110°F. This will take about an hour. Do not stir. You want to move the fudge as little as possible during this time to prevent sugar crystals from forming too early and giving your fudge a gritty taste.

Once it has reached 230°C, 110°F it is time to stir. You will be stirring until it turns a lighter shade. It can take up to 30 minutes. Add the crushed nuts. Quickly pour it into your pan and smooth out the top with a spatula. Let look for 3- 24 hours. It's easier to cut the next day. Cut in 1/2 inch pieces.


Instructions with pictures:

In a large pot, combine brown sugar and maple syrup. You can stir it at this stage. Heat until boiling. Once boiling add the milk and water. Boil for 2 minutes with the lid on.


Do not stir. Butter your thermometer and stick in the mixture, making sure it is not touching the bottom of the pan. Keep the mixture boiling until it reaches the soft ball stage (112 to 116 °C (234 to 241 °F). This will take about 10 minutes but can be longer.


Take an 8 x 8" pan and line with aluminum foil. Grease the foil with butter.


Do not stir. Remove from the heat. Add the butter. Let sit until it cools down to 230°C, 110°F. This will take about an hour. Do not stir. You want to move the fudge as little as possible during this time to prevent sugar crystals from forming too early and giving your fudge a gritty taste.


Once it has reached 230°C, 110°F it is time to stir. You will be stirring until it turns a lighter shade. It can take up to 30 minutes. Add the crushed nuts.


Quickly pour it into your pan and smooth out the top with a spatula. Let set for 3- 24 hours. It's easier to cut the next day.


Cut in 1/2 inch pieces.


Hope you enjoy! If you liked this post, please share it!

Copyright © 2008-2020 Stephanie Ann Farra. All rights reserved.

All materials posted on this site are subject to copyrights owned by Stephanie Ann Farra. Any reproduction, retransmissions, or republication of all or part of any document found on this site is expressly prohibited, unless the author has explicitly granted its prior written consent to so reproduce, retransmit, or republish the material. All other rights reserved.