Showing posts with label 1950s. Show all posts

August 28, 2020

Historical Kids Craft: Great Depression Paper Poppers

 This year has been weird, to say the least. My sister is a nurse so I have been spending most of my time being Nanny-Auntie to my nephew who is bouncing-off-the-walls energetic and starting 3rd grade next week. 

It’s been mostly exhausting and I’m sure others are feeling this way. We have been finding crafts and projects from the past to stay busy and paper poppers was a fast, easy history craft that kept him busy for hours. All you need is a sheet of paper.


1930s Crafts for Kids Paper Popper


If you're interested in reading more about the Great Depression here is an affiliate link to the book we were reading about it. The Great American Depression book of fun. 

August 19, 2020

1929 Guacamole Recipe: A Recipe From the Great Depression


Everyone who knows me know I LOVE tacos. I was excited and intrigued to find this early recipe for guacamole. The recipe is from Ramona's Spanish-Mexican Cookery. The author spent 20 years in Mexico learning Mexican recipes and sharing American ones. She wrote this cookbook for Americans who visited Mexico and missed the mouthwatering food.  

This recipe was so good! I've literally made it 3 times since first trying it a few weeks ago and it looks so cute served in the shells and made it easy for everyone to have a personal bowl of guacamole by their plates without dirtying more bowls. 


Ramona's Spanish-Mexican cookery: the first complete and authentic Spanish-Mexican cook book in English (1929).


Vintage Guacamole Recipe

Ingredients:

- 3 Medium Avocados
- 1 Tomato, Minced
- 1 Tablespoon Onion, Minced
- 1 Teaspoon Jalapenos, Minced
- 1 Tablespoon Cilantro
- 2 Tablespoons Olive Oil 
- Salt and Cayenne Pepper to taste
- Tomato slices and quartered Lemons for garnish

Instructions:

Cut avocados in half and remove the pits. Set peels aside. Mash the avocado meat. Mix in the tomato, onion, jalapeños, cilantro. Salt to taste. Spoon the avocado filling into the avocado shells and garnish with a slice of tomato, slice of lemon and a dash of cayenne pepper. Refrigerate until time to serve.


You can skip the olive oil and not notice the flavor difference. I added another tablespoon of cilantro and onion, and a bit more jalapeño. Click here to watch Tanya Muñeton make a very similar recipe in Spanish.


December 11, 2019

Chewable Eggnog? World War II Era Eggnog Pie Recipe, Old Fashioned Taste

World War 2 Christmas recipe

I'm not a fan of eggnog but it is mostly the texture that I don't like. This piqued my interest. Would I like the flavor with a different texture? By chance, I had everything at home to make this so I did, even though I had no event to serve it at. This recipe is from Good Housekeeping Magazine Party Cook Book (1941) and is quite tasty.

I would highly recommend topping this with candied or maraschino cherries. I only had some of these leftover cranberries in the house but boy, are they sour! If I was to make this again, I would add about 1/3 a cup of sugar to the whipped cream and cover the whole pie with it, then top with some cinnamon and nutmeg. The custard was a little less sweet than I prefer but a second opinion said that they appreciated it was not sweet. It ended up having a flan like consistency that's actually quite nice and light. Even this vintage santa came down the chimney to steal a slice.

World War 2 Christmas recipe


Ingredients:

Crust:

-1 1/4 Cup Graham Crackers, finely rolled
- 1/4 Cup Sugar
- 1/4 Cup Butter
- 1 Tablespoon Water

Combine graham crackers crumbs and sugar. gradually add to soften butter and stir in water. Press into a 9 inch pie plate and bake in a preheated oven at 325 °F for 10 minutes. Let cool.

Filling:

- 1 1/2 Tablespoons Gelatin
- 2 Cups Milk
- 2 Eggs
- 1/8 teaspoon Salt
- 3 Tablespoons Brandy or Brandy Flavoring (I used Rum)
- 1/2 teaspoon Nutmeg, ground

Soak the gelatin in 1/4 cup of the milk and set aside. In a double boiler on medium heat, scald the rest of the milk.

Warm your eggs in a bowl of warm water. Separate the whites from the yolks into two bowls. Beat the yolks slightly and mix in 1/3 cup sugar and salt. Pour the scaled milk over the yolk mixture while stirring. Return the mixture to the double boiler and stir constantly until the custard coats the spoon. Remove from heat and stir in the the soaked gelatin until dissolved.

Beat the egg whites stiff and stir into the custard. Fold them into the custard and add the brandy/rum and the nutmeg. Chill until the mixture begins to stiffen. Pour into the baked crust and chill in the refrigerator until set.   

Topping:

- 1/2 Cup Heavy Whipping Cream
- 1-2 Tablespoons Brandy (Rum) if desired.

Mix the cream with the flavoring and whip until whipped cream. Coat the top of the pie with it. Serve chilled.


**To simplified this recipe you can buy a premade graham cracker pie shell and premade whipped cream. I won't judge. If you have never made a custard before, it's helpful to read this guide.**


October 23, 2019

World War 2 Era Bismarck Tea Ring


"OH NO! That looks nothing like the picture!" Yes, that happens sometimes but everyone said to bring it to the event anyway. It wouldn't be right if I didn't share the failures as well as the successes. It tasted fine but wasn't as pretty as it could have been.

I kneaded the biscuit dough about 5 minutes before I realized it was only supposed to be for 30 seconds. The damage had been done. It was near impossible to roll it out to a nice 1/8 of an inch dough. No pretty swirly rolls for me. The flavour was there but the result turned out to be kind of blobby. It wouldn't have been in the spirit of World War II if I threw it out and started over. All that flour and butter!

I ended up making and using apple jelly instead of raspberry as I had apples browning in my fruit bowl and was trying to keep the costs down. It might not look as pretty as it should but it tasted good. It was less sweet than we're used to but that could be fixed by an extra sprinkle of sugar over the jelly before rolling.


World War 2 Era Bismarck Tea Ring


Biscuit Dough


- 2 Cups sifted Flour
-2 teaspoons Baking Powder
- 1/2 teaspoon Salt
- 4 Tablespoons Butter or Shortening
- 3/4 Cups Milk

Mix flour, salt and baking powder and sift. Cut in the butter or shortening and add milk slowly until a dough is formed. Flour your hands and knead for 30 seconds or until all is combined. Roll out on a lightly floured piece of parchment paper on a cookie sheet until the dough is a rectangle about 1/8 of an inch thick.

Filling 


-1/2 Cup Raspberry Jam

Glaze


- 1 Cup Powdered Sugar
- 2 Tablespoons Milk
- 2 Tablespoons Raspberry Jam

Instructions:

Preheat oven to 400° F. Spread a thin coat of raspberry jam on the dough. If you make it thick, it will slide out and make a mess. Starting at one long side of the dough, carefully roll it up until you have a log. Bend the two ends together to form a circle and cut 1 inch slices (leaving some dough to keep it in a ring). Twist each slice so the cut edges are facing up. Bake for 30 minutes on a parchment lined cookie sheet. Remove to a cake rack. Combine jam, sugar and milk to make a glaze. Drizzle glaze on the top with a spoon and serve warm.


A bunch of us looked at the original photo and aren't entirely convinced that the hole in the center wasn't cut out after it was baked. Some theorized it might have been baked in a bundt pan. My ring baked solid so I did what you're supposed to do when you cook a blob: covered it in gaze. I'd love to see what you end up with if you try it. If I make it again, I'll update with the results. This recipe is from 10 Steps to Perfect Baking (1937.)  

October 9, 2019

World War II Pumpkin Pie Recipe

WW2 Recipes Pumpkin Pie

I'm still a beginning pie baker and my grandma had no tips. She never learned to make crust and I've never been very good at it either. The 1940s baker could be economical and make pie crust from scratch but packaged pie crust mix was available. We may or may not have cheated.

This recipe is from Recipes for Good Eating (1944). The booklet suggested pre-making bulk crust mix and using as needed, as their recipe called for Crisco instead of butter and would not spoil in a container in the cupboard. The texture is less firm than modern pie but still has a good flavor.

Nearly 20 million Americans grew Victory Gardens to help with food shortages. The Us Department of Agriculture estimates that citizen growers  grew over 40% of the vegetables grown in the US at the time. I was going to make a victory garden on the pie but it ended up being a big pumpkin patch, which is okay because pumpkins are easy to grow and feed a lot of people.  The Victory Garden Handbook (1944) by the Pennsylvania State Council of Defense recommended them as a good source of Vitamin A, Thiamin, Calcium, Vitamin B and Iron. I recommend them because they are delicious.

WW2 Recipes Pumpkin Pie
Rosskam, Louise, photographer. Washington, D.C. Victory gardening in the Northwest section. District of Columbia United States Washington D.C. Washington D.C, 1943. May. Photograph. https://www.loc.gov/item/2017853905/.
  

World War II Pumpkin Pie Recipe


Ingredients:

- 1/2 Cup Sugar
- 1/2 teaspoon Salt
- 1 teaspoon Ginger
- 1 teaspoon Cinnamon
- 1/4 teaspoon Cloves
- 1 1/2 Cups Pumpkin Puree(canned or homemade)
- 2 Eggs
- 1 1/2 Cups Hot Milk
- Pie Crust

Instructions:

Preheat your oven to 425°F.  Line your 9" pie pan with a crust.

In a mixing bowl, mix sugar, spices salt, pumpkin.

Beat the eggs and add them to the mix. Then stir in the hot milk.

Pour the mixture into your pie crust. Bake for 15 minutes

Reduce heat to 350 °F.  and bake for 30 minutes or until done in the middle. Let cool in the open oven for 15 minutes, then on a counter for 4 hours. Drizzle with chopped nuts and honey before serving.


I baked the crust decorations on parchment paper in a separate pans. Modern custards that use heavy cream can hold decorations during baking but I didn't want to risk it here as the batter was very thin before baking.

WW2 Recipes Pumpkin Pie

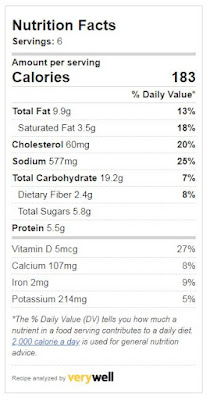
Wee used a 0 calorie sweetener for a second pie. Here are the nutrition facts if you want to do that.


WW2 Recipes Pumpkin Pie
If you make this pie, I would love to see photos!

October 2, 2019

WW2 Herbal Remedies Your Grandmother Knew (and a Few You Wish She Didn't)

Historical WWII ww2 medicines


The Old Herb Doctor is an advertising book published in 1941. The aim was to sell prepared tinctures but the book includes many herbal remedies submitted by readers all over the US. Food was not the only thing rationed during WWII. Medicines were being produced in bulk for use overseas, leaving people on the home front to make-do or find another way. This book likely sparked interest in those trying to fill the gap left open once some of the chemical medicines no longer available to the general public.

Herbal remedies from World War 2. Medicine was rationed. Women on the home front were learning to make do, find new ways or rediscover old ways to treat illnesses.

Herbal Remedy Excerpts from the book The Old Herb Doctor:


For Diarrhea -- Take Allspice and boil in water, take when cold 1/2 teaspoonful of the spice to half cupful of water. Writes Mrs. F.E., Munday, Tex.

For Cramps, bathe the feet in Wintergreen Leaves, with a handful of Common Salt, using water just as warm as the flesh will stand, but don't wipe the water off; just let it dry. This was given to me by an Indian Woman 86 years old and a wonderful woman. Writes N. W., Alma Center, Wis.

Cramps-- Here is a recipe for Cramps and ailments of the stomach, also for Colds when you can not sleep. I am sure anyone will find it useful. Two teaspoons of Catnip. Pour on 1 cup of boiling water, and let stand a few minutes. Then drink contents hot, sweetened with sugar to suit yourself, at bedtime. Writes Mr. W. D., Matawan, N.J.


Historical WWII ww2 medicines
Catnip

Old-Fashioned Fruit Laxative --
1 pound Prunes, 1/2 pound Figs, and the same amount of Dates and an ounce of Senna Leaves. Remove pits from fruit and chop altogether, mold into bars or small sticks and dry. Dose--a piece the size of a hickory nut for an adult, less for a child. This formula will keep all winter. Writes Mrs. M.P., Cleveland Ohio.


Bull Nettle Cough Syrup- Take a large handful of the dried roots of Bull Nettle, put in a quart of water, boil down to a pint and strain. Add enough sugar and boil to a syrup. Take a tablespoon every hour until relieved. Dose--for children, 1 teaspoon every hour. Writes Miss T.R., Henryville, Tenn.

To Break Up a Cold-- Take 4 lemons and roast in oven until the juice comes through the skin, remove all the juice from them, and strain. Take 3 Tablespoonfuls of Horehound and steep in water, then strain and add enough water to make a thin syrup. When cold add the lemon juice and bottle. Writes Mrs. G. L. Pontiac Mich.
Historical WWII ww2 medicines
Horehound

During the epidemic I contracted the Flu and could not obtain a doctor. I ordered a strong brew of Boneset tea, mixed with lemon juice and sugar, and in the meantine I wrapped up in a blanket, then drank it as hot as possible. Writes M.E.S., Englishtown, N.J.

Here is a recipe for colds, coughs and hoarseness. The following is soothing, and healing to most ordinary coughs and colds. One pint of boiling water, two ounces whole flaxseed and the juice of two lemons and sugar. Writes Mrs. A.B., Harper, Wash.

Coughs-- Take a double handful of Pine Needles to a quart of water, boil for 15 minutes, strain and add 1 1/2 cups of sugar, boil to a thin syrup. This is excellent for coughs: take 2 teaspoonfuls night and morning. Writes F. S., Mena Ark.

For Earache-- Pour hot Olive Oil in ear and in a short while the pain will have vanished. Writes M.K., boston, Mass.

My Recipe for Burns-- Use linseed Oil on burns of any kind. Have used it for years, and there will be no blister. Writes Mrs. M. B., Manchester, Tenn.


And a few you might want to pass on:

For Congested Bowels-- Warm half pint or very near that amount of the best Olive Oil. Put in a fountain syringe and inject to bowel. It is best to raise the person a little so the oil will stay in the bowel, but if the pack is low down it won't stay. This is a sure remedy that will do the work. It takes a few hours for the oil to soften the stools, but if it stays in the bowel it will. I relieved many a person with this. Writes L.W., Cold Springs, Mo. 


Take skunk oil, be sure it is genuine. Warm three or four drops and put in ear, let run down good and then put in cotton loose. I have never heard of a case where it did not stop the earache. Writes A. D. D., Sedalia, Mo. 


DISCLAIMER: All information contained in this site is provided for informational purposes only, and should not be construed as medical advice or take the place of a doctor. Use at your own risk. For further research please check: Web MD. All of the excerpts above are quoted directly and do not necessarily reflect the beliefs of the webmistress.

July 24, 2018

WWII Blueberry Muffin Recipe

1940s WWII World War Two Recipe Blueberry Muffin


Back from the WWII, Berwick, PA event hosted by the Stuart Tank Memorial Association! Despite the rain, everyone had a great time. I brought these muffins to share and while they were a little dry when I made them, they ended up moist after a day of being under saran wrap. Saran wrap didn't hit the shelves until after the war but the plastic used for saran wrap was developed during the war to make ventilated insoles for combat boots. I think a tupperware container would have the same effect. The boys ate them up at the event.

This recipe is from The Good Housekeeping Cookbook (1942.) In accordance with the wartime shortages, this recipe has less butter and eggs than we're used to in modern times.

WWII Blueberry Muffin Recipe


- 2 Cups all-purpose Flour
- 3 tsp Baking powder
- 1/2 tsp Salt
- 2 Tbs Sugar
- 1 Egg, beaten
- 1 Cup Milk (or 1/2 Cup of Evaporated Milk + 1/2 Cup Water)
- 4 Tbs Vegetable Oil or Melted Shortening
- Canned or Frozen Blueberries, well rinsed and drained


Preheat oven to 425 degrees. Sift together dry ingredients. Slowly stir in the oil, milk, and eggs and mix until it has a lumpy appearance but no longer. Grease cupcake pan (I found it better to grease and flour it.)  Place 2 tablespoons of batter in each cup, cover with 1 tsp of blueberries and then top with 1 tablespoon of batter. Bake for about 25 minutes or until the tops are golden. Makes about 14 muffins.


February 9, 2018

Fight the Gap Crud: WWII Era Chicken Noodle Soup

Everyone had a great weekend at the Fort Indiantown Gap Event!

But now it's here: The Gap Crud, The Barracks Plague, The Soldier's Sickness! Everyone is sick now. This post isn't going to be very in-depth because I'm typing from my bed, under a mound of crumpled tissues. I'm leaving it up to sleep and the science of Chicken Soup to fix this.


Chicken soup has been a staple in homes since chicken became a thing, although it wasn't until 1934 when Campbell's released their "Noodle with Chicken Soup" that Americans began buying and stocking their pantries with it. The 1930 and 40s were the start of being able to buy this previously homemade dish at the store, a luxury to anyone who has had to cook three meals a day from scratch.   
Although many people erroneously think a Campbell's Soup name mix-up on the radio in the 1930s is the origin of the name, the name "Chicken Noodle Soup" was in use at least since WWI. The mix-up did; however, prompt Campbell's to change the name of their soup to "Chicken Noodle,"  and it's a popular name for the dish today.
1947 Advertisement

Chicken Noodle Soup

Ingredients

- 4 Cups Chicken Broth
- 2 Carrots, peeled and chopped
- 2 ribs of Celery. chopped
- 1 medium Onion, diced
- Handful of noodles (fresh or store bought, we're sick so I'm doing store bought.)
- Chopped parsley, optional
- Cooked shredded chicken, optional

Instructions:

In a large saucepan, boil the carrots, celery and onion in the chicken broth until tender. Add the noodles and chicken, serve with a garnish of parsley.

Some recipes recommended making broth using a whole chicken. If you used a chicken to make broth, it was likely only a few shreds would find their way into the soup, the boiled chicken would likely be served in other dishes to stretch it. Chicken soup is a great way to use the chicken bones though.


Some pics from the Fort Indiantown Gap Event:


I wish everyone a speedy recovery!

December 8, 2017

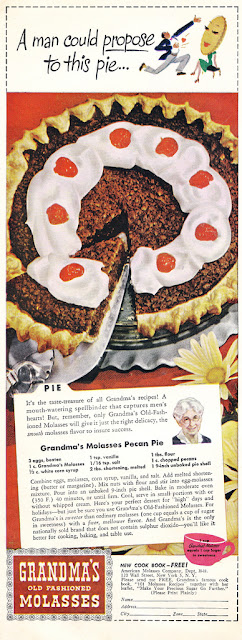
"A Man Could Propose to This Pie" WWII Era Recipe: Pecan Pie

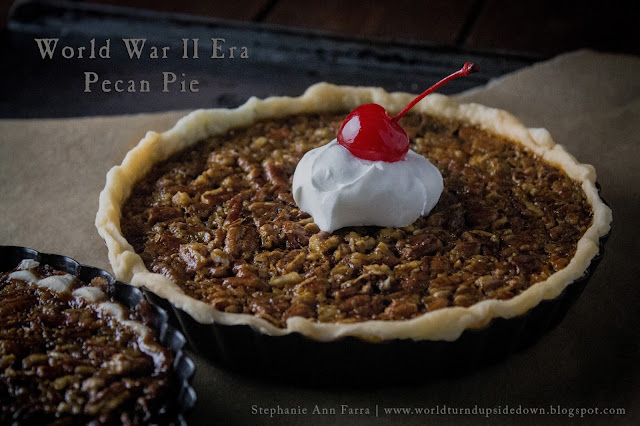
WWII Era Recipe: Pecan Pie

Recipes for the earliest versions of pecan pie date back to the 1880s but the dish didn't reach its height of popularity until the 1940s when sugar rationing made this sugarless dish a good alternative to other pies. Older recipes tend to favor molasses while newer ones tend to favor corn syrup. The Karo corn syrup company helped popularize it in the 30s and 40s. 

Pecan pie has strong southern associations due to the cultivation of pecan trees there. It is currently the official dessert of the state of Texas, which is fitting, because the earliest recipes that are most similar to pecan pie today started popping up in the 1880s in Texas.   

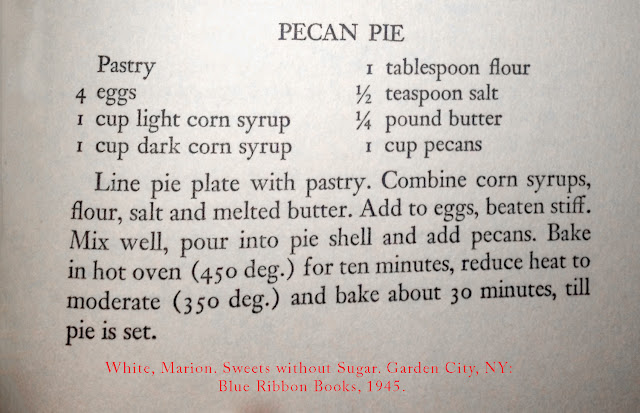
I chose to make the Grandma's Old Fashioned Molasses version because, ahem, I'm giving it to a man--I mean--because molasses is the best nutritional substitute for sugar according to Sweets Without Sugar (1945), a book dedicated to wartime sweetener substitutes. (We'll see.)  I also used margarine as my shortening to keep in theme with WWII era substitutions. 


WWII Era Recipe: Pecan Pie WW2


WWII Era Recipe: Pecan Pie WW2

Ingredients:

- 2 Eggs, Beaten
- 1/2 Cup light Corn Syrup
- 1 teaspoon Vanilla Extract
- 1/16 teaspoon Salt
- 2 Tablespoons Shortening, melted
- 1 Tablespoon Flour
- 1 Cup Chopped Pecans
-  1, 9 inch unbaked Pie Shell

Preheat your oven to 350 degrees. Line your pie pan with crust, a little on the thicker side. Mix eggs, corn syrup, molasses, vanilla and salt. Add melted, but cool-to-the-touch, shortening. (Or else you'll have omelette in your pie.) Mix in your nuts and pour the mixture into your pie crust. Bake for 40 minutes. Let cool completely, then serve with whipped cream and cherries.


WWII Era Recipe: Pecan Pie  World War Two

June 23, 2017

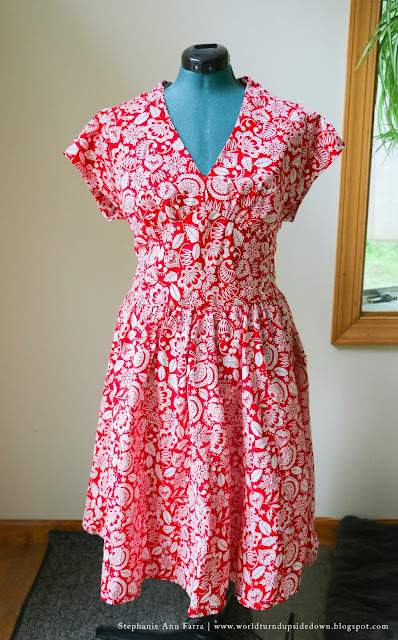
Easy WW2 1940s Dress Pattern Review: Butterick B5209

WWII Dress Sewing Pattern B5209

I made this dress what feels like forever ago and am only now getting to review the pattern. A few months ago I had the chance to see some old friends that would be coming out my way for the WWII Weekend at Valley Forge (formerly Graeme Park.) I thought it would be fun to hang out with them for more than a day trip since I hadn't seen them in awhile and one of my local friends wanted to meet them so about 2 weeks before, we were convinced to stay for the dance. Now, I know what you're thinking: 2 weeks is not enough time for two girls to prepare for a dance. It wasn't.

We originally thought that this dress would be simple enough for us both to make one in time but it took a long time to find any fabric I remotely liked. Then the pattern wouldn't work for both of us and we didn't have time to do mock ups. My friend amazingly fit into the WWII Dress that I made a few years ago and looked fantastic so I only had to make the one dress. I've been working a lot and it was tough to find sewing time while everyone in the house was awake so I sewed all the way up to the minute I left, as per usual. :D


This patterns on the 40s to 50s cusp. It's easy in terms of historical clothing but 1940s stuff is always deceptively a bit difficult due to high end finishing techniques, small details or odd seams. The pattern itself is a little late for WWII but not excessively so. Similar patterns were popular in the 30s as well as after the war.

I was originally hoping to make the dress out of a light linen from my stash but I was a little short and after a voracious search I settled on this cotton fabric. I was hoping for something with a Hawaiian feel as I wanted to wear it as a sundress this summer.


If I was to make it again, I would probably insist on a lightweight linen or satin and I would definitely take the time to make sure it was properly fitted. It ended up being a little big but there wasn't much I could do about it during the time crunch. We never actually got a picture of me wearing the finished dress but I hope this picture of us having fun in the car on the way will suffice.

The dress is not too difficult and can be sewn in a few days. Just be sure that you are following the correct instructions if you want to make the dress with sleeves. So many people I know have accidentally followed the sleeveless version. I've made this dress a second time in a slightly smaller size and it fits much better.


We had a great night and have both been having fun learning to dance to Swing since.  I later made this headband out of the fabric scraps. Haven't worn them together yet but I think it will be cute.

Forgive the frizzy hair the humidity here is crazy!
WWII Dress Sewing Pattern B5209

Hope everyone is having an awesome summer and I hope to be posting more soon!

September 22, 2016

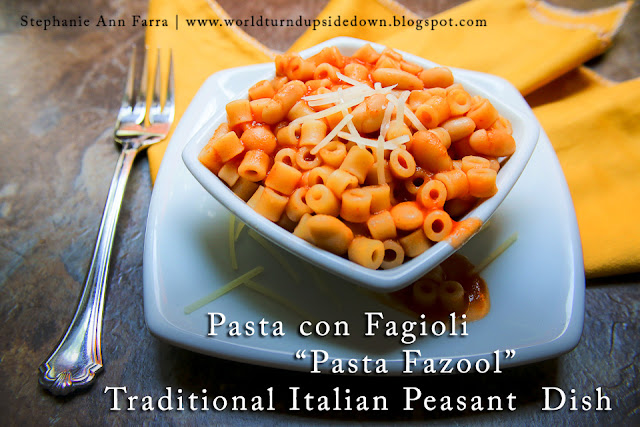
Pasta con Fagioli (Pasta "Fazool") Pasta with Beans Recipe

"Don't be a fool, eat Pasta Fazool"- Gus Van & Joe Schenck (1927)


"Pasta Fazool Recipe" | -1 Box Ditalini Pasta - Olive Oil (enough to coat the bottom of the pan) - 3 1/2 cups/28 ounces of Tomato Sauce of choice* - 1 15.5 ounce can of Navy Beans or Northern Beans  - 1 Small Onion - Salt and Pepper to taste - Grated Parmesan


This recipe was cooked for the Historical Food Fortnightly. A yearly challenge that encourages bloggers to cook a historical food every two weeks. The challenge this time was Ethnic Dishes and I chose to recreate the "Pasta Fazool" of my childhood. This dish was like a warm hug in your belly on chilly nights. My grandmother claimed my mother and her brothers didn't like it as kids but she made it on Fridays because it was cheap, easy and did not have meat in it.

Pasta con Fagioli (Pasta with Beans) has been popular since at least, the 1870s. There are many different recipes for it, some on the soupy side and some on the thicker side. The only real requirement is that the recipe contains both pasta and beans. The term "Pasta Fazool", which is what we always called it in my house, is a relaxed pronunciation of the Neapolitan and Sicilian pronunciation of beans.       

I was torn on this recipe. I wanted to make it the way my grandmother used to when I was a kid. She told me she made it the way that her mother-in-law did but that she had the recipe in a book her mother gave her called The Italian Cookbook (1955.) This book is something special, I've never actually seen it before but it's the kind of cookbook I like to see: brimming with character and frequent use. Some people like their cookbooks squeaky clean with tight spines, but not me. The more newspaper clippings, tears, stains, written annotations, the better. 

However the two recipes didn't match up the way I had hoped. The recipe in the cookbook specified soaking dry beans and making sauce and as much as I wanted to do it that way, it stated in the recipe, I did want to make the equally as authentic Pasta Fazool my grandma made with the time saving elements. 

I stuck with the recipe I had to weasel out of my grandma. (You know how hard it is to get recipes from people who cook, right?) But I will add the ingredients list from the book at the bottom in case anyone wants to try.  

"Pasta Fazool" Recipe | -1 Box Ditalini Pasta - Olive Oil (enough to coat the bottom of the pan) - 3 1/2 cups/28 ounces of Tomato Sauce of choice* - 1 15.5 ounce can of Navy Beans or Northern Beans  - 1 Small Onion - Salt and Pepper to taste - Grated Parmesan


The Challenge: Ethnic Foods (September 9 - September 22) Foodways and cuisine are at the heart of every ethnic group around the world and throughout time. Choose one ethnic group, research their traditional dishes or food, and prepare one as it is traditionally made.

The Recipe:


The Date/Year and Region: 1920s-1950s
Ingredients:


-1 Box Ditalini Pasta
- Olive Oil (enough to coat the bottom of the pan)
- 3 1/2 cups/28 ounces of Tomato Sauce of choice*
- 1 15.5 ounce can of Navy Beans or Northern Beans 
- 1 Small Onion
- Salt and Pepper to taste
- Grated Parmesan

* Alternatively you can make your own sauce with crushed tomatoes, olive oil, oregano, pepper.

How Did You Make It: 


Coat the bottom of a medium size sauce pan, cooking on medium heat. Peel and add the whole onion, cover your pan. Stir the onion around occasionally until the outside of the onion starts to brown. Add the tomato sauce and the beans. Let cook about 10 minutes, stirring occasionally. Cook and drain the ditalini and return to pot. Stir in the sauce and beans. Remove the onion. Add salt and pepper to taste. If too thick, add water. Top with grated Parmesan.    

Time to Complete:
About 20 minutes.

Total Cost: $7.00

How Successful Was It?: Surprised myself. It didn't look like it should have until everything was combined. Tasted delicious.


How Accurate Is It?: Pretty close to grandma's. I did not eat the onion after I removed it although my grandma said that it was the best part. 


Pasta con Fagioli | -1 Box Ditalini Pasta - Olive Oil (enough to coat the bottom of the pan) - 3 1/2 cups/28 ounces of Tomato Sauce of choice* - 1 15.5 ounce can of Navy Beans or Northern Beans  - 1 Small Onion - Salt and Pepper to taste - Grated Parmesan


Ingredients from The Italian Cookbook

-3 Cups Water
-1 1/4 Cups Navy Beans
-1/2 Teaspoon Salt
-2 Quarts Water
-1 Teaspoon Salt
-2 Cups Ditalini Pasta
-1/4 Cup Sieved Tomatoes
- 1 Tablespoon Olive Oil
- 1/4 teaspoon Pepper
- 1/4 teaspoon Oregano
- Grated Parmesan Cheese

February 11, 2016

History of Caesar Salad or Aviator's Salad 1940s Recipe


This recipe was cooked for the Historical Food Fortnightly. A yearly challenge that encourages bloggers to cook a historical food every two weeks. The inspiration for this recipe came from my grandma who recently went out to eat with some family members. She ordered a Caesar Salad which is one of her favorites but she couldn't say anything favorable about it.

"A Caesar salad used to be a big to do. The chef would bring the ingredients to the table and make it fresh in front of you. This one they just handed it to me and the dressing was from a bottle!"

Which got me wondering why this particular salad was such a big deal and how far away from the my grandma's amazing recipe was from the originals. How old is Caesar Salad anyway? Sounded like the perfect recipe to cook for the history detective challenge!

Like with many foods, various people have claimed to be the inventor of the Caesar salad. One would think the dish has obvious old world origins but it turns out it is an American/Mexican invention. The most likely inventor is Caesar Cardini an Italian-American restaurant owner who took advantage of prohibition by establishing Caesar's Palace in Tijuana which attracted people looking to drink legally.

As the story goes, the 4th of July weekend in 1924 was particularly busy. So busy the restaurant started running out of food. Caesar mixed together left over ingredients and tried to make up for the limited dish with fanfare at the table. The dish was made with full leaves of romaine lettuce so diners could eat pieces with their hands in traditional Italian fashion. 

Caesar's brother Alex, made a similar dish, substituting anchovy paste for Worcestershire sauce, which he called Aviator's Salad. His story is that he served it to pilots from Rockwell Field Air Force for breakfast after they drank too much and missed curfew. Alex being a pilot himself during WWI named the dish in honor of the pilots.  Eventually aviator's Salad became more popular and eventually became known as Caesar Salad. (1)  Julia Child's claimed that she remembered being served the dish at Caesar's restaurant in the 20s but not what was in it and by the 1950s it was a household dish.        

The Challenge: History Detective (January 29 - February 11) For this challenge, you get to be the detective! Either use clues from multiple recipes to make a composite recipe, or choose a very vague recipe and investigate how it was made.

The Date/Year and Region: 1924 invented in Mexico, popularized in the 1940s in the US. 

The Recipe

Ingredients:

- 3 cloves Garlic, crushed
- 1/2 cup Olive Oil
- Juice of 1/2 Lemon
- 1/4 teaspoon Dry Mustard
- 1 spoonful of Worcestershire Sauce
-  Anchovy paste, to taste
- 1/4 cup Parmesan Cheese, freshly grated
-  Black Pepper, freshly ground as a garnish 
- Croutons
- 1 lb Lettuce  

*Grandma says some places added a coddled egg but it's not necessary. Strangely this is my grandfather's recipe. It said so on the crumpled up recipe my grandma gave me. She said he liked it so much he convinced a chef friend in Philadelphia to give him the secret recipe.  

Instructions: Squeeze the garlic in a garlic press, straight into the oil. Add the lemon juice, mustard, Parmesan cheese and Worcestershire Sauce. Add the anchovy paste to taste. Wash and dry your lettuce, keeping the leaves full if you want a finger food or chopped if you want to use a fork. Add croutons to thee lettuce and pour on the dressing then top with freshly ground pepper.    

Time to Complete: A few minutes regardless of what Dorothy Kilgallen wrote in the newspaper in 1948 about the popular dish from California " tak[ing] ages to prepare."

Total Cost: A few dollars.

How Successful Was It?: Very successful. This recipe will have you wondering how we can even call that stuff in the bottle Caesar dressing.

How Accurate Is It?: I used the coddled egg but having had it without the coddled egg, it really doesn't need it. The traditional recipe calls for lime juice instead of lemon but it seems almost immediately other restaurants were using lemons instead due to a mistranslation.   

February 19, 2013

The Supersizers Go...

Book of Household Management, 1861
I know I am routinely behind on all things television and movie related but I can't help but point out this interesting series for historical foodies called "The Supersizers Go." It's a BBC series from 2007 in which the hosts spend time eating in ways of the past.  I was introduced to the series through another blog that I can't for the life of me find right now. (If it's you, leave a comment. :) )


Everyone into history has at least wondered what would happen if we ate like our forefathers for an extended period of time. Would we be healthy? Would it taste good? Would we gain weight? Would we lose weight? Would our teeth fall out?


This is a great series because it answers those questions and you don't even have to be the human guinea pig.

During the series the "supersizers" go: Elizabethan, Regency, Restoration, Victorian,WWII, and the 1970s. Even though some things in the series are a bit (or a lot) questionable, it's still a very fun watch. If you like the series, they've also made a second called "The Supersizers Eat," but I have yet to get around to that one.   

The good thing about being so behind on TV is that the series is so old, you can find it all online.

July 14, 2010

A Recipe from my Great Grandmother

My Grandmother was trying to find a recipe for me from my Great Aunt Ann for Perogies. We couldn't find it today--she has a lot of recipes! She did pull out this recipe for crabcakes and said "This is my mother's handwriting."

I looked at it, scrawled in green pen, her handwriting is much sloppier than my grandmother's. The recipe was nothing special; there was no ingredient list and there were blue ink annotations correcting the measurements.

What I found very fascinating, living in the modern, disposable age, was that the paper it was written on. The recipe was written on the back side of an order form from the "Stork Diaper Service."

"How long ago did you use cloth diapers?"

"Oh, a long long time, now you can use the disposable ones," she said."
She looked at the back of the recipe and said "This must have been when Uncle Freddie used to work there."

" I'm thinking of using cloth diapers, when I have kids," I said with a smile.

She looked at me with horror and said the first curse word I have ever heard from her in my 22 years-- "No, they were horrible! It was just a rag! You had to send them away all S***ty and they'd clean them there and send you back the same number your sent them. They would sanitize them. Don't tell your mother, I still have two of hers."

She went up to her rag drawer and pulled out two white rags.

"I use them for the windows. They soak up a lot more than normal rags."

The cloth diapers would have been from the 1950s and my Grandmother said the recipe was probably from around the same time. She tried to remember how to wrap the diapers.

"The extra fold goes in the back for girls and in the front for boys. That's all I remember. And you had to make sure you didn't pin the baby."

We tried wrapping the cloth diaper on Pinocchio, another relic from the 1950s. We weren't very successful, and she reiterated that I should use disposable ones when the time comes.

"They are very expensive," I said.

"It's well worth it!"

I guess it is true because statistics say that in the 1950s, 92% of babies were toilet trained by the time they were a year and a half old. Today only 4% are toilet trained by that time. There is an interesting article here about this: Cloth Diapers. I am guessing that this would have been true in years before as well. No one wanted to carry around a messy baby. Imagine the ruined clothing!

Diapers seem to have been a thick cloth for the most part in history
The book, Babyhood from 1891, mentions that cheesecloth diapers are better than cotton ones and that you should put one diaper folded up inside of the "wrapping diaper."

Only at Grandma's can you go in looking for a recipe and end up putting a Nappie on Pinocchio.  

 The Crab cake Recipe:
"Fry onions + celery together in [1 TB] Butter until tender then add 1 can Crab Meat stir it good then [1/2 cup] 1 qt. milk bring to a boil, then take it off the stove and stir in [2 TBS] 1 Cup flour, do not dilute the flour, stir it in dry, then a little soy sause, salt + pepper or if you have Chicken Boullion it gives a nice flavor, make This The day before you use it Then its eas-ier to bread you Take a spoonful and roll it in Bread-crumbs."

Copyright © 2008-2020 Stephanie Ann Farra. All rights reserved.

All materials posted on this site are subject to copyrights owned by Stephanie Ann Farra. Any reproduction, retransmissions, or republication of all or part of any document found on this site is expressly prohibited, unless the author has explicitly granted its prior written consent to so reproduce, retransmit, or republish the material. All other rights reserved.