December 22, 2019

Civil War Fruit Cake Recipe -150+ Years Old!


Fruitcake. I'm young enough to have never encountered a fruitcake in the wild. Its reputation had been cemented before I was a child. Likened to paper weights and door stops, fruitcake has disappeared from tables.  The theory that there is only one fruitcake in the world and people just keep regifting it to each other has expedited its demise.

Still there are diehard fans who can't have Christmas if there is not a fruitcake and I'm apt to believe that the real reason for the demise is the cost and care they take to make in a world that increasingly values quick and cheap.

Fruitcake has a long history. Nutritionally dense and long lasting, fruitcake like mixtures date back to at least Ancient Rome, but the modern recipe has its roots in the Middle Ages.  Richard Briggs includes a recipe for "Plum Cake" in his 1788 cookbook The English Art of Cookery that includes all the hallmarks of what we would call a fruitcake todayIn 1840, Queen Victoria and Prince Albert's wedding featured a highly decorated, 300 pound fruitcake popularising the choice for many future brides. By the 1860s fruitcake was a classic choice for Christmas and weddings.

This is my first attempt to make a fruitcake so I tried to find a simple recipe. I asked on Facebook what time period fruitcake I should make and many wanted to see a Civil War Fruitcake. So here it is. The recipe is from Godey's- the June edition as fruitcakes generally need to cure from 1 month to 6 months for the best flavors.


The recipe was very simple so I looked to E.F. Haskell's The Housekeeper's Encyclopedia (1861) for information on how to mix and bake the cake:
Rich Fruit Cake.—One pound of sugar, three-fourths of a pound of butter, worked together until very light; one wine-glass of brandy, one dozen ground cloves, half a nutmeg, a teaspoonful of ground cinnamon, ten eggs beat separately, the yolks to be used first, and afterwards the whites, one-fourth of a pound of sliced citron, two pounds of washed currants rubbed in flour and mixed in the cake with one pound of raisins cut fine, and one seeded and left whole or cut once, and one pound of sifted flour; stir in the citron, currants, and the chopped raisins, and lastly, the flour and whole raisins alternately; bake in a moderate oven in deep basins two hours. If the fire is strong, the heat should be decreased the last hour. Line the basins with buttered paper, and keep a piece over the top of the cake. Frost it and it will keep two months or longer if desired.

I ended up lining my pans with buttered paper and frosting my cake. I was interested in using rum to keep my cake soft so I did not try frosting it before storing it.


Civil War Fruit Cake


Ingredients:

- 2 Cups Butter
- 2 Cups Molasses
- 2 Cups Sugar
- 6 Eggs
- 2 teaspoons Baking Soda
- 1 Pound Raisins, Chopped
- 1 Pound Currants, Chopped
- 1/2 Pound Citron, Chopped
- 1 teaspoon Salt
- 1 Tablespoon Nutmeg, Ground
- 1 Tablespoon Cinnamon, Ground
- 1 teaspoons Cloves, Ground
~ 6 Cups of Flour


Instructions:

Preheat oven to 325°F.  In a mixing bowl, cream the butter, molasses sugar, salt, nutmeg, and cloves. Add a little water to your fruits and mix in a little flour to coat the fruits. Alternatively add fruits and mix in  flour to make a stiff batter. Beat your eggs and fold in at the end. Line your pans with buttered paper. Fill pans 2/3 of the way with batter and cover the tops with greased paper. Bake for 1 hour to 2 hours depending on pan size. Test the middle with a skewer.

This made 6 3x6 sized loaves. I baked them for an hour and 15 minutes.

Sorry for the cell phone pics.

The day after they were baked, the tops were hard. I used a skewer to poke holes half way down into the cakes and spooned rum over. I left the paper on and wrapped the cakes in plastic wrap then put them in a plastic container. Historically they would be wrapped in paper and kept in an airtight tin but I couldn't find one big enough. Some people wrap them in alcohol soaked cheesecloth first. I tried coating them with rum weekly unless they seemed soggy, then I skipped a week.

It is rumored you can keep fruitcake good for up to 25 years by storing them in powdered sugar. They apparently do last forever. There was one found from Robert Falcon Scott's expedition to Antarctica in the early 1900s that still appears to be edible and one being passed down from the Ford family for over a century.
 
There are 6 of my fruitcakes floating around in the ether and I hope to update you after everyone has tried them. I won't be trying mine until Christmas Day but will update with a photo when I cut mine open. I gave everyone the drunken fruitcake disclaimer. Can't get drunk off cake? Check out this article by Stuart Heritage who decided to not only answer the question "Can you get drunk off of fruitcake?" but the question of "How drunk?" I hope everyone has a good holiday and I'd love to hear if anyone tries this recipe.


UPDATE: I've updated with a picture of the inside. We ate this on Christmas and it was overall not bad. I didn't pour a final bit of rum on it before icing it I wish I had. It felt kind of soggy on the top and I didn't want it to be soggy. The flavor was nice an mild. I thought the flavors would be strong but they were very delicate and the fruits practically melted into the cake. The raisins definitely disappeared! I have one cake left so I'm going to keep feeding it and test it in 6 months to see if the flavor changes any. 

December 11, 2019

Chewable Eggnog? World War II Era Eggnog Pie Recipe, Old Fashioned Taste

World War 2 Christmas recipe

I'm not a fan of eggnog but it is mostly the texture that I don't like. This piqued my interest. Would I like the flavor with a different texture? By chance, I had everything at home to make this so I did, even though I had no event to serve it at. This recipe is from Good Housekeeping Magazine Party Cook Book (1941) and is quite tasty.

I would highly recommend topping this with candied or maraschino cherries. I only had some of these leftover cranberries in the house but boy, are they sour! If I was to make this again, I would add about 1/3 a cup of sugar to the whipped cream and cover the whole pie with it, then top with some cinnamon and nutmeg. The custard was a little less sweet than I prefer but a second opinion said that they appreciated it was not sweet. It ended up having a flan like consistency that's actually quite nice and light. Even this vintage santa came down the chimney to steal a slice.

World War 2 Christmas recipe


Ingredients:

Crust:

-1 1/4 Cup Graham Crackers, finely rolled
- 1/4 Cup Sugar
- 1/4 Cup Butter
- 1 Tablespoon Water

Combine graham crackers crumbs and sugar. gradually add to soften butter and stir in water. Press into a 9 inch pie plate and bake in a preheated oven at 325 °F for 10 minutes. Let cool.

Filling:

- 1 1/2 Tablespoons Gelatin
- 2 Cups Milk
- 2 Eggs
- 1/8 teaspoon Salt
- 3 Tablespoons Brandy or Brandy Flavoring (I used Rum)
- 1/2 teaspoon Nutmeg, ground

Soak the gelatin in 1/4 cup of the milk and set aside. In a double boiler on medium heat, scald the rest of the milk.

Warm your eggs in a bowl of warm water. Separate the whites from the yolks into two bowls. Beat the yolks slightly and mix in 1/3 cup sugar and salt. Pour the scaled milk over the yolk mixture while stirring. Return the mixture to the double boiler and stir constantly until the custard coats the spoon. Remove from heat and stir in the the soaked gelatin until dissolved.

Beat the egg whites stiff and stir into the custard. Fold them into the custard and add the brandy/rum and the nutmeg. Chill until the mixture begins to stiffen. Pour into the baked crust and chill in the refrigerator until set.   

Topping:

- 1/2 Cup Heavy Whipping Cream
- 1-2 Tablespoons Brandy (Rum) if desired.

Mix the cream with the flavoring and whip until whipped cream. Coat the top of the pie with it. Serve chilled.


**To simplified this recipe you can buy a premade graham cracker pie shell and premade whipped cream. I won't judge. If you have never made a custard before, it's helpful to read this guide.**


November 13, 2019

WW1 Recipes to Help Rebuild France: Serbian Sarma


This recipe is from the book Allied Cookery (1916), a book written to raise funds to support World War 1 victims in France. It contains recipes from the allied nations. It was the work of Gertrude Clergue and her sister Grace Harrison who were born of a French father and American mother.  Clergue, was awarded the Medal of French Gratitude in 1920 fr her efforts. The funds would help rebuild farms and eventually the food supply in the war torn areas:

Unfortunately the list of calamities that have melted on France does not do not stop there: all the territory invaded by the German troops, from which they have been driven, which goes from the Marne to the Aisne, and that covered hundreds of prosperous villages in one of the regions the most fertile and richest in France, was ravaged by enemy troops. The owners of these thousands of farms - old men, women and children - have returned to their homes destroyed to raise their houses and have the land produced food they need. They lost everything: houses, furniture, clothes, animals, farm implements.

The book was reprinted in 1917 and 1936. I'm not an authority on Serbian cooking and I can't claim that this recipe is the most "authentic one." The book was published in mostly English and intended for American and Canadian audiences but looking at the recipes they do seem to match up on a basic level with foreign foods at the time. Some recipes use picked cabbage instead of relying on sauerkraut for the kick.

It is delicious and I can't wait to make this again. I walked in with the cabbage and my Grandma told me to bring down the extra because she would make stuffed cabbage. I said I was making stuffed cabbage and she was way more interested in having me do it. :)


WW1 Serbian Sarma


Ingredients:

- 1 Head of Cabbage
- 1 Cup of Rice
- 2 Pounds of Ground Beef
- 2 Pounds of Ground Pork
- 5 Onions, chopped
- 4 Egg, beaten
- Sauerkraut
- Salt
- Pepper
- Spoonful of Flour
- Spoonful of Paprika
- Lard/ shortening


Instructions:

Boil a pot of water,remove from heat and carefully add your cabbage.  Fry your onions in a large frying pan in a spoonful of lard/shortening. (Remove one onion's worth to a separate bowl to use for the sauce.) Mix in the beef, pork, eggs, salt, pepper and uncooked rice until well combined. Set aside.

Carefully remove your cabbage from the water. Pat dry and remove the leaves.

Fill each cabbage leaf with two spoonfuls of filling and fold in the two sides and the top and bottom to form a little packet.

Fill the bottom of a deep casserole dish with some sauerkraut and the juice. Place the filled cabbage leaves in the dish, layering sauerkraut and cabbage leaves. Cover and bake for 45 minutes at 325.

Put the remaining onion into a frying pan on medium heat. Saute the onions in a spoonful of lard and add a spoonful of flour, a spoonful of paprika, and a cup of water. Cook until it thickens. Pour over the cabbage leaves and bake for another 15 minutes. Top with sour cream when serving, if desired.


***I used Impossible Burger meatless and Vegan Field Roast Frankfurters for this. I also halved the "meat" in the recipe, used vegetable shortening instead of lard and smoked paprika. You certainly could bake or cook it on the stove for the full two hours.***


Here's a video if you want to see the "pot" sarma is supposed to be baked in. I didn't have one so had to make do with a good ol' casserole dish.


Harrison, Grace Clergue, and Gertrude Clergue. Allied Cookery, British, French, Italian, Belgian, Russian. New York: G.P. Putnams Sons, 1916.


October 23, 2019

World War 2 Era Bismarck Tea Ring


"OH NO! That looks nothing like the picture!" Yes, that happens sometimes but everyone said to bring it to the event anyway. It wouldn't be right if I didn't share the failures as well as the successes. It tasted fine but wasn't as pretty as it could have been.

I kneaded the biscuit dough about 5 minutes before I realized it was only supposed to be for 30 seconds. The damage had been done. It was near impossible to roll it out to a nice 1/8 of an inch dough. No pretty swirly rolls for me. The flavour was there but the result turned out to be kind of blobby. It wouldn't have been in the spirit of World War II if I threw it out and started over. All that flour and butter!

I ended up making and using apple jelly instead of raspberry as I had apples browning in my fruit bowl and was trying to keep the costs down. It might not look as pretty as it should but it tasted good. It was less sweet than we're used to but that could be fixed by an extra sprinkle of sugar over the jelly before rolling.


World War 2 Era Bismarck Tea Ring


Biscuit Dough


- 2 Cups sifted Flour
-2 teaspoons Baking Powder
- 1/2 teaspoon Salt
- 4 Tablespoons Butter or Shortening
- 3/4 Cups Milk

Mix flour, salt and baking powder and sift. Cut in the butter or shortening and add milk slowly until a dough is formed. Flour your hands and knead for 30 seconds or until all is combined. Roll out on a lightly floured piece of parchment paper on a cookie sheet until the dough is a rectangle about 1/8 of an inch thick.

Filling 


-1/2 Cup Raspberry Jam

Glaze


- 1 Cup Powdered Sugar
- 2 Tablespoons Milk
- 2 Tablespoons Raspberry Jam

Instructions:

Preheat oven to 400° F. Spread a thin coat of raspberry jam on the dough. If you make it thick, it will slide out and make a mess. Starting at one long side of the dough, carefully roll it up until you have a log. Bend the two ends together to form a circle and cut 1 inch slices (leaving some dough to keep it in a ring). Twist each slice so the cut edges are facing up. Bake for 30 minutes on a parchment lined cookie sheet. Remove to a cake rack. Combine jam, sugar and milk to make a glaze. Drizzle glaze on the top with a spoon and serve warm.


A bunch of us looked at the original photo and aren't entirely convinced that the hole in the center wasn't cut out after it was baked. Some theorized it might have been baked in a bundt pan. My ring baked solid so I did what you're supposed to do when you cook a blob: covered it in gaze. I'd love to see what you end up with if you try it. If I make it again, I'll update with the results. This recipe is from 10 Steps to Perfect Baking (1937.)  

October 9, 2019

World War II Pumpkin Pie Recipe

WW2 Recipes Pumpkin Pie

I'm still a beginning pie baker and my grandma had no tips. She never learned to make crust and I've never been very good at it either. The 1940s baker could be economical and make pie crust from scratch but packaged pie crust mix was available. We may or may not have cheated.

This recipe is from Recipes for Good Eating (1944). The booklet suggested pre-making bulk crust mix and using as needed, as their recipe called for Crisco instead of butter and would not spoil in a container in the cupboard. The texture is less firm than modern pie but still has a good flavor.

Nearly 20 million Americans grew Victory Gardens to help with food shortages. The Us Department of Agriculture estimates that citizen growers  grew over 40% of the vegetables grown in the US at the time. I was going to make a victory garden on the pie but it ended up being a big pumpkin patch, which is okay because pumpkins are easy to grow and feed a lot of people.  The Victory Garden Handbook (1944) by the Pennsylvania State Council of Defense recommended them as a good source of Vitamin A, Thiamin, Calcium, Vitamin B and Iron. I recommend them because they are delicious.

WW2 Recipes Pumpkin Pie
Rosskam, Louise, photographer. Washington, D.C. Victory gardening in the Northwest section. District of Columbia United States Washington D.C. Washington D.C, 1943. May. Photograph. https://www.loc.gov/item/2017853905/.
  

World War II Pumpkin Pie Recipe


Ingredients:

- 1/2 Cup Sugar
- 1/2 teaspoon Salt
- 1 teaspoon Ginger
- 1 teaspoon Cinnamon
- 1/4 teaspoon Cloves
- 1 1/2 Cups Pumpkin Puree(canned or homemade)
- 2 Eggs
- 1 1/2 Cups Hot Milk
- Pie Crust

Instructions:

Preheat your oven to 425°F.  Line your 9" pie pan with a crust.

In a mixing bowl, mix sugar, spices salt, pumpkin.

Beat the eggs and add them to the mix. Then stir in the hot milk.

Pour the mixture into your pie crust. Bake for 15 minutes

Reduce heat to 350 °F.  and bake for 30 minutes or until done in the middle. Let cool in the open oven for 15 minutes, then on a counter for 4 hours. Drizzle with chopped nuts and honey before serving.


I baked the crust decorations on parchment paper in a separate pans. Modern custards that use heavy cream can hold decorations during baking but I didn't want to risk it here as the batter was very thin before baking.

WW2 Recipes Pumpkin Pie

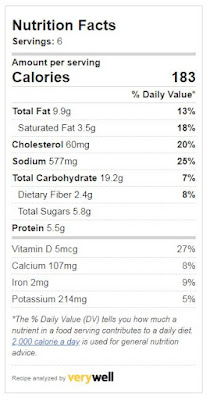
Wee used a 0 calorie sweetener for a second pie. Here are the nutrition facts if you want to do that.


WW2 Recipes Pumpkin Pie
If you make this pie, I would love to see photos!

October 2, 2019

WW2 Herbal Remedies Your Grandmother Knew (and a Few You Wish She Didn't)

Historical WWII ww2 medicines


The Old Herb Doctor is an advertising book published in 1941. The aim was to sell prepared tinctures but the book includes many herbal remedies submitted by readers all over the US. Food was not the only thing rationed during WWII. Medicines were being produced in bulk for use overseas, leaving people on the home front to make-do or find another way. This book likely sparked interest in those trying to fill the gap left open once some of the chemical medicines no longer available to the general public.

Herbal remedies from World War 2. Medicine was rationed. Women on the home front were learning to make do, find new ways or rediscover old ways to treat illnesses.

Herbal Remedy Excerpts from the book The Old Herb Doctor:


For Diarrhea -- Take Allspice and boil in water, take when cold 1/2 teaspoonful of the spice to half cupful of water. Writes Mrs. F.E., Munday, Tex.

For Cramps, bathe the feet in Wintergreen Leaves, with a handful of Common Salt, using water just as warm as the flesh will stand, but don't wipe the water off; just let it dry. This was given to me by an Indian Woman 86 years old and a wonderful woman. Writes N. W., Alma Center, Wis.

Cramps-- Here is a recipe for Cramps and ailments of the stomach, also for Colds when you can not sleep. I am sure anyone will find it useful. Two teaspoons of Catnip. Pour on 1 cup of boiling water, and let stand a few minutes. Then drink contents hot, sweetened with sugar to suit yourself, at bedtime. Writes Mr. W. D., Matawan, N.J.


Historical WWII ww2 medicines
Catnip

Old-Fashioned Fruit Laxative --
1 pound Prunes, 1/2 pound Figs, and the same amount of Dates and an ounce of Senna Leaves. Remove pits from fruit and chop altogether, mold into bars or small sticks and dry. Dose--a piece the size of a hickory nut for an adult, less for a child. This formula will keep all winter. Writes Mrs. M.P., Cleveland Ohio.


Bull Nettle Cough Syrup- Take a large handful of the dried roots of Bull Nettle, put in a quart of water, boil down to a pint and strain. Add enough sugar and boil to a syrup. Take a tablespoon every hour until relieved. Dose--for children, 1 teaspoon every hour. Writes Miss T.R., Henryville, Tenn.

To Break Up a Cold-- Take 4 lemons and roast in oven until the juice comes through the skin, remove all the juice from them, and strain. Take 3 Tablespoonfuls of Horehound and steep in water, then strain and add enough water to make a thin syrup. When cold add the lemon juice and bottle. Writes Mrs. G. L. Pontiac Mich.
Historical WWII ww2 medicines
Horehound

During the epidemic I contracted the Flu and could not obtain a doctor. I ordered a strong brew of Boneset tea, mixed with lemon juice and sugar, and in the meantine I wrapped up in a blanket, then drank it as hot as possible. Writes M.E.S., Englishtown, N.J.

Here is a recipe for colds, coughs and hoarseness. The following is soothing, and healing to most ordinary coughs and colds. One pint of boiling water, two ounces whole flaxseed and the juice of two lemons and sugar. Writes Mrs. A.B., Harper, Wash.

Coughs-- Take a double handful of Pine Needles to a quart of water, boil for 15 minutes, strain and add 1 1/2 cups of sugar, boil to a thin syrup. This is excellent for coughs: take 2 teaspoonfuls night and morning. Writes F. S., Mena Ark.

For Earache-- Pour hot Olive Oil in ear and in a short while the pain will have vanished. Writes M.K., boston, Mass.

My Recipe for Burns-- Use linseed Oil on burns of any kind. Have used it for years, and there will be no blister. Writes Mrs. M. B., Manchester, Tenn.


And a few you might want to pass on:

For Congested Bowels-- Warm half pint or very near that amount of the best Olive Oil. Put in a fountain syringe and inject to bowel. It is best to raise the person a little so the oil will stay in the bowel, but if the pack is low down it won't stay. This is a sure remedy that will do the work. It takes a few hours for the oil to soften the stools, but if it stays in the bowel it will. I relieved many a person with this. Writes L.W., Cold Springs, Mo. 


Take skunk oil, be sure it is genuine. Warm three or four drops and put in ear, let run down good and then put in cotton loose. I have never heard of a case where it did not stop the earache. Writes A. D. D., Sedalia, Mo. 


DISCLAIMER: All information contained in this site is provided for informational purposes only, and should not be construed as medical advice or take the place of a doctor. Use at your own risk. For further research please check: Web MD. All of the excerpts above are quoted directly and do not necessarily reflect the beliefs of the webmistress.

September 25, 2019

Colonial Era Cold Remedy That Actually Works: 18th Century Elderberry Syrup


1700s Remedies Elderberry Syrup

It's the middle of September in 1774, your mother is sick and has sent you out to collect elderberries to make syrup. You know just where to find them as you have a favorite spot. You fill your basket and turn to leave but eye up a particularly nice stalk that you can hollow out later.

By the 1700s, Elderberry (Sambucus) was a well known plant. Herbal manuals from the 1600s include it, and it was a favorite plant among young boys for making, of all things, popguns. The berries were also used for making wine. Elderberry wine was a main ingredient in a remedy printed in The Family Physitian (1696) to help treat scurvy in the winter when "herbs are scarce." Elderberry wine and honey make a very simple cough suppressant if you didn't feel like making elderberry syrup.   


You could use sugar instead of honey in this but I prefered to have the extra antibacterial properties of honey. Elderberry is still being studied but there have been a lot of promising studies that support  the healing properties of elderberry in shortening the duration of cold and flu symptoms.

18th Century Herbal Remedy: Elderberry Syrup


Ingredients:

- 1/4 Cup Elderberry Extract
- 3/4 Cup Honey
- 3 Cups of Water

Or

- 2/3 of a cup of berries (fresh or frozen and defrosted)
- 3/4 Cup of Honey
- 3 Cups of Water

Optional Ingredients:

Ginger, cinnamon, and cloves.

Instructions:

Mix all ingredients together and bring to a boil, reduce heat and simmer until the mixture is reduced by half. Pour into a bottle and let cool. If you used whole berries, crush them with a spoon, and strain into a bottle, let cool before use.  Take a Tablespoonful by mouth 3 times a day or mix the syrup into tea. You can refrigerate the syrup for up to 3 months or freeze them into cubes and use as needed.

For those of you asking if you can just buy it ( I get it, you're sick) I have used and recommend this brand: Gaia Black Elderberry 

If you are planning on buying I would greatly appreciate if you would use the affiliate links above. It doesn't cost you any more but helps me keep the website running.


DISCLAIMER: All information contained in this site is provided for informational purposes only, and should not be construed as medical advice or take the place of a doctor. Use at your own risk. For further research please check: Web MD.

~~~~~~~~~~~~~~~~~~~~~~~~~~~~~~~~~~~~

Colonial Popguns 


If you've found your way to this page I'm assuming you're sick and since you're sick anyway I thought you might have fun passing the time reading about popguns. I have always been curious about what they would look like in the 18th century and how they would work. Making popguns has been a children's pastime for hundreds of years, only to be lost recently. The popguns in the 18th century likely looked and functioned something like this:


Be sure to watch this video of this gentleman having some fun with his homemade, elder popgun and apple chunks. Hope you feel better soon! Have you tried Elderberry Syrup? How did it work for you? Be sure to leave a comment with any elderberry tips you have. 


September 18, 2019

Civil War Pumpkin Bread Recipe from the Confederate Receipt Book

Civil War Recipes Bread Substitute Confederate 1863


The blockade hit hard. Wheat prices rose fast. Speculators hoarded flour. By 1863, women were rioting in the streets of the South because they couldn't buy bread. The Richmond Examiner (1865) reported that shops were selling bread in 3 sizes: "The first is only visible by microscopick aid; the second can be discerned with the naked eye, and the third can be seen with outline and shape distinct."

Southerners rushed to show off their ingenuity by using substitutes for wheat and relied heavily on cornmeal but people soon tired of substitutes and worked to try to figure out more complex substitutes that better mimicked the real articles. Soldiers and civilians alike wrote about being sick of corn bread.

Sarah Morgan, expressed her joy of having received real bread in New Orleans in 1863:

One woman who has recently joined us has nothing except a matress... But then, we got bread! Real, pure wheat bread! And coffee! None of your potato, burnt sugar, and parched corn abomination, but the unadulterated berry! I cant enjoy it fully though; every mouthful is cloyed with the recollection that Lilly and her children have none.

This recipe is from The Confederate Receipt Book (1863.) The pumpkin in this recipe is used as a substitute for milk, eggs and butter and to help mask the taste of cornmeal. It has a slight taste of pumpkin but you might not even realize there is cornmeal in it. Topped with a little butter and molasses, it does taste surprisingly like regular wheat bread.

Civil War Recipes Bread Substitute Confederate 1863

Civil War Pumpkin Bread Recipe


- 1 Cup Pumpkin Puree (fresh or canned)
- 1 Cup Cornmeal
- 2 Cups Bread Flour
- 1 Package of Yeast dissolved in 1/4 cup of warm water (105°F-110°F)
- 1 Tablespoon Molasses
- 1 Teaspoon Salt

In a medium sized bowl, mix the dry ingredients then add the wet ingredients. Knead on a floured surface for 6-8 minutes adding flour to make a soft dough. Place in a greased bowl and cover with a warm, wet cloth and set in a warm spot for 30 minutes to let it rise. Punch down the dough. Grease your bread pan(s) and form a loaf in it. Let it rise in a warm spot, covered with a wet cloth for an hour. Preheat oven to 375°F and bake for 20-30 minutes. Remove from pan and cool on a cooling rack.

 **I made 3 small loaves which baked fully in 20 minutes.

Civil War Recipes Bread Substitute Confederate 1863


My site uses affiliate links. If you are planning on making a purchase, I would greatly appreciate if you would use the affiliate links above. It doesn't cost you any more but it does help me keep the website running. Thanks!

September 12, 2019

Easy World War 1 Bran Muffins Recipe

World War 1 Recipes Bran Muffins WW1

This recipe is from the book Allied Cookery (1916), a book written to raise funds to support World War 1 victims in France. It contains recipes from the allied nations. I spent last week in New England and we had bran muffins with butter. It was my first time there although I've lived fairly close by my whole life. I was happy to find this New England Bran Muffin recipe which contains no butter, sugar or eggs and thought it would be a fun recipe to try out.

My grammy and I mixed this up in her kitchen and I'm not going to lie, it looked like something you might remove from a sloppy gerbil's cage. They didn't rise much and also didn't look very pretty until they cooled about 5 minutes. This makes 6 extra large muffins or 12 regular muffins. We used these pans here if you are in the market and want to support me: Jumbo Baking Pans.

They were surprisingly tasty, filling and healthy. My grammy said she used to add bran to her meatballs when my mom and uncles were young because they wouldn't eat it otherwise. She also said this was the sort of this promoted during "her war," (World War 2) as you "just couldn't get sugar."


World War 1 Recipes Bran Muffins


Easy World War 1 Bran Muffins Recipe


Ingredients:


- 2 Cups Bran
- 1 Cup Flour
- 1 Cup Milk
- 1/2 Cup Molasses
- 1 Tablespoon Baking Powder
- 1/4 Teaspoon Salt
-1/2 Cup Raisins (if wanted)

Instructions:

Preheat the oven to 400°F. Mix dry ingredients and slowly mix in wet ingredients and raisins. Butter a muffin pan and fill pans 1/2 way with batter. Top with a few raisins if desired. Bake for 20 minutes, remove and let cool on a cooling rack.


September 5, 2019

Civil War Era Cheesikins Recipe, What?


Yes, I made this recipe just because of the name, and yes, it's an early cheese-based nibble snack. This recipe if from Cre-Fydd's Family Fare (1864.) A very similar recipe for cheesikins was printed in Godey's Lady's Book in 1865 as well.

The book gives a suggestion about how to serve the cheesikins, as a side dish to lamb and veal. They have a strong flavor from the mustard and pepper. I can't see eating a ton of these in one sitting but they are a nice change of pace that could be used to make an otherwise bland meal a bit more exciting  while using up stale bread.


Civil War Era Cheesikins Recipe


Ingredients:

- 4 ounces (1 cup) Parmesan Cheese (freshly grated)
- 3 ounces (3/4 cup) Breadcrumbs
- 4 Tablespoons Butter
- 2 Eggs, beaten
- 1/4 teaspoon Cayenne Pepper
- 1 teaspoon Ground Mustard
- 1/4 teaspoon White Pepper


Instructions: 

Mix all ingredients in a mixing bowl, cover bowl with a cloth and let it sit for an hour.  Preheat oven to 400°F.  Knead the dough, roll out to 1/8 inch and cut into triangles. Bake on a cookie sheet for 16-18 minutes.  

August 27, 2019

18th Century Lemon Cheese Recipe from The Cookbook of Unknown Ladies

18th Century Lemon Cheese Forgotten Recipe

I was excited to try this recipe. I have yet to see anyone else attempt it and it is from a handwritten recipe book in Westminster City Archives in London known as the Cookbook of Unknown Ladies. Little is known about the recipe book or the women who contributed to it only that it was written by "various unknown women about the year 1761," as is printed on a title page.  Be sure to check out all of the recipes from The Cookbook of Unknown Ladies.

This was a mystery recipe.  I can generally read and approximate what the finished product of a recipe will be. For this recipe I didn't have a clue. I thought it sounded most like a cream cheese but it was whipped before being hung to separate the whey out. Would that make a difference? My grandma and I kept testing it throughout the process to try and get an idea of what it would turn into.

I was very afraid that the minute I added lemon to the cream that it would separate the way it does when making cheese but it didn't. I waited until the cream was whipped then quickly stirred in the juice and the rind.

It turned out that this makes a spread that tastes like a delicious lemon cheesecake. It was delicious on the 1796 pound cake I happened to make the same night. It would also be good on scones or toast.

Excerpt from The Cookbook of Unknown Ladies:


Lemmon Cheese
A qurt of good thick sweet creame. Put to it the juce of four lemons as as mutch peel as well give it an agreeable flavour. Sweeten it to your taste & add a littile peach or orange flower water if you like it. Whip it up as you would for sellabubs but very solid. If you have a tin vat, put a thin cloath in it & pour in your cream. If not, put it in a napkin and tye it pritty close. Hang it up to let the whey run from it. Make it the night be fore you use it. Garnish it with currant jelliy or candied oranges.


Ingredients:

- 16 ounces Heavy Whipping Cream
- 2 Lemons (Juice and Peel)
- 1 Tablespoon  Orange Flower Water
- 2+/- Tablespoons sweetener (Sugar, Honey, Molasses, )

Instructions:

Zest and juice your lemons. Put cream in large bowl, add sugar and orange flower water and whisk until you have whipped cream. Stir in lemon juice and peel gently to avoid over whipping. Pour into doubled cheese cloth and tie it up. Hang it overnight. In the morning press all the remaining juice out with your hands, make into a ball or press into a mold and serve with jelly or candied oranges.


I had this hanging over a bowl in my living room and my puppy was terrified of it.

If you haven't used cheesecloth before, I recommend paying a little extra to get the kind that you can wash and reuse: Cheesecloth. 


My site uses affiliate links. If you are planning on making a purchase, I would greatly appreciate if you would use the affiliate links above. It doesn't cost you any more but it does help me keep the website running. Thanks!

August 20, 2019

Amelia Simmons' 18th Century Pound Cake Recipe


We had a little teaser of fall over the last few days but that light breeze has been replaced with an Indian monsoon season. Again. I haven't wanted to look at the oven, let alone turn it on. I took advantage of the nice weekend weather to get a little baking done.

This recipe is from Amelia Simmons' cookbook American Cookery, famous for being the first American written cookbook intended for American cooks utilizing the ingredients local to them.

This is a true pound cake recipe. A true pound cake is a cake made from a pound of flour, a pound of butter, a pound of sugar and a pound of eggs. Traditional pound cakes do not use any additional leavening agents and rely on the eggs to puff them up a bit. This recipe gives the vague "spice to taste" so I had to do a little rummaging to see what spices were popular in cakes like this and settled on cinnamon, nutmeg and carraway.


18th Century Pound Cake 


Ingredients:

- 2 Sticks Butter (1/2 Pound)
- 1 Cup Sugar
- 2 Cups Flour (3+ if you you don't have small tins and want to bake them "cookie" style)
- 1/3 Cup (2 ounces) Rosewater
- 4 Eggs
- 1 Teaspoon Cinnamon
- 1/4 teaspoon Nutmeg
- Caraway Seeds

Instructions:


This is only half the recipe which made about 20, 3 inch cakes.

Preheat oven to 350 °F. Cream the butter, add the sugar, rosewater, cinnamon and nutmeg and mix well. Crack the eggs in a separate bowl and whisk 10-15 minutes by hand. Add eggs to the butter mixture and mix until well combined. Slowly mix in the flour.

If using small tins, grease the tins and fill with batter. Add carrayway on top.

If using cookie cutters, add enough flour to create a dough you can roll out. I kneaded it with my hands a little bit. This made a very light dough. Place cakes on parchment paper on a cookie sheet. Sprinkle carraway over the cakes.

Bake cakes for 15 minutes. They won't brown more than a slight orange at the rim on the base of the cakes.


The first thing I noticed about this cake was that it tasted good soft but probably tastes even better crunchy which is probably the point. These probably get better over time which is good because if you made a whole batch you'd have around 40 small cakes on your hands.  

August 15, 2019

1920s Sealing Wax Art Jewelry


Over the weekend we went antiquing and I found this really pretty booklet on sealing wax art. Sealing wax art involves melting sealing wax, originally used to seal letters, and shaping the softened wax into different beads and pendant shapes. I had seen wax flowers and pearls before but this was new and I never thought to try and make some myself.

DIY Your Own Vintage Style Jewelry with the whole book here: Sealing Wax Art


1920s Sealing-Wax Art Jewelry

Some of my friends and I have been mailing each other letters with wax seals so I already had the materials and thought I might as well try and get some practice in before all those Roaring '20s parties start happening. I still need a lot of practice but it was fun to do. The book shows some very pretty, intricate examples. 


1920s Sealing-Wax Art Jewelry


1920s Sealing-Wax Art Jewelry
My attempt. I still need more practice!

The only advice I can give so far is that the harder, wax pellets that are melted in a spoon were giving me better results than the sticks with the wicks in them.

1920s Sealing-Wax Art Jewelry

1920s Sealing-Wax Art Jewelry

1920s Sealing-Wax Art Jewelry

1920s Sealing-Wax Art Jewelry
Advertisement from 1924

You can read the whole book here: Sealing Wax Art


If you try it out, I'd love to see photos of what you come up with!

August 4, 2019

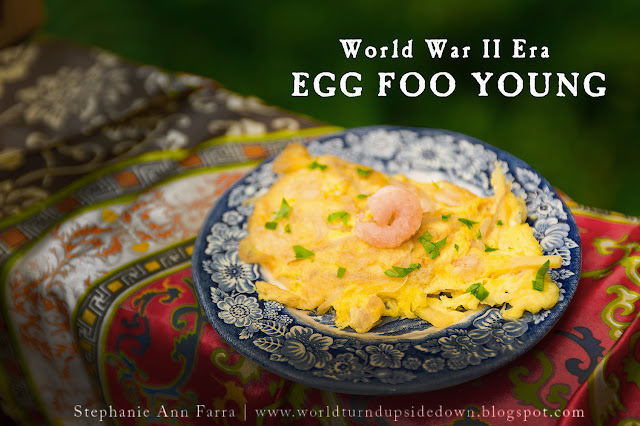
WWII Era Egg Foo Young Recipe

Egg Foo Young World War II Recipe


This is another recipe from The Chinese Cook Book (1936.) You can see the Shrimp Fried Rice I made from this book here. This was a cookbook by a Chinese-American woman meant for American cooks wishing to recreate the dishes they were eating in popular "Chop Suey" Houses. Chop Suey Houses were popular for their cheap and delicious food, elegant decor and live music.

You might ask why Chinese food would be popular during a time of war that emphasised nationalism. In the early 1900s, labor unions felt that nonunion Chop Suey houses were bad for business and pushed for laws that would shut them down. Many of these laws focused on disallowing live music and not allowing young people to enter them late at night. We know how well that works. Chop Suey Houses gained a reputation for being exotic and a part of a wild lifestyle. By the 1940s they were still fashionable places to see and be seen. It's interesting to note how the dish, Chop Suey has fallen out of fashion so much that few people have ever tried it.       

Egg Foo Young is another great way to use up leftover vegetables and protein. Celery, green onions, carrots and any sort of leftover meat would be delicious in this. In modern times it is served with a gravy but the Chinese Cook Book emphasised Soy Sauce, which was then called "Chinese Sauce" due to its ubiquity in Chinese American dishes. 


Egg Foo Young


Ingredients:

- 5 Eggs
-1/2 Cup Chopped Shrimp
- 1/2 Cup Onion, shredded
- 1 Cup Bean Sprouts
- Bamboo Shoots (cut in matchsticks)
- 1/4 Cup Water Chestnuts, chopped
- 5 Tablespoons Peanut Oil or Vegetable Oil

Beat eggs together and mix in chopped vegetables and shredded onions . Pour some oil in a large wok or frying pan and heat to medium-high heat. Using a ladle, scoop out one patty's worth of mixture in the hot oil. Create as many of these "patties" as can fit in the pan without touching. Fry until you it is lightly browned on one side, then flip and fry on the other side until lightly browned.


In modern times, Egg Foo Young is deep fried and foodies scoff at the idea of pan frying. You can deep fry this is about 2 inches of oil. Make sure to use a metal ladle and hold it in the oil in the ladle for a few seconds before pouring it in. Frying takes about 5 minutes and you'll have to flip it.   


Copyright © 2008-2020 Stephanie Ann Farra. All rights reserved.

All materials posted on this site are subject to copyrights owned by Stephanie Ann Farra. Any reproduction, retransmissions, or republication of all or part of any document found on this site is expressly prohibited, unless the author has explicitly granted its prior written consent to so reproduce, retransmit, or republish the material. All other rights reserved.