Showing posts with label Pattern. Show all posts

August 15, 2019

1920s Sealing Wax Art Jewelry


Over the weekend we went antiquing and I found this really pretty booklet on sealing wax art. Sealing wax art involves melting sealing wax, originally used to seal letters, and shaping the softened wax into different beads and pendant shapes. I had seen wax flowers and pearls before but this was new and I never thought to try and make some myself.

DIY Your Own Vintage Style Jewelry with the whole book here: Sealing Wax Art


1920s Sealing-Wax Art Jewelry

Some of my friends and I have been mailing each other letters with wax seals so I already had the materials and thought I might as well try and get some practice in before all those Roaring '20s parties start happening. I still need a lot of practice but it was fun to do. The book shows some very pretty, intricate examples. 


1920s Sealing-Wax Art Jewelry


1920s Sealing-Wax Art Jewelry
My attempt. I still need more practice!

The only advice I can give so far is that the harder, wax pellets that are melted in a spoon were giving me better results than the sticks with the wicks in them.

1920s Sealing-Wax Art Jewelry

1920s Sealing-Wax Art Jewelry

1920s Sealing-Wax Art Jewelry

1920s Sealing-Wax Art Jewelry
Advertisement from 1924

You can read the whole book here: Sealing Wax Art


If you try it out, I'd love to see photos of what you come up with!

January 27, 2018

WWII Knit Cap : Easy Pattern

I was hoping to get this out before FIG because I hear it's supposed to snow! O.O  I also here there will be a fair amount of knitting going on next weekend. Hopefully I'll have a female pattern up by then. I have an easy and fun one in mind but I might have to post it after the event.

This pattern comes from the booklet Knit for Defense (1941) which encouraged women to knit for the troops. It advertised this cap as "A practical cap for winter wear in any branch of the Service." It suggested Chadwick's Red Heart Knitting Worsted, which you can still find on occasion on etsy, but Lion Brand Collection Pure Wool is very similar.   

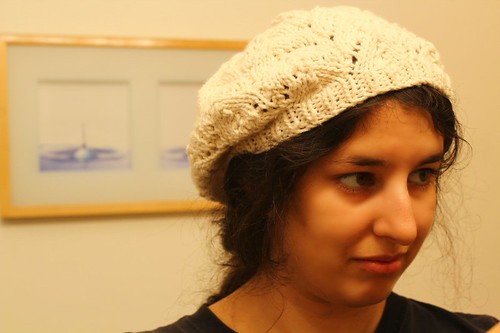
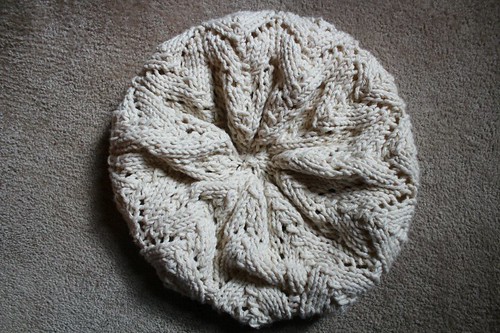
This pattern is very easy but I had to frog it about 6 times because I couldn't keep focused. :D I've included some extra instructions if you also need a little help on the decreases.


CAP

GAUGE: 5½ sts make 1 inch; 7 rnds make 1 inch.

Cast on 108 sts on 3 needles (36 sts on each needle). Join, being careful not to twist stitches. Work 2 inches in ribbing of k 1, p 1. Now work in stockinette stitch (k each rnd) for 4 inches.

To Shape Crown: 1st rnd: * Sl 1 as if to knit, k 1, p.s.s.o., k 12, k 2 tog., k 2. Repeat from * around (96 sts remaining). 2nd and 3rd rnds: Knit around. 4th rnd: * Sl 1, k 1, p.s.s.o., k 10, k 2 tog., k 2. Repeat from * around (84 sts remaining). 5th and 6th rnds: Knit around. Continue decreasing 12 sts in this manner on every 3rd rnd, until 24 sts remain.

Break yarn, leaving an 8-inch end. Thread needle with this end and run through remaining sts. Draw up tight and fasten securely on wrong side. Turn back cuff.


To Shape Crown for the Pattern Unfortunate:

Round 1: * Sl 1 as if to knit, k 1, p.s.s.o., k 12, k 2 tog., k 2. Repeat from * around (96 sts remaining).
Round 2: Knit All
Round 3: Knit All
Round 4: * Sl 1 as if to knit, k 1, p.s.s.o., k 10, k 2 tog., k 2. Repeat from * around (84 sts remaining).
Round 5:Knit All
Round 6: Knit All
Round 7: * Sl 1 as if to knit, k 1, p.s.s.o., k 8, k 2 tog., k 2. Repeat from * around (72 sts remaining).
Round 8: Knit All
Round 9: Knit All
Round 10: * Sl 1 as if to knit, k 1, p.s.s.o., k 6, k 2 tog., k 2. Repeat from * around (60 sts remaining).
Round 11: Knit All
Round 12: Knit All
Round 13: * Sl 1 as if to knit, k 1, p.s.s.o., k 4, k 2 tog., k 2. Repeat from * around (48 sts remaining).
Round 14: Knit All
Round 15: Knit All
Round 16: * Sl 1 as if to knit, k 1, p.s.s.o., k 2, k 2 tog., k 2. Repeat from * around (36 sts remaining).
Round 17: Knit All
Round 18: Knit All
Round 19:* Sl 1 as if to knit, k 1, p.s.s.o., k 2 tog., k 2. Repeat from * around (24 sts remaining).

Break yarn, leaving an 8-inch end. Thread needle with this end and run through remaining sts. Draw up tight and fasten securely on wrong side. Turn back cuff.

Suggested Colors:

Khaki, Navy, Maroon, Lt. Oxford, Oxford Gray, Air Force Blue. 


I'll get a guy to model it at the next event but for now, I'm tooling around town like Lea Salonga in Les Miserables. Hope you enjoy! If you end up knitting this, I'd love to see a picture of the finished cap. 

February 5, 2015

Civil War Knitted or Crocheted Army Mittens or "Shooter's Mittens" Patterns

Civil War Soldier Mittens, Trigger finger
Image courtesy of the New-York Historical Society

Tensions were high in 1861 and even before the first shots were fired, men and boys lined up to join the coming fight. As loved ones left home and took their spots in rank, the wives, sisters, mothers and children at home were busy doing their part to keep their loved ones safe and as comfortable as possible. Women formed handiwork groups and people commented that girls no longer sat idle in public at any time but were always working on some garment for the soldiers.

Many organizations were created or took part in collecting items for the soldiers. Money, foodstuffs and clothing made up the bulk of donations and organizations were not shy in their requests for items:
"WOOLLEN MITTENS.—An officer from West Point who commands one of the finest regiments in the service, suggests that woollen [sic] mittens for the soldiers will be greatly needed when the cold weather begins. Will not all who can employ themselves in this way, help to furnish 500,000 pairs? They should be knit with one finger to allow the free use of the first finger and thumb. It is said there were more soldiers disabled in the Crimean war from frost bitten fingers than from any other cause."
 -Delaware State Journal and Statesman, November 5, 1861
The need was great enough that there were knit, crochet and even sewn patterns printed for this style of glove. Woollen mittens with a separate finger and thumb were so associated with soldiers that they found their way into a poem printed in The Ladies’ Repository in 1861,

"Knit-knit-knit-
With a warm heart and a true!
Knit-knit-knit-
The stockings warm and new.
The mittens with a finger and thumb complete,
The gloves for the drummers their drums to beat-
And the nice warm socks for the shivering feet-"

As the war raged on, the pattern stopped appearing in publications, likely due to the war frenzy dying down. Women were still knitting and sewing items but many utilized the patterns they had collected early on.   

By January 1865, E.A. Paul, a correspondent from the New York Times to Sheridan's army reported that the weather had been cold, icy and wet and that 1 out of 4 soldiers did not have mittens. He postulated that the extra money spent on Christmas dinners could have covered the expense of the 50,000 pairs of mittens the army needed.  

Different versions of the pattern:

Civil War Shooter's Mittens

1860s Mitten pattern Free
Civil War Army Mittens Pattern

Civil War Knitting Pattern
Photo courtesy of Bren Woodard
Click here for a modern pattern for  "Shooter's Mitts."

References:

http://historydetectives.nyhistory.org/2014/04/blast-from-the-past-mittens-and-slippers-during-the-american-civil-war/

http://cyrusforwood.blogs.delaware.gov/tag/us-sanitary-commission/

November 3, 2014

Knitted Civil War Era Talma Shawl Cape Pattern

Civil War Shawl Pattern Stephanie Ann Farra
As it is getting colder, I am routinely exploring historical knitting patterns.

Here is a crazy pattern for a Civil War Era Talma. I do not have the patience to start a project with 650 stitches right now but have seen these being worn and they are absolutely beautiful and practical.

I'm slowly modernizing this pattern but will not post it unless I have more experienced eyes look it over. :)

I am currently knitting 1700s fingerless gloves for work and just finished a Monmouth cap. I don't know if this will make the list this year, but one can dream.

This is what I have so far but is just the beginning and very, VERY preliminary. 
 

Cast on 650 stitches in red.The knit all, purl all knit all, purl all rows should be in red, the rest white.

1,3: Knit all.
2,4: Purl all.
5: K2, YO, K11, sl1, K2TOG, psso (this is the center of each point) *K11, YO, K1, YO, K11, sl1, K2TOG, psso* Repeat ** to end, K2
6: Purl
7: K2, YO, K11, sl1, K2TOG, psso (this is the center of each point) *K10, YO, K1, YO, K11, sl1, K2TOG, psso* Repeat ** to end, K2

Alternate Rows 6 and 7 until row 22.

23: Purl all, k3TOG at center of each "point."
24: Knit all
25: Purl all
26: Knit all

27: K2, YO, K10, sl1, K2TOG, psso (this is the center of each point) *K10, YO, K1, YO, K10, sl1, K2TOG, psso* Repeat ** to end, K2
28: Purl

Alternate Rows 27 and 28 until row 46.

46: Purl all, k3TOG at center of each "point."
47: Knit all
48: Purl all
49: Knit all
50:K2, YO, K91, sl1, K2TOG, psso (this is the center of each point) *K9, YO, K1, YO, K9, sl1, K2TOG, psso* Repeat ** to end, K2

December 3, 2013

Free Civil War Era Scarf Pattern

 It's winter and time to get knitting!

I have been trying to find the provenance of the photo at the left. It is a great illustrative photo as to the type of scarf that this pattern creates. the stitches are tiny and the scarf, much wider than what we are used to. 
 

1859 Scarf Pattern

Size 00 needles, DK weight yarn. 

Border:
Cast on 100 stitches
Row 1: *K2tog x4, yo, k1 x8 , K2tog x4, p1* repeat between the * until end of row.
Row 2: purl all stitches.
Row 3: knit all stitches.
Row 4: purl all stitches.
Repeat Rows 1-4 until the scarf reaches 14 inches.
Final Row: Purl all stitches.

Scarf Main:
Row 1: *yo,sl 1, k1, psso, k1, p1* repeat between the  until end of row.
Repeat row 1 until the scarf is 14 inches shorter than you want it. 

Finishing Border:
Row 1: purl all stitches.
Row 2: knit all stitches.
Row 3: purl all stitches.
Row 4: *K2tog x4, yo, k1 x8 , K2tog x4, p1* repeat between the * until end of row.
Finish scarf with fringe or netting. 


25 stitch practice swatch.

September 9, 2013

Peterson Magazine's Princess Capote Hood Pattern from 1862

This hood is a pretty alternative to the Red Riding Hood that I posted last Friday. Both hoods were published in Peterson's Magazine in 1862 and are constructed similarly.

The ruffles, braid and tassel make this hood an intricate and pretty accessory.

Of course, I am very interested in any headwear that allows me to lay down while wearing it. Farby, I know. But there's nothing like walking a few miles in your corset and heavy dress and sneaking into your tent for a few minutes of temporary relief. You fluff up your blankets and try to lay down for a few minutes, and your bonnet or hat are in the way, making laying down impossible. By the time you get your bonnet or hat off, it's generally time to start cooking. :) 


This is a pretty hood and would be a nice thing to have come the colder events. Enjoy the nice cool weather we've been having. 

September 6, 2013

Red Riding Hood from Peterson's Magazine 1862

One can imagine the fashionable lady, walking down the street, a bright red rose in the bleak, snowy streets.   

This pretty little hood was published in Peterson's Magazine in 1862. This hood was meant to make a statement. The instructions directed fashionable ladies to procure the most brilliant scarlet that could be had. It also touted the ease of make and the prettiness of finished hood.

While not the typical riding cloak we think of when we hear the term "riding hood," this hood evokes the headwear of  François Fleury-Richard's "Red Riding Hood" from 1820.


Similar hoods were already popular in the 1860s, this particular style was an imaginative twist to a winter wardrobe staple. It seems like a good weekend project, just in time for the colder events to come.  

 
François Fleury-Richard


Some very pretty examples of this hood made up:


February 1, 2013

1859 Sewn and Embroidered Reticule Pattern

This is a very labor intensive sewn reticule from Arthur's Home Magazine, from 1859. The instructions recommend velvet fabric, embroidered with red roses and white Fleurs-de-lis separated by gold flat braid. Each of the roses contains 5 gold beads.    

The instructions give an alternative pattern of gold flat braid on purple velvet with embroidered red roses and green shamrocks. 

It is a nice pattern because the purse is a little more substantial than a crocheted or knit bag and it is of a pretty decent size, especially for those of us accustomed to modern purses. In the mid-1800s, a reticule only held a few coins and a handkerchief, although a sewing machine company in 1862 advertised that they has a machine "so light and portable (weighing less than one pound) that it can be conveniently carried in the pocket or reticule."

Add caption
The top of the fabric is 5 inches at the top, 9 1/2 on the bottom and 7 1/2 inches long. The pattern recommends leaving the velvet 1 inch longer all around. This purse should be stiffened with a stiff muslin or buckram and lined with silk. This could be sewn plain, without embroidery. If you plain to embroider, do so before you cut out the fabric to save a lot of frustration from frayed edges.

As fabric is easily damaged, many original metal purse fasteners can be found online or at antique shops. If you do your research into what kind of styles and fasteners were available, you may even be able to find some modern bags with clasps at thrift stores that can be repurposed. But make sure you really research, you don't save any money if you end up buying something you can't use. 

Purse closing example from the Met.
Screw closing example from the Met.
Another Example.

For some purse  inspiration, check out this awesome Pinterest board by Muriel.

January 21, 2013

1861 Ladies' Wool Tie Pattern

It's a bit late for New Year's but here's a quick knitting pattern from 1861. The knitted tie is bordered with imitation, knitted ermine which was popular at the time. It has fallen out of fashion in modern times to give New Year's gifts but it's still a neat idea.

All of my period knitting items use the conversion table and information written by Collen Formby. If you haven't read that article, it's a lifesaver when trying to create period knitting projects.

I like that this tie would create a bit of warmth around the neck without adding a lot of bulk. It would also be a way to add a bit of color to an otherwise plain dress. The full pattern in the book includes a set of matching cuffs.

One thing about 1850s clothing that looks really strange to our modern eyes is the use of matching which looks excessive to us. For instance, it was popular for women to wear two identical bracelets, one on each wrist. Women might also wear a large "show piece" necklace with equally large matching earrings.Today we would consider the looks gaudy.

Unfortunately every once in a while, my historical wardrobe will sneak into my modern one and I'll find myself over-jeweled in a way that looks almost sarcastic today. Only one of the few problems with trying to be stylish in multiple centuries. :)     

October 4, 2012

1850s Civil War Men's Shirt Pattern


This pattern is from 1852 and was published in a guide meant to teach sewing skills to ladies who might live "humble lives." It teaches the most economical ways to cut out multiple shirts so as not to waste any fabric.
 The book has basic instructions on how to assemble the shirt but only the basics. It does not include the front pleats which were a matter of personal taste.

Like many shirts of the period, this shirt is cut out of mostly rectangles and squares, using gussets instead of sloped shoulder holes to make the shirt comfortable in the underarm. The book suggests using linen fabric and the age-old technique of taking apart a shirt that the man likes and using it as a template for his new shirts.   

I've charted out the pattern but will assume that only seamstresses and tailors with some experience will be attempting it. For one, seam allowance is not included in my chart and you have to pay special attention to the seams that need a little bit of extra to sew without leaving an exposed edge.

Shirts aren't terribly hard once you make one. It is much easier to size when you do have a shirt from the person you'll be sewing for. 

There is a lovely tutorial for sewing a similar shirt (an earlier style but the basics are the same) at MY Mr. Knightley: Making a Shirt 

August 7, 2012

Knitted Beret

I finally got some modern knitting done! I'm always excited for modern knitting because I work with period yarns a lot and after awhile the selection is pretty boring.


I was so excited to finish that I threw it on and took some photos. Now that I am looking at them, I really should have changed out of my pajamas and put something nice on.


It's pretty from the back, it forms a intricate looking star pattern but it ended up being pretty easy.


Side view of the beret.


This project was great because it only required a small ball of cotton. I choose a cream color like the original pattern purely for the fact that I wanted to be able to wear this with a lot of different outfits. up close the cotton has tiny little black specs. I liked that I could wear this one in the summer and into the fall.  

Close-up view of the pattern.

This pattern can be downloaded for free from Ravelry at Spring Beret.


If you don't have a Ravelry account they might make you sign up, but it's free and worth it to see everyone's projects and comments. I know reading the comments on there saved me from a lot of frustration and stitch-ripping.

May 23, 2012

Pocketbook Pattern from Godey's Lady's Book, 1862

Uh oh! I have seen to have hit my image max on my blogger account and I can't add anymore photos until I upgrade to a paid account which would cost $30 per year. I love blogging, but it is just a hobby for me. I am certainly not willing to pay money for a blog that makes me $0.00 in profit. I won't be going anywhere, but I'm experimenting with different, free ways to get my photos up here.

In the meantime, please take a look at this tiny pocketbook from Godey's Lady's Book. A the image suggests, it is to be made in velvet or leather and includes two small pockets and a change pouch. The total pocketbook only measures 5 x 8cm when it is completed.

I can't for the life of me figure out what the middle "holder" and "strap is for. My best guess is a skeleton key possibly. Maybe one of my readers knows or has a different guess. If I made this, I would probably put a few pencil ends in there, so I have them when I need them.

This could easily be enlarged or adapted to make a "housewife," or sewing kit for soldiers. I diagrammed the pocketbook out below. It's a pretty straightforward pattern. I recommend using some thick fabric and stiffener under the "fashion fabric" to give it a sturdy shape and a good base for embroidery or beading.


The pieces are cut out and the raw edges are bound with tape. These were popular embroidery items due to their small size. A great collection of purses for inspiration can be found at the Museum of Fine Arts, Boston. Most of these purses are from the 1700s but they are so gorgeous!

March 24, 2012

"Polly Put the Kettle On":19th Century Kettle-Holders

When you are cooking over an open fire, kettle-holders are of the utmost importance. Unlike modern pots, the handles of cast iron get very hot, even if it doesn't look it.


Today, what we call pot holders were called kettle-holders. Pot holders then were metal stands designed to hold pots off of the ground.  

It was common for kettle-holders to be made of wool squares, bound together at the edges with binding. Knitted kettle-holders also existed but were knitted with thinner yarn than we are used to today and "thicker" stitches. Similarly to holders today, kettle-holders generally had a loop in one corner for hanging.


Kettle-holders were small and easy embroidery projects and many feature designs or sayings such as the common "Polly put the pot on," or the abolitionist, "Any holder but a slave holder."

For examples of embroidery for kettle holders there are many "pot holder" quilts made during the Civil War. These quilts were not made from pot holders but the same type of technique was used to make each square and the binding between squares gives the appearance of pot holders.

Some Civil War "pot holder" Quilts:

-1864 Civil War Quilt
- Pot Holder Quilts
-Major Thoughts: Potholder Quilts

A later design featuring "Polly."
Another Knitted Pattern

I've got to get working on some of these. We always just use rags as they are the closest thing around but it's time that we stop dirtying our rags just to move pots. 

February 3, 2012

Civil War Boy's Jacket Pattern from Godey's Lady's Book

When I went to Antietam, the museum there had a tiny Zouave jacket worn by a musician during the battle. It has fabric covered decorative buttons on the red patterns and was sewn with white thread.The coat was small, it was almost sad to think about the boy wearing it.

I found a very similar jacket pattern in Godey's and wanted to offer the pattern to my readers with children. 


I was going to wait to post this until I had it drafted to correct shape and proportions but school has been extremely busy again and it doesn't seem like I'll have a chance to do it for a while. So far I have the back proportioned out correctly but am working on making the front armholes a comfortable curve. My drafting skills are terrible so I am sure someone else could have this drawn out quickly.  

November 4, 2011

How to Make Civil War Period Corset Ties

 "My! I'm so uncomfortable; I've broke my stay-lace, and I have not got another. You couldn't lend me one, Betsy, could you?" said a young woman to her next-door neighbour, as, early one morning, they were both cleaning their door-steps.


'No,' replied Betsy,  'I haven't got a spare one; but there's the boy we get our matches and black-lead from; I dare say he'll get you one in a jiffey.'" - Hogg's Weekly Instructor, 1845

 Been looking for period laces for your corset? Or laces for your shoes or boots? You're in luck because they are very easy to make. I've been meaning to replace those awful modern shoelaces I've been using to fasten my corset.


During the 1850s and 60s, laces were made by machines but making laces was a cottage industry for frugal families. Poor girls in charity institutions were taught to make them as a way to make a bit of money and stay laces and boot laces were  popular street vendor items.


Cast on three stitches.
Slide the stitches to the right end of the needle.
Knit into the stitches normally. Slide the stitches to the right of the needle.
Repeat until you reach the necessary length and cast off.


Stay lace made with crochet cotton.


 Boot and shoe laces were made exactly the same way. This lace can also be used for creating frog fasteners as most modern frog style fasteners are made from synthetic materials. There are numerous instructions available for knitted laces and it is pretty much a universal pattern. In modern times, we call this an "i cord." 


Copyright © 2008-2020 Stephanie Ann Farra. All rights reserved.

All materials posted on this site are subject to copyrights owned by Stephanie Ann Farra. Any reproduction, retransmissions, or republication of all or part of any document found on this site is expressly prohibited, unless the author has explicitly granted its prior written consent to so reproduce, retransmit, or republish the material. All other rights reserved.