July 25, 2016

18th Century Bookbinding with Ramon Townsend

18th Century Bookbinding

Today I was fortunate enough to attend a class on Colonial Bookbinding will Williamsburg trained bookbinder Ramon Townsend at the Harrinton House, home of Walter Staib's A Taste of History.

First off, I was really excited to take this class as I love little journals and notebooks and have made quite a few in my life but have never had the chance to learn how to make them the 18th century way. I'm not kidding. I was so excited to take this class that I had that dream where you are late for something important and then everything that happens makes you more late. The universe also threw me for a loop when the morning of class my car decided it didn't want to start but finally acquiesced last minute and I made it in time. The class was so much fun and everyone left with a pretty book and I'm now in love with marbled paper.

I took a lot of pictures during the class in case anyone is interested in the whole process or curious exactly what is under the spine of old books. We used rag paper, paste and leather so these books should weather time as good as 18th century books have. Well made, 18th century books fare surprisingly better than many 19th century books due to the use of rag paper over wood pulp paper.

18th Century Bookbinding

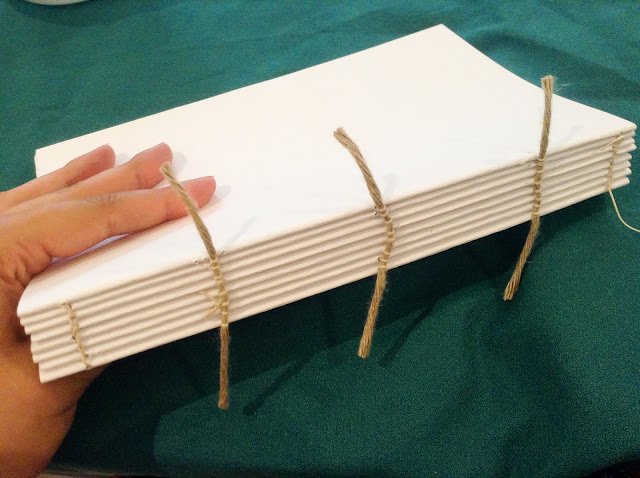
We each used a sewing frame to hold the cords in place for sewing. We each only made one book but the frame is designed to sew a stack of books at one time.

18th Century Bookbinding

18th Century Bookbinding

18th Century Bookbinding

We learned how to sew in the signatures in the 18th century way. Along with the necessary stitches.

18th Century Bookbinding

18th Century Bookbinding

We glued down the cords to attach the covers.

18th Century Bookbinding

18th Century Bookbinding

Attached the leather to the spines.

18th Century Bookbinding

Attached the decorative covers.

18th Century Bookbinding

18th Century Bookbinding

One of the other books made in the class.


We learned how to use embossing tools to decorate leather books.


It was an extremely enjoyable class and I hope to take the paper marbling and book repair class when they are offered again.

July 17, 2016

Civil War Era Recipe: Preserved Watermelon Rind


As you know, watermelon rind is poisonous.

I'm just kidding but a surprising number of people believe that it is true. It follows the theory that bitter tastes are a marker for things that can hurt you such as bitter almonds and poison ivy, but it is just a rumor and watermelon rind has a surprising amount of uses. It can be preserved and eaten as pieces, candied, pickled, and even be turned into jelly or preserves.

This recipe was cooked for the Historical Food Fortnightly. A yearly challenge that encourages bloggers to cook a historical food every two weeks as part of the challenge "Waste not, Want not" and what gets wasted more than watermelon rinds?

The Challenge: Waste Not, Want Not (July 1 - July 14)
Good housekeeping in any historic era included making the most of your food items. Pick a recipe that involves avoiding waste (maybe reusing leftovers, or utilizing things commonly thrown out) and show us how historically-green you can be!

The Recipe:


The Date/Year and Region: 1850s-60s, United States

Ingredients:

- Watermelon Rind, cut into pieces or shapes
- Alum or Salt
- Lemon Peel
- Ginger
- Sugar, pound for pound to the rinds
- Cabbage Leaves for coloring

Instructions:


Cut out the inside of the watermelon. Pare the skin off the rind and cut the rind into small, thin pieces. Soak the pieces in a mixture of alum water for 3 days and plan water for 3 days, changing the water each day. Drain the pieces and boil in a sauce pan on medium heat in new water until the pieces are translucent and a fork can pass through easily. Drain the pieces and return to saucepan. Add the lemon peel, ginger and sugar and boil until the sugar forms a thick syrup. Let cool and eat or can for future use. If the sugar does not form quickly enough, remove the pieces and boil the sugar mixture until a syrup is formed then pour it over the pieces.  


How Did You Make It: 

Godey's Lady's Book in 1858 suggested soaking the pieces for 3 days in salt water, 3 days in alum water and 3 days in plain water (changing the water each day) to remove any alum flavor before preserving the rinds.

Time to Complete: Days to soak it but actual prepare time 30 mins to 1 hour.

Total Cost: $3.00 for the watermelon.

How Successful Was It?: I admit I was afraid to taste it. Something about the rind just sounds unappealing. But I forced myself too and it was delicious. If you didn't tell someone this was the rind of a watermelon, they'd think it was crisp, flavored, honeydew. The pieces aren't quite so toxic looking when light isn't shining through them. These would be a nice treat if made in different colors and flavors. The rind itself has a very neutral flavor good for absorbing other flavors.  


How Accurate Is It?: I dyed with spinach instead of cabbage leaves. The first receipt I found said to layer in ivy leaves, but I did not feel confident in the safety of it. 

Copyright © 2008-2020 Stephanie Ann Farra. All rights reserved.

All materials posted on this site are subject to copyrights owned by Stephanie Ann Farra. Any reproduction, retransmissions, or republication of all or part of any document found on this site is expressly prohibited, unless the author has explicitly granted its prior written consent to so reproduce, retransmit, or republish the material. All other rights reserved.