August 27, 2019

18th Century Lemon Cheese Recipe from The Cookbook of Unknown Ladies

18th Century Lemon Cheese Forgotten Recipe

I was excited to try this recipe. I have yet to see anyone else attempt it and it is from a handwritten recipe book in Westminster City Archives in London known as the Cookbook of Unknown Ladies. Little is known about the recipe book or the women who contributed to it only that it was written by "various unknown women about the year 1761," as is printed on a title page.  Be sure to check out all of the recipes from The Cookbook of Unknown Ladies.

This was a mystery recipe.  I can generally read and approximate what the finished product of a recipe will be. For this recipe I didn't have a clue. I thought it sounded most like a cream cheese but it was whipped before being hung to separate the whey out. Would that make a difference? My grandma and I kept testing it throughout the process to try and get an idea of what it would turn into.

I was very afraid that the minute I added lemon to the cream that it would separate the way it does when making cheese but it didn't. I waited until the cream was whipped then quickly stirred in the juice and the rind.

It turned out that this makes a spread that tastes like a delicious lemon cheesecake. It was delicious on the 1796 pound cake I happened to make the same night. It would also be good on scones or toast.

Excerpt from The Cookbook of Unknown Ladies:


Lemmon Cheese
A qurt of good thick sweet creame. Put to it the juce of four lemons as as mutch peel as well give it an agreeable flavour. Sweeten it to your taste & add a littile peach or orange flower water if you like it. Whip it up as you would for sellabubs but very solid. If you have a tin vat, put a thin cloath in it & pour in your cream. If not, put it in a napkin and tye it pritty close. Hang it up to let the whey run from it. Make it the night be fore you use it. Garnish it with currant jelliy or candied oranges.


Ingredients:

- 16 ounces Heavy Whipping Cream
- 2 Lemons (Juice and Peel)
- 1 Tablespoon  Orange Flower Water
- 2+/- Tablespoons sweetener (Sugar, Honey, Molasses, )

Instructions:

Zest and juice your lemons. Put cream in large bowl, add sugar and orange flower water and whisk until you have whipped cream. Stir in lemon juice and peel gently to avoid over whipping. Pour into doubled cheese cloth and tie it up. Hang it overnight. In the morning press all the remaining juice out with your hands, make into a ball or press into a mold and serve with jelly or candied oranges.


I had this hanging over a bowl in my living room and my puppy was terrified of it.

If you haven't used cheesecloth before, I recommend paying a little extra to get the kind that you can wash and reuse: Cheesecloth. 


My site uses affiliate links. If you are planning on making a purchase, I would greatly appreciate if you would use the affiliate links above. It doesn't cost you any more but it does help me keep the website running. Thanks!

August 20, 2019

Amelia Simmons' 18th Century Pound Cake Recipe


We had a little teaser of fall over the last few days but that light breeze has been replaced with an Indian monsoon season. Again. I haven't wanted to look at the oven, let alone turn it on. I took advantage of the nice weekend weather to get a little baking done.

This recipe is from Amelia Simmons' cookbook American Cookery, famous for being the first American written cookbook intended for American cooks utilizing the ingredients local to them.

This is a true pound cake recipe. A true pound cake is a cake made from a pound of flour, a pound of butter, a pound of sugar and a pound of eggs. Traditional pound cakes do not use any additional leavening agents and rely on the eggs to puff them up a bit. This recipe gives the vague "spice to taste" so I had to do a little rummaging to see what spices were popular in cakes like this and settled on cinnamon, nutmeg and carraway.


18th Century Pound Cake 


Ingredients:

- 2 Sticks Butter (1/2 Pound)
- 1 Cup Sugar
- 2 Cups Flour (3+ if you you don't have small tins and want to bake them "cookie" style)
- 1/3 Cup (2 ounces) Rosewater
- 4 Eggs
- 1 Teaspoon Cinnamon
- 1/4 teaspoon Nutmeg
- Caraway Seeds

Instructions:


This is only half the recipe which made about 20, 3 inch cakes.

Preheat oven to 350 °F. Cream the butter, add the sugar, rosewater, cinnamon and nutmeg and mix well. Crack the eggs in a separate bowl and whisk 10-15 minutes by hand. Add eggs to the butter mixture and mix until well combined. Slowly mix in the flour.

If using small tins, grease the tins and fill with batter. Add carrayway on top.

If using cookie cutters, add enough flour to create a dough you can roll out. I kneaded it with my hands a little bit. This made a very light dough. Place cakes on parchment paper on a cookie sheet. Sprinkle carraway over the cakes.

Bake cakes for 15 minutes. They won't brown more than a slight orange at the rim on the base of the cakes.


The first thing I noticed about this cake was that it tasted good soft but probably tastes even better crunchy which is probably the point. These probably get better over time which is good because if you made a whole batch you'd have around 40 small cakes on your hands.  

August 15, 2019

1920s Sealing Wax Art Jewelry


Over the weekend we went antiquing and I found this really pretty booklet on sealing wax art. Sealing wax art involves melting sealing wax, originally used to seal letters, and shaping the softened wax into different beads and pendant shapes. I had seen wax flowers and pearls before but this was new and I never thought to try and make some myself.

DIY Your Own Vintage Style Jewelry with the whole book here: Sealing Wax Art


1920s Sealing-Wax Art Jewelry

Some of my friends and I have been mailing each other letters with wax seals so I already had the materials and thought I might as well try and get some practice in before all those Roaring '20s parties start happening. I still need a lot of practice but it was fun to do. The book shows some very pretty, intricate examples. 


1920s Sealing-Wax Art Jewelry


1920s Sealing-Wax Art Jewelry
My attempt. I still need more practice!

The only advice I can give so far is that the harder, wax pellets that are melted in a spoon were giving me better results than the sticks with the wicks in them.

1920s Sealing-Wax Art Jewelry

1920s Sealing-Wax Art Jewelry

1920s Sealing-Wax Art Jewelry

1920s Sealing-Wax Art Jewelry
Advertisement from 1924

You can read the whole book here: Sealing Wax Art


If you try it out, I'd love to see photos of what you come up with!

August 4, 2019

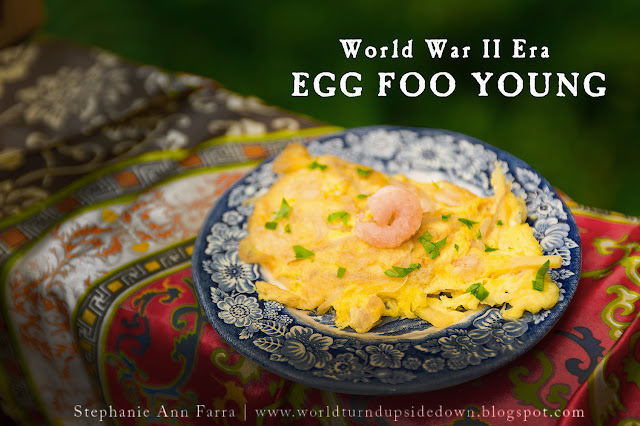
WWII Era Egg Foo Young Recipe

Egg Foo Young World War II Recipe


This is another recipe from The Chinese Cook Book (1936.) You can see the Shrimp Fried Rice I made from this book here. This was a cookbook by a Chinese-American woman meant for American cooks wishing to recreate the dishes they were eating in popular "Chop Suey" Houses. Chop Suey Houses were popular for their cheap and delicious food, elegant decor and live music.

You might ask why Chinese food would be popular during a time of war that emphasised nationalism. In the early 1900s, labor unions felt that nonunion Chop Suey houses were bad for business and pushed for laws that would shut them down. Many of these laws focused on disallowing live music and not allowing young people to enter them late at night. We know how well that works. Chop Suey Houses gained a reputation for being exotic and a part of a wild lifestyle. By the 1940s they were still fashionable places to see and be seen. It's interesting to note how the dish, Chop Suey has fallen out of fashion so much that few people have ever tried it.       

Egg Foo Young is another great way to use up leftover vegetables and protein. Celery, green onions, carrots and any sort of leftover meat would be delicious in this. In modern times it is served with a gravy but the Chinese Cook Book emphasised Soy Sauce, which was then called "Chinese Sauce" due to its ubiquity in Chinese American dishes. 


Egg Foo Young


Ingredients:

- 5 Eggs
-1/2 Cup Chopped Shrimp
- 1/2 Cup Onion, shredded
- 1 Cup Bean Sprouts
- Bamboo Shoots (cut in matchsticks)
- 1/4 Cup Water Chestnuts, chopped
- 5 Tablespoons Peanut Oil or Vegetable Oil

Beat eggs together and mix in chopped vegetables and shredded onions . Pour some oil in a large wok or frying pan and heat to medium-high heat. Using a ladle, scoop out one patty's worth of mixture in the hot oil. Create as many of these "patties" as can fit in the pan without touching. Fry until you it is lightly browned on one side, then flip and fry on the other side until lightly browned.


In modern times, Egg Foo Young is deep fried and foodies scoff at the idea of pan frying. You can deep fry this is about 2 inches of oil. Make sure to use a metal ladle and hold it in the oil in the ladle for a few seconds before pouring it in. Frying takes about 5 minutes and you'll have to flip it.   


Copyright © 2008-2020 Stephanie Ann Farra. All rights reserved.

All materials posted on this site are subject to copyrights owned by Stephanie Ann Farra. Any reproduction, retransmissions, or republication of all or part of any document found on this site is expressly prohibited, unless the author has explicitly granted its prior written consent to so reproduce, retransmit, or republish the material. All other rights reserved.