December 22, 2019

Civil War Fruit Cake Recipe -150+ Years Old!


Fruitcake. I'm young enough to have never encountered a fruitcake in the wild. Its reputation had been cemented before I was a child. Likened to paper weights and door stops, fruitcake has disappeared from tables.  The theory that there is only one fruitcake in the world and people just keep regifting it to each other has expedited its demise.

Still there are diehard fans who can't have Christmas if there is not a fruitcake and I'm apt to believe that the real reason for the demise is the cost and care they take to make in a world that increasingly values quick and cheap.

Fruitcake has a long history. Nutritionally dense and long lasting, fruitcake like mixtures date back to at least Ancient Rome, but the modern recipe has its roots in the Middle Ages.  Richard Briggs includes a recipe for "Plum Cake" in his 1788 cookbook The English Art of Cookery that includes all the hallmarks of what we would call a fruitcake todayIn 1840, Queen Victoria and Prince Albert's wedding featured a highly decorated, 300 pound fruitcake popularising the choice for many future brides. By the 1860s fruitcake was a classic choice for Christmas and weddings.

This is my first attempt to make a fruitcake so I tried to find a simple recipe. I asked on Facebook what time period fruitcake I should make and many wanted to see a Civil War Fruitcake. So here it is. The recipe is from Godey's- the June edition as fruitcakes generally need to cure from 1 month to 6 months for the best flavors.


The recipe was very simple so I looked to E.F. Haskell's The Housekeeper's Encyclopedia (1861) for information on how to mix and bake the cake:
Rich Fruit Cake.—One pound of sugar, three-fourths of a pound of butter, worked together until very light; one wine-glass of brandy, one dozen ground cloves, half a nutmeg, a teaspoonful of ground cinnamon, ten eggs beat separately, the yolks to be used first, and afterwards the whites, one-fourth of a pound of sliced citron, two pounds of washed currants rubbed in flour and mixed in the cake with one pound of raisins cut fine, and one seeded and left whole or cut once, and one pound of sifted flour; stir in the citron, currants, and the chopped raisins, and lastly, the flour and whole raisins alternately; bake in a moderate oven in deep basins two hours. If the fire is strong, the heat should be decreased the last hour. Line the basins with buttered paper, and keep a piece over the top of the cake. Frost it and it will keep two months or longer if desired.

I ended up lining my pans with buttered paper and frosting my cake. I was interested in using rum to keep my cake soft so I did not try frosting it before storing it.


Civil War Fruit Cake


Ingredients:

- 2 Cups Butter
- 2 Cups Molasses
- 2 Cups Sugar
- 6 Eggs
- 2 teaspoons Baking Soda
- 1 Pound Raisins, Chopped
- 1 Pound Currants, Chopped
- 1/2 Pound Citron, Chopped
- 1 teaspoon Salt
- 1 Tablespoon Nutmeg, Ground
- 1 Tablespoon Cinnamon, Ground
- 1 teaspoons Cloves, Ground
~ 6 Cups of Flour


Instructions:

Preheat oven to 325°F.  In a mixing bowl, cream the butter, molasses sugar, salt, nutmeg, and cloves. Add a little water to your fruits and mix in a little flour to coat the fruits. Alternatively add fruits and mix in  flour to make a stiff batter. Beat your eggs and fold in at the end. Line your pans with buttered paper. Fill pans 2/3 of the way with batter and cover the tops with greased paper. Bake for 1 hour to 2 hours depending on pan size. Test the middle with a skewer.

This made 6 3x6 sized loaves. I baked them for an hour and 15 minutes.

Sorry for the cell phone pics.

The day after they were baked, the tops were hard. I used a skewer to poke holes half way down into the cakes and spooned rum over. I left the paper on and wrapped the cakes in plastic wrap then put them in a plastic container. Historically they would be wrapped in paper and kept in an airtight tin but I couldn't find one big enough. Some people wrap them in alcohol soaked cheesecloth first. I tried coating them with rum weekly unless they seemed soggy, then I skipped a week.

It is rumored you can keep fruitcake good for up to 25 years by storing them in powdered sugar. They apparently do last forever. There was one found from Robert Falcon Scott's expedition to Antarctica in the early 1900s that still appears to be edible and one being passed down from the Ford family for over a century.
 
There are 6 of my fruitcakes floating around in the ether and I hope to update you after everyone has tried them. I won't be trying mine until Christmas Day but will update with a photo when I cut mine open. I gave everyone the drunken fruitcake disclaimer. Can't get drunk off cake? Check out this article by Stuart Heritage who decided to not only answer the question "Can you get drunk off of fruitcake?" but the question of "How drunk?" I hope everyone has a good holiday and I'd love to hear if anyone tries this recipe.


UPDATE: I've updated with a picture of the inside. We ate this on Christmas and it was overall not bad. I didn't pour a final bit of rum on it before icing it I wish I had. It felt kind of soggy on the top and I didn't want it to be soggy. The flavor was nice an mild. I thought the flavors would be strong but they were very delicate and the fruits practically melted into the cake. The raisins definitely disappeared! I have one cake left so I'm going to keep feeding it and test it in 6 months to see if the flavor changes any. 

December 11, 2019

Chewable Eggnog? World War II Era Eggnog Pie Recipe, Old Fashioned Taste

World War 2 Christmas recipe

I'm not a fan of eggnog but it is mostly the texture that I don't like. This piqued my interest. Would I like the flavor with a different texture? By chance, I had everything at home to make this so I did, even though I had no event to serve it at. This recipe is from Good Housekeeping Magazine Party Cook Book (1941) and is quite tasty.

I would highly recommend topping this with candied or maraschino cherries. I only had some of these leftover cranberries in the house but boy, are they sour! If I was to make this again, I would add about 1/3 a cup of sugar to the whipped cream and cover the whole pie with it, then top with some cinnamon and nutmeg. The custard was a little less sweet than I prefer but a second opinion said that they appreciated it was not sweet. It ended up having a flan like consistency that's actually quite nice and light. Even this vintage santa came down the chimney to steal a slice.

World War 2 Christmas recipe


Ingredients:

Crust:

-1 1/4 Cup Graham Crackers, finely rolled
- 1/4 Cup Sugar
- 1/4 Cup Butter
- 1 Tablespoon Water

Combine graham crackers crumbs and sugar. gradually add to soften butter and stir in water. Press into a 9 inch pie plate and bake in a preheated oven at 325 °F for 10 minutes. Let cool.

Filling:

- 1 1/2 Tablespoons Gelatin
- 2 Cups Milk
- 2 Eggs
- 1/8 teaspoon Salt
- 3 Tablespoons Brandy or Brandy Flavoring (I used Rum)
- 1/2 teaspoon Nutmeg, ground

Soak the gelatin in 1/4 cup of the milk and set aside. In a double boiler on medium heat, scald the rest of the milk.

Warm your eggs in a bowl of warm water. Separate the whites from the yolks into two bowls. Beat the yolks slightly and mix in 1/3 cup sugar and salt. Pour the scaled milk over the yolk mixture while stirring. Return the mixture to the double boiler and stir constantly until the custard coats the spoon. Remove from heat and stir in the the soaked gelatin until dissolved.

Beat the egg whites stiff and stir into the custard. Fold them into the custard and add the brandy/rum and the nutmeg. Chill until the mixture begins to stiffen. Pour into the baked crust and chill in the refrigerator until set.   

Topping:

- 1/2 Cup Heavy Whipping Cream
- 1-2 Tablespoons Brandy (Rum) if desired.

Mix the cream with the flavoring and whip until whipped cream. Coat the top of the pie with it. Serve chilled.


**To simplified this recipe you can buy a premade graham cracker pie shell and premade whipped cream. I won't judge. If you have never made a custard before, it's helpful to read this guide.**


November 13, 2019

WW1 Recipes to Help Rebuild France: Serbian Sarma


This recipe is from the book Allied Cookery (1916), a book written to raise funds to support World War 1 victims in France. It contains recipes from the allied nations. It was the work of Gertrude Clergue and her sister Grace Harrison who were born of a French father and American mother.  Clergue, was awarded the Medal of French Gratitude in 1920 fr her efforts. The funds would help rebuild farms and eventually the food supply in the war torn areas:

Unfortunately the list of calamities that have melted on France does not do not stop there: all the territory invaded by the German troops, from which they have been driven, which goes from the Marne to the Aisne, and that covered hundreds of prosperous villages in one of the regions the most fertile and richest in France, was ravaged by enemy troops. The owners of these thousands of farms - old men, women and children - have returned to their homes destroyed to raise their houses and have the land produced food they need. They lost everything: houses, furniture, clothes, animals, farm implements.

The book was reprinted in 1917 and 1936. I'm not an authority on Serbian cooking and I can't claim that this recipe is the most "authentic one." The book was published in mostly English and intended for American and Canadian audiences but looking at the recipes they do seem to match up on a basic level with foreign foods at the time. Some recipes use picked cabbage instead of relying on sauerkraut for the kick.

It is delicious and I can't wait to make this again. I walked in with the cabbage and my Grandma told me to bring down the extra because she would make stuffed cabbage. I said I was making stuffed cabbage and she was way more interested in having me do it. :)


WW1 Serbian Sarma


Ingredients:

- 1 Head of Cabbage
- 1 Cup of Rice
- 2 Pounds of Ground Beef
- 2 Pounds of Ground Pork
- 5 Onions, chopped
- 4 Egg, beaten
- Sauerkraut
- Salt
- Pepper
- Spoonful of Flour
- Spoonful of Paprika
- Lard/ shortening


Instructions:

Boil a pot of water,remove from heat and carefully add your cabbage.  Fry your onions in a large frying pan in a spoonful of lard/shortening. (Remove one onion's worth to a separate bowl to use for the sauce.) Mix in the beef, pork, eggs, salt, pepper and uncooked rice until well combined. Set aside.

Carefully remove your cabbage from the water. Pat dry and remove the leaves.

Fill each cabbage leaf with two spoonfuls of filling and fold in the two sides and the top and bottom to form a little packet.

Fill the bottom of a deep casserole dish with some sauerkraut and the juice. Place the filled cabbage leaves in the dish, layering sauerkraut and cabbage leaves. Cover and bake for 45 minutes at 325.

Put the remaining onion into a frying pan on medium heat. Saute the onions in a spoonful of lard and add a spoonful of flour, a spoonful of paprika, and a cup of water. Cook until it thickens. Pour over the cabbage leaves and bake for another 15 minutes. Top with sour cream when serving, if desired.


***I used Impossible Burger meatless and Vegan Field Roast Frankfurters for this. I also halved the "meat" in the recipe, used vegetable shortening instead of lard and smoked paprika. You certainly could bake or cook it on the stove for the full two hours.***


Here's a video if you want to see the "pot" sarma is supposed to be baked in. I didn't have one so had to make do with a good ol' casserole dish.


Harrison, Grace Clergue, and Gertrude Clergue. Allied Cookery, British, French, Italian, Belgian, Russian. New York: G.P. Putnams Sons, 1916.


October 23, 2019

World War 2 Era Bismarck Tea Ring


"OH NO! That looks nothing like the picture!" Yes, that happens sometimes but everyone said to bring it to the event anyway. It wouldn't be right if I didn't share the failures as well as the successes. It tasted fine but wasn't as pretty as it could have been.

I kneaded the biscuit dough about 5 minutes before I realized it was only supposed to be for 30 seconds. The damage had been done. It was near impossible to roll it out to a nice 1/8 of an inch dough. No pretty swirly rolls for me. The flavour was there but the result turned out to be kind of blobby. It wouldn't have been in the spirit of World War II if I threw it out and started over. All that flour and butter!

I ended up making and using apple jelly instead of raspberry as I had apples browning in my fruit bowl and was trying to keep the costs down. It might not look as pretty as it should but it tasted good. It was less sweet than we're used to but that could be fixed by an extra sprinkle of sugar over the jelly before rolling.


World War 2 Era Bismarck Tea Ring


Biscuit Dough


- 2 Cups sifted Flour
-2 teaspoons Baking Powder
- 1/2 teaspoon Salt
- 4 Tablespoons Butter or Shortening
- 3/4 Cups Milk

Mix flour, salt and baking powder and sift. Cut in the butter or shortening and add milk slowly until a dough is formed. Flour your hands and knead for 30 seconds or until all is combined. Roll out on a lightly floured piece of parchment paper on a cookie sheet until the dough is a rectangle about 1/8 of an inch thick.

Filling 


-1/2 Cup Raspberry Jam

Glaze


- 1 Cup Powdered Sugar
- 2 Tablespoons Milk
- 2 Tablespoons Raspberry Jam

Instructions:

Preheat oven to 400° F. Spread a thin coat of raspberry jam on the dough. If you make it thick, it will slide out and make a mess. Starting at one long side of the dough, carefully roll it up until you have a log. Bend the two ends together to form a circle and cut 1 inch slices (leaving some dough to keep it in a ring). Twist each slice so the cut edges are facing up. Bake for 30 minutes on a parchment lined cookie sheet. Remove to a cake rack. Combine jam, sugar and milk to make a glaze. Drizzle glaze on the top with a spoon and serve warm.


A bunch of us looked at the original photo and aren't entirely convinced that the hole in the center wasn't cut out after it was baked. Some theorized it might have been baked in a bundt pan. My ring baked solid so I did what you're supposed to do when you cook a blob: covered it in gaze. I'd love to see what you end up with if you try it. If I make it again, I'll update with the results. This recipe is from 10 Steps to Perfect Baking (1937.)  

October 9, 2019

World War II Pumpkin Pie Recipe

WW2 Recipes Pumpkin Pie

I'm still a beginning pie baker and my grandma had no tips. She never learned to make crust and I've never been very good at it either. The 1940s baker could be economical and make pie crust from scratch but packaged pie crust mix was available. We may or may not have cheated.

This recipe is from Recipes for Good Eating (1944). The booklet suggested pre-making bulk crust mix and using as needed, as their recipe called for Crisco instead of butter and would not spoil in a container in the cupboard. The texture is less firm than modern pie but still has a good flavor.

Nearly 20 million Americans grew Victory Gardens to help with food shortages. The Us Department of Agriculture estimates that citizen growers  grew over 40% of the vegetables grown in the US at the time. I was going to make a victory garden on the pie but it ended up being a big pumpkin patch, which is okay because pumpkins are easy to grow and feed a lot of people.  The Victory Garden Handbook (1944) by the Pennsylvania State Council of Defense recommended them as a good source of Vitamin A, Thiamin, Calcium, Vitamin B and Iron. I recommend them because they are delicious.

WW2 Recipes Pumpkin Pie
Rosskam, Louise, photographer. Washington, D.C. Victory gardening in the Northwest section. District of Columbia United States Washington D.C. Washington D.C, 1943. May. Photograph. https://www.loc.gov/item/2017853905/.
  

World War II Pumpkin Pie Recipe


Ingredients:

- 1/2 Cup Sugar
- 1/2 teaspoon Salt
- 1 teaspoon Ginger
- 1 teaspoon Cinnamon
- 1/4 teaspoon Cloves
- 1 1/2 Cups Pumpkin Puree(canned or homemade)
- 2 Eggs
- 1 1/2 Cups Hot Milk
- Pie Crust

Instructions:

Preheat your oven to 425°F.  Line your 9" pie pan with a crust.

In a mixing bowl, mix sugar, spices salt, pumpkin.

Beat the eggs and add them to the mix. Then stir in the hot milk.

Pour the mixture into your pie crust. Bake for 15 minutes

Reduce heat to 350 °F.  and bake for 30 minutes or until done in the middle. Let cool in the open oven for 15 minutes, then on a counter for 4 hours. Drizzle with chopped nuts and honey before serving.


I baked the crust decorations on parchment paper in a separate pans. Modern custards that use heavy cream can hold decorations during baking but I didn't want to risk it here as the batter was very thin before baking.

WW2 Recipes Pumpkin Pie

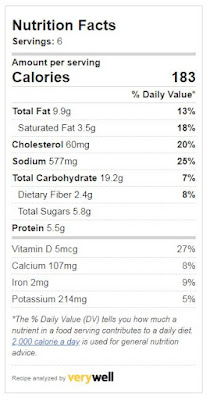
Wee used a 0 calorie sweetener for a second pie. Here are the nutrition facts if you want to do that.


WW2 Recipes Pumpkin Pie
If you make this pie, I would love to see photos!

Copyright © 2008-2020 Stephanie Ann Farra. All rights reserved.

All materials posted on this site are subject to copyrights owned by Stephanie Ann Farra. Any reproduction, retransmissions, or republication of all or part of any document found on this site is expressly prohibited, unless the author has explicitly granted its prior written consent to so reproduce, retransmit, or republish the material. All other rights reserved.