September 5, 2016

Civil War Stationary and Envelope Templates


"Good bye my sweet little wife -- write to me often"

-Jedediah Hotchkiss to Sara A. Hotchkiss, August 4, 1861

Some of the most prolific cries in Civil War soldier's letters is "Why don't you write me more?" and "Tell everyone to write me!" Mail delivery was highly anticipated by soldiers who felt left out of the events on the home front. Letters were a huge source of information and the main source of communication back home to the common soldier. It was reported that some regiments were sending out around 600 letters per day.   

I've been meaning to get some reproduction Civil War stationary and envelope templates on here forever and my friend Austin Landis was nice enough to lend me these letters for this post. The letters are from a collection of letters written by a Pennsylvania family writing to each other during the war.

Stationary and envelopes during the Civil War period were beautiful. They typically featured patriotic messages, imagery and political cartoons. It was not uncommon for envelopes to be as decorative as the stationary. Soldiers had the option to write "Soldier's Letter" on the front of their envelope to have the recipient pay for the postage due to the trouble of tracking down stamps and keeping stamps usable in the field. In 1861, the cost of mailing a typical letter was 3 cents if it was travelling under 3,000 miles. In the Confederacy in June 1861, it was 5 cents to mail a letter that was traveling under 500 miles.     


Civil War Era Letter and Envelope Templates for Reenacting | World Turn'd Upside Down
From the private collection of Austin D. Landis


Civil War Era Letter and Envelope Templates for Reenacting | World Turn'd Upside Down
From the private collection of Austin D. Landis


Civil War Era Letter and Envelope Templates for Reenacting | World Turn'd Upside Down
From the private collection of Austin D. Landis


From the Library of Congress


Civil War Letter Templates to Print:


A common size of stationary during the Civil War was 8. 5 x 11 inches folded in half width way. 


Back of the stationery page.

Civil War Era Letter and Envelope Templates for Reenacting | World Turn'd Upside Down

3 x 5.5 inches was a common envelope size. Print this out on heavy paper and use it as a template for tracing out envelopes. Fold along the dotted line. Each envelope fits on an 8.5 x 11 page.

If you right click on the images and "open in a new tab" If you print the images at 100%, they should be the correct size to use.

Click here to see more Civil War Envelopes!

August 26, 2016

WARNING:PHOTO HEAVY POST- The Mercer Museum and Early American Tools

I went to the place where they send good historians when they die.

As you all know, and pretty much anyone who knows me knows, one of my biggest passions in life is how people lived and prospered in the Early American, pre-industrial age. I don't know why it fascinates me so much in this age of "buy everything at a mega-store and hire a professional to do it," but it does. I feel like people have become so reliant on corporations for even the bare necessities of life.

Very few people can service any of the items we use on a daily basis, let alone, build one of these themselves. More often than not, the cry you hear when something breaks is "I'll have to buy a new one." So I am forever amazed at the ingenuity and usefulness of people in a time before industrial machinery was king. Seeing everyday tools and materials from hundreds of years ago just makes me giddy. So you can't imagine the brain explosion I had when I entered the Mercer Museum in Bucks County, Pennsylvania.

Henry Chapman Mercer was a wealthy eccentric who became very interested in pre-industrial tools and trades. He was fascinated by tools of the past he had heard of but never seen before and became a voracious collector of all things that related to Early American trades. He thought these forgotten, everyday objects were the real story of human progress and he used avant garde methods to display what was essentially trash when he was collecting in around the turn of the century. (If you aren't already packing for your visit to this museum, you should be. There's plenty of time to read this post when you get back.)

The collection currently contains over 40,000 artifacts, only 20,000 of which are on display. The museum is jammed packed with artifacts that relate to over 60 Early American trades, such as farming, textile production, glass making, coopering, shoe making, basket weaving, and ceramics making. Full disclosure: I spent most of the time looking right to left and up and down like a dog when someone is waving bacon in front of its face.      

Mercer Museum

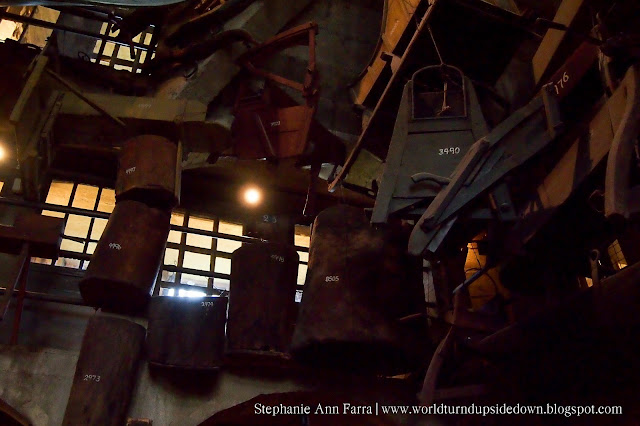
Of course, the only way to display a collection like this is to house it in a seven story, fireproof cement castle, right?


Mercer Museum Cradles

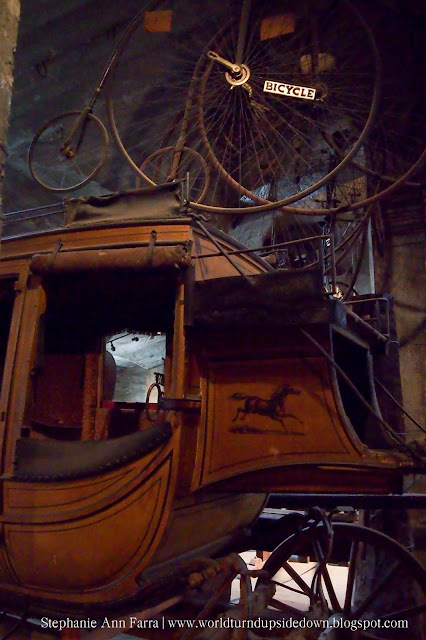
A lot of the collection is suspended from the ceilings, like these cradles and chairs but you can even see a whaleboat from the perspective of the marine life.

Mercer Museum Plows and Mortars

Plows and enormous mortars for grinding.

Mercer Museum Terrapin Tortoise Shell

Tortoise shell and horn item tools.  

Mercer Museum Terrapin Tortoise Shell

Mercer Museum Terrapin Tortoise Shell

Mercer Museum Redware

This is nowhere near all of the redware pottery and slipware on display.

Mercer Museum Glass

Mercer Museum Glass

Mercer Museum General Store

A stocked, early 19th century general store.

Mercer Museum Textile

Wooden textile printing blocks.

Mercer Museum Yokes

Livestock and farming equipment.

Mercer Museum Shoemakers tools

Shoemakers tools.

Mercer Museum Lighting

Oil lamp collection, the oldest of which is about 2,000 years old.

Mercer Museum  Medicine

Early medical equipment.

Mercer Museum Weaving Spinning Wheels

A whole room dedicated to spinning and weaving!

Mercer Museum Muskets

Early guns and gunpowder horns. 

Mercer Museum Powder Horns


Mercer Museum  Carriage

Carriages and bicycles.

Mercer Museum Baskets

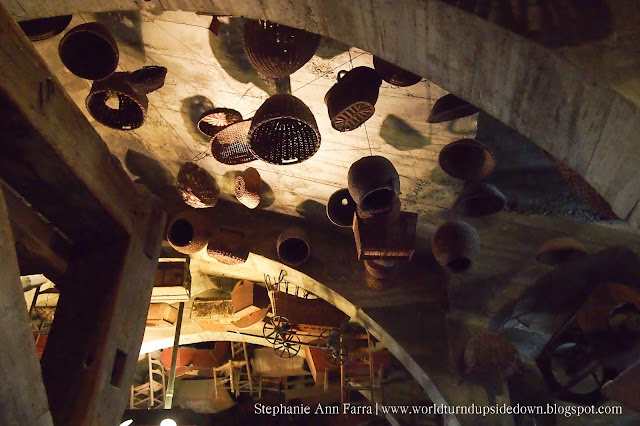
Baskets and a miniature wagon.

Mercer Museum instruments

Musical instruments.

Mercer Museum Fireplace Backs

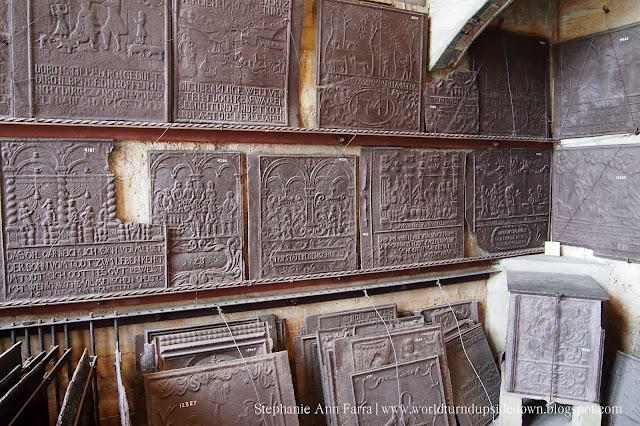
Fireplace backs, many of which dated to the 1700s.

Mercer Museum Gallows

The gallows used in the last hanging in Bucks County in 1914.

Mercer Museum Noose shackes

Mercer Museum Native American

Pre-historic Native American tools.


This is a beautiful, beaded Native American bag, from the temporary exhibit "Long May She Wave: A Graphic History of the American Flag." Forgive me for the upside down photo, I had to take it at an odd angle but the beading was too lovely to pass up.

Apparently, I'm the last one to know about this museum and heard lovely things from people on Facebook about just how awesome it is. It is definitely not one to miss if you are visiting the Philadelphia or Allentown areas. Have you been to the museum? What did you think? 

August 18, 2016

Help Decode 15,971 Civil War Telegrams!


The Huntington Library is looking for volunteers to help decode and transcribe 15,971 telegrams sent by the Union Army during the Civil War. These telegrams are part of the Thomas T. Eckert Papers which not only contain everyday wartime communication, but are also know to contain coded messages to Abraham Lincoln.  The project aims to make these messages available online and accessible and is funded by a grant from the Publications and Records Commission (NHPRC).

Eckert was the aide-de-camp of military telegraph operations for General McClellan and soon became the administrator of the War Department's military telegraphs at the capitol and went on to become Assistant Secretary of War in 1866. The telegraphs are part of his personal collection and no doubt hold a lot of new information about the war that can only be discovered if everyone helps!  

July 25, 2016

18th Century Bookbinding with Ramon Townsend

18th Century Bookbinding

Today I was fortunate enough to attend a class on Colonial Bookbinding will Williamsburg trained bookbinder Ramon Townsend at the Harrinton House, home of Walter Staib's A Taste of History.

First off, I was really excited to take this class as I love little journals and notebooks and have made quite a few in my life but have never had the chance to learn how to make them the 18th century way. I'm not kidding. I was so excited to take this class that I had that dream where you are late for something important and then everything that happens makes you more late. The universe also threw me for a loop when the morning of class my car decided it didn't want to start but finally acquiesced last minute and I made it in time. The class was so much fun and everyone left with a pretty book and I'm now in love with marbled paper.

I took a lot of pictures during the class in case anyone is interested in the whole process or curious exactly what is under the spine of old books. We used rag paper, paste and leather so these books should weather time as good as 18th century books have. Well made, 18th century books fare surprisingly better than many 19th century books due to the use of rag paper over wood pulp paper.

18th Century Bookbinding

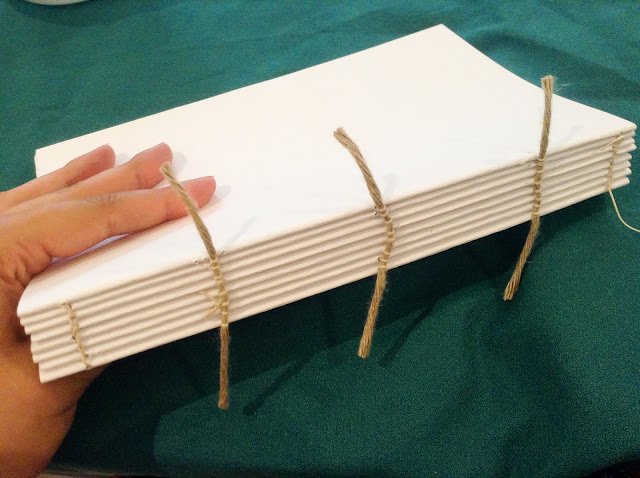
We each used a sewing frame to hold the cords in place for sewing. We each only made one book but the frame is designed to sew a stack of books at one time.

18th Century Bookbinding

18th Century Bookbinding

18th Century Bookbinding

We learned how to sew in the signatures in the 18th century way. Along with the necessary stitches.

18th Century Bookbinding

18th Century Bookbinding

We glued down the cords to attach the covers.

18th Century Bookbinding

18th Century Bookbinding

Attached the leather to the spines.

18th Century Bookbinding

Attached the decorative covers.

18th Century Bookbinding

18th Century Bookbinding

One of the other books made in the class.


We learned how to use embossing tools to decorate leather books.


It was an extremely enjoyable class and I hope to take the paper marbling and book repair class when they are offered again.

July 17, 2016

Civil War Era Recipe: Preserved Watermelon Rind


As you know, watermelon rind is poisonous.

I'm just kidding but a surprising number of people believe that it is true. It follows the theory that bitter tastes are a marker for things that can hurt you such as bitter almonds and poison ivy, but it is just a rumor and watermelon rind has a surprising amount of uses. It can be preserved and eaten as pieces, candied, pickled, and even be turned into jelly or preserves.

This recipe was cooked for the Historical Food Fortnightly. A yearly challenge that encourages bloggers to cook a historical food every two weeks as part of the challenge "Waste not, Want not" and what gets wasted more than watermelon rinds?

The Challenge: Waste Not, Want Not (July 1 - July 14)
Good housekeeping in any historic era included making the most of your food items. Pick a recipe that involves avoiding waste (maybe reusing leftovers, or utilizing things commonly thrown out) and show us how historically-green you can be!

The Recipe:


The Date/Year and Region: 1850s-60s, United States

Ingredients:

- Watermelon Rind, cut into pieces or shapes
- Alum or Salt
- Lemon Peel
- Ginger
- Sugar, pound for pound to the rinds
- Cabbage Leaves for coloring

Instructions:


Cut out the inside of the watermelon. Pare the skin off the rind and cut the rind into small, thin pieces. Soak the pieces in a mixture of alum water for 3 days and plan water for 3 days, changing the water each day. Drain the pieces and boil in a sauce pan on medium heat in new water until the pieces are translucent and a fork can pass through easily. Drain the pieces and return to saucepan. Add the lemon peel, ginger and sugar and boil until the sugar forms a thick syrup. Let cool and eat or can for future use. If the sugar does not form quickly enough, remove the pieces and boil the sugar mixture until a syrup is formed then pour it over the pieces.  


How Did You Make It: 

Godey's Lady's Book in 1858 suggested soaking the pieces for 3 days in salt water, 3 days in alum water and 3 days in plain water (changing the water each day) to remove any alum flavor before preserving the rinds.

Time to Complete: Days to soak it but actual prepare time 30 mins to 1 hour.

Total Cost: $3.00 for the watermelon.

How Successful Was It?: I admit I was afraid to taste it. Something about the rind just sounds unappealing. But I forced myself too and it was delicious. If you didn't tell someone this was the rind of a watermelon, they'd think it was crisp, flavored, honeydew. The pieces aren't quite so toxic looking when light isn't shining through them. These would be a nice treat if made in different colors and flavors. The rind itself has a very neutral flavor good for absorbing other flavors.  


How Accurate Is It?: I dyed with spinach instead of cabbage leaves. The first receipt I found said to layer in ivy leaves, but I did not feel confident in the safety of it. 

Copyright © 2008-2020 Stephanie Ann Farra. All rights reserved.

All materials posted on this site are subject to copyrights owned by Stephanie Ann Farra. Any reproduction, retransmissions, or republication of all or part of any document found on this site is expressly prohibited, unless the author has explicitly granted its prior written consent to so reproduce, retransmit, or republish the material. All other rights reserved.