August 4, 2019

WWII Era Egg Foo Young Recipe

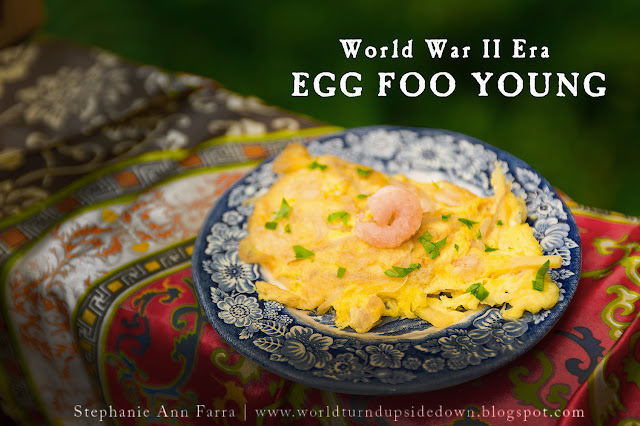
Egg Foo Young World War II Recipe


This is another recipe from The Chinese Cook Book (1936.) You can see the Shrimp Fried Rice I made from this book here. This was a cookbook by a Chinese-American woman meant for American cooks wishing to recreate the dishes they were eating in popular "Chop Suey" Houses. Chop Suey Houses were popular for their cheap and delicious food, elegant decor and live music.

You might ask why Chinese food would be popular during a time of war that emphasised nationalism. In the early 1900s, labor unions felt that nonunion Chop Suey houses were bad for business and pushed for laws that would shut them down. Many of these laws focused on disallowing live music and not allowing young people to enter them late at night. We know how well that works. Chop Suey Houses gained a reputation for being exotic and a part of a wild lifestyle. By the 1940s they were still fashionable places to see and be seen. It's interesting to note how the dish, Chop Suey has fallen out of fashion so much that few people have ever tried it.       

Egg Foo Young is another great way to use up leftover vegetables and protein. Celery, green onions, carrots and any sort of leftover meat would be delicious in this. In modern times it is served with a gravy but the Chinese Cook Book emphasised Soy Sauce, which was then called "Chinese Sauce" due to its ubiquity in Chinese American dishes. 


Egg Foo Young


Ingredients:

- 5 Eggs
-1/2 Cup Chopped Shrimp
- 1/2 Cup Onion, shredded
- 1 Cup Bean Sprouts
- Bamboo Shoots (cut in matchsticks)
- 1/4 Cup Water Chestnuts, chopped
- 5 Tablespoons Peanut Oil or Vegetable Oil

Beat eggs together and mix in chopped vegetables and shredded onions . Pour some oil in a large wok or frying pan and heat to medium-high heat. Using a ladle, scoop out one patty's worth of mixture in the hot oil. Create as many of these "patties" as can fit in the pan without touching. Fry until you it is lightly browned on one side, then flip and fry on the other side until lightly browned.


In modern times, Egg Foo Young is deep fried and foodies scoff at the idea of pan frying. You can deep fry this is about 2 inches of oil. Make sure to use a metal ladle and hold it in the oil in the ladle for a few seconds before pouring it in. Frying takes about 5 minutes and you'll have to flip it.   

June 30, 2019

WWII Era Sweet Potatoes in Apple and Orange Cups

WWII WW2 Recipe Sweet potatoes


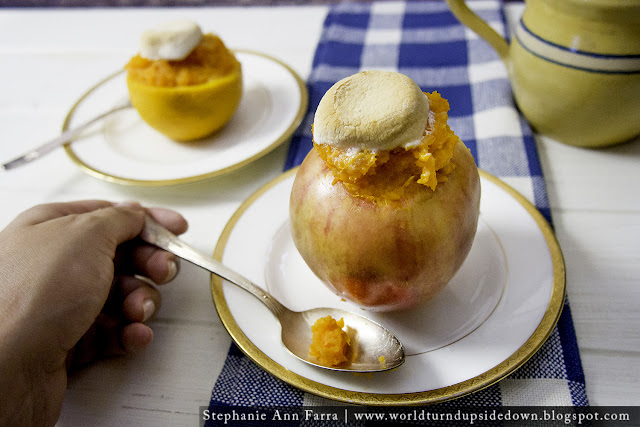
This recipe came from the book 250 Ways of Serving Potatoes (1941) by the Culinary Arts Institute. Potatoes and sweet potatoes are easy to grow and very filling. By the end of WWII, American farmers were growing 3 billion pounds of sweet potatoes a year!

250 ways is more ways than anyone needs to know, but this way sounded so interesting I knew I had to try it. I was not disappointed. I love the taste of sweet potatoes but we really only eat them "Thanksgiving style."

 If their sweet taste is not enough to entice you, sweet potatoes are highly nutritious. They are high in vitamin C, niacin, magnesium, manganese, antioxidants, fiber, and sporamin. Sporamin reportedly has anti-aging and cancer fighting properties. In fact, some of the oldest living humans ate sweet potatoes as 60% of their diets!


WWII WW2 Recipe Sweet potatoes

Sweet Potatoes in Apple Cups


- 4 Medium Sweet Potatoes
- 3 Tablespoons Butter
- 1/2 teaspoon Salt
- 2 Tablespoons Sugar
- 4 Red-skinned Baking Apples
- 4 Marshmallows

Boil sweet potatoes until soft then peel and mash. Add butter, salt, and sugar, mix and set aside. Core your apples, place apples in the nooks on a cupcake pan. Fill apples with sweet potato mixture and bake on 325℉ about 15 minutes or until the apples are soft. Remove from oven, top each apple with a marshmallow and return to the oven until the marshmallows brown. 

Sweet Potatoes in Orange Cups 


- 2 Cups Mashed Sweet Potatoes
- 1/2 cup Orange Juice
- 2 Tablespoons Butter
- 1/2 teaspoon Salt
- 3 Large Oranges
- 6 Marshmallows, quartered

Boil sweet potatoes until soft then peel and mash. Cut each orange in half, juice, and remove the pulp. Add 1/2 cup of the juice, salt, and butter to the sweet potatoes and mix. Fill orange peels with the sweet potato mixture and top with marshmallow pieces.  Place oranges in the  nooks on a cupcake pan. Bake a 400℉ for about 15 minutes.


The orange was not bad but masked the flavor of the sweet potatoes too much for my preference but I could see it being a welcome change if you had a ton of sweet potatoes to eat. I very much liked the sweet potato in the apple. Maple syrup or honey would also be delicious substitutions in this. Hope you all enjoy!

May 12, 2019

WWII Era Sauerkraut Viennese Recipe

WWII WW2 Recipe Sauerkraut Viennese


When I was younger, my grandmother made cabbage weekly. Cabbage fried in soy sauce and topped with ketchup or cabbage stuffed with ground beef, cabbage soups, and coleslaw. Always with that particular smell that accompanied a hot, steamy kitchen.

Everytime I see I recipe that calls for cabbage, I remember how much I like it and wonder why I don't cook it. In fact, I couldn't even remember the last time I had cabbage short of coleslaw. It was something that fell off my food radar as an adult. My diet has gotten bland, relying heavily on foods flavored with sugar and salt.  Many fermented foods were dropped so I'm now making a more conscious attempt to add them back in again because they're delicious and provide good health benefits.

Fermented foods can improve digestion, boost immune systems and have inflammatory properties among other benefits. For this recipe, I replaced the sour cream with plain yogurt to really up the probiotic count (okay, so I just happened to have a ton in the fridge I needed to use up.). Any kind of sausage would go good in this but kielbasa is amazing, I used Field Roast Italian with good results. This recipe is from 500 Delicious Dishes from Leftovers, 1940.

WW2 Sauerkraut Viennese 


Ingredients:

- 3 Cups Sauerkraut
- 1 Pound Link Sausage
- 1 Cup Sour Cream
- 1/2 teaspoon salt
- 3 Cloves
- 1 Bay Leaf

Instructions:

Preheat oven to 350 degrees F. Place sausage in a casserole dish and make until browned.

While the sausage is baking, add sauerkraut, bay leaf, and cloves to a large saucepan on medium-high heat. Stir periodically to avoid burning. Remove from heat when the water from the sauerkraut has cooked off.

Remove the bay leaf and the cloves and stir in the sour cream. Serve on a platter, topped with the sausage.


May 2, 2019

Easy, DIY Cottage Cheese Tutorial, WWI Meat Substitute Recipe


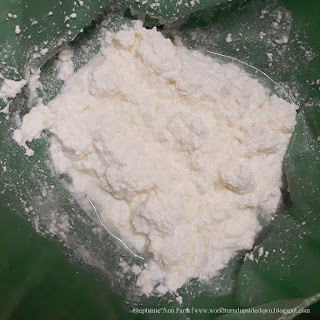
This basic cottage cheese or farm cheese recipe has been used for centuries. Leftover buttermilk, lemon juice, or vinegar can be used to separate the curds and the whey. I used vinegar because I like the idea of being able to make this with stuff already in your refrigerator. I have an 18th century recipe that uses lemon juice for the purpose.

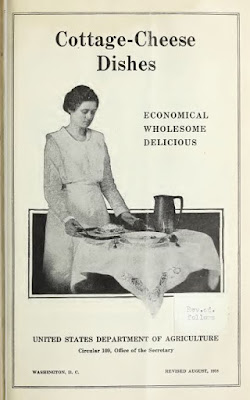
During WWI, the government encouraged Americans to make and use cottage cheese to reduce meat consumption. I've included some recipes from Cottage-Cheese Dishes, a pamphlet by the US Department of Agriculture, printed in August 1918.


Cottage Cheese How to Tutorial WWI World War One


Cottage Cheese How to Tutorial WWI World War One


Easy Cottage Cheese Recipe


Ingredients:

- 8 Cups Whole Milk
- 6 Tablespoons Vinegar or Lemon Juice
- 1 teaspoon Salt
- Splash of milk (optional for serving)

Instructions:

Pour milk into large pan. 

Cottage Cheese How to Tutorial WWI World War One

Heat the milk and salt until simmering (don't let it boil.) 

Cottage Cheese How to Tutorial WWI World War One

Stir constantly so the milk doesn't scald. Once simmering, remove from heat.

Cottage Cheese How to Tutorial WWI World War One

Add the vinegar or lemon juice and stir until curds and whey form.

Cottage Cheese How to Tutorial WWI World War One

Cover pot and let sit for 15 minutes off the heat.

Place a bowl under a colander or sieve and place quadruple folded cheese cloth or a linen cloth in it. 14" x 14" square should be enough.

Cottage Cheese How to Tutorial WWI World War One

Skim off the curds with a slotted spoon and place into the colander, pour the remains of the pot little by little, allowing it to drain.

Cottage Cheese How to Tutorial WWI World War One

Collect the corners of the cloth together to form a sack.

Cottage Cheese How to Tutorial WWI World War One

If you want cottage cheese, tie a string around the top of the bag and hang over a bowl overnight. When serving, add salt and a couple tablespoons of fresh milk.

 If you want meat substitute, sliceable cheese, squeeze the water out and let sit for an hour. Pack the cottage cheese into a bowl to form a loaf, refrigerate for 2 hours, then invert it on a plate and serve.

The Department of Agriculture pamphlet recommend adding chopped peppers, cucumbers, nuts, pimentos, and/or horseradish before serving, which all sound delicious. 


I froze the whey in ice cube trays until i figured out what I wanted to do with it. Whey honey sounds like a good topping for cottage cheese, especially since I'm out of honey. (I have to go pester the bees and their housekeeping staff.) The lemonade punch also sounds good. I'll keep you updated if I get to either of them.


WWI Honey Lemonade Recipe World War One

April 17, 2019

WWI Era Maple Fudge Recipe 1905, 1916


This morning my friend Eva sent me this video, from Imbrandonferris on Youtube called "Making Fudge from the 1900's!" with the caption "I started a fire!"


Sometimes I get distraught that no one reads my posts or that no one cooks anything I post. I wonder why I bother. Old recipes and foodways are so important to me and I believe it's a skill that needs to be passed onto future generations, especially in an era where meals come frozen and vegetables are unrecognizable to many.

 I started posting when I was young as a way to share the things I was learning. Every dish I cooked was an experiment. Maybe it would come out, maybe it wouldn't. I had a heck of a time transcribing measurements that sounded ridiculous. Pick the walnuts when they're the size of a squirrel's ear? Okay.

So many of the ingredients were foreign and needed research to decipher and effort to obtain. But now that I've been over 10 years into it, am a buttload of books more familiar with foodways over last 300 years and have studied under some of the best, some of that excitement when trying a new recipe has waned.     


This video made me laugh so much. It brought me right back to the days when I didn't have any clue. It's a great reminder of why I started cooking old recipes in the first place. I made a lot of friends along the way and I love running into people who love reading my blog.

So without further ado, here is "Fudge from the 1900s"  The recipe from a book called "A Little Cookbook for a Little Girl." First published in 1905, it was reprinted in 1916 and still being advertised in newspapers in 1921.


WWI Era Maple Fudge Recipe 1905, 1916


Ingredients:

- 3 Cups Brown Sugar
- 2 Cups 100% Maple Syrup
- 1 cup Whole Milk
- 1/2 cup water
- 4 Tablespoons Butter (the size of an egg which is actually a very common measurement)
- 1 Cup Walnuts or Hickory nuts, chopped

Instructions:

In a large pot, combine brown sugar and maple syrup. You can stir it at this stage. Heat until boiling. Once boiling add the milk and water. Boil for 2 minutes with the lid on.

Do not stir. Butter your thermometer and stick in the mixture, making sure it is not touching the bottom of the pan. Keep the mixture boiling until it reaches the soft ball stage (112 to 116 °C (234 to 241 °F). This will take about 10 minutes but can be longer.

Take an 8 x 8" pan and line with aluminum foil. Grease the foil with butter.

Do not stir. Remove from the heat. Add the butter. Let sit until it cools down to 230°C, 110°F. This will take about an hour. Do not stir. You want to move the fudge as little as possible during this time to prevent sugar crystals from forming too early and giving your fudge a gritty taste.

Once it has reached 230°C, 110°F it is time to stir. You will be stirring until it turns a lighter shade. It can take up to 30 minutes. Add the crushed nuts. Quickly pour it into your pan and smooth out the top with a spatula. Let look for 3- 24 hours. It's easier to cut the next day. Cut in 1/2 inch pieces.


Instructions with pictures:

In a large pot, combine brown sugar and maple syrup. You can stir it at this stage. Heat until boiling. Once boiling add the milk and water. Boil for 2 minutes with the lid on.


Do not stir. Butter your thermometer and stick in the mixture, making sure it is not touching the bottom of the pan. Keep the mixture boiling until it reaches the soft ball stage (112 to 116 °C (234 to 241 °F). This will take about 10 minutes but can be longer.


Take an 8 x 8" pan and line with aluminum foil. Grease the foil with butter.


Do not stir. Remove from the heat. Add the butter. Let sit until it cools down to 230°C, 110°F. This will take about an hour. Do not stir. You want to move the fudge as little as possible during this time to prevent sugar crystals from forming too early and giving your fudge a gritty taste.


Once it has reached 230°C, 110°F it is time to stir. You will be stirring until it turns a lighter shade. It can take up to 30 minutes. Add the crushed nuts.


Quickly pour it into your pan and smooth out the top with a spatula. Let set for 3- 24 hours. It's easier to cut the next day.


Cut in 1/2 inch pieces.


Hope you enjoy! If you liked this post, please share it!

Copyright © 2008-2020 Stephanie Ann Farra. All rights reserved.

All materials posted on this site are subject to copyrights owned by Stephanie Ann Farra. Any reproduction, retransmissions, or republication of all or part of any document found on this site is expressly prohibited, unless the author has explicitly granted its prior written consent to so reproduce, retransmit, or republish the material. All other rights reserved.