October 31, 2013

Witch Jugs and Witch Bottles

Child Levitation
 Witch bottle, or witch jugs are a curious archeological find today. Bottles filled with liquid, rusty nails, hair, pins, and nail clippings have puzzled people who have come across them in home renovations for years.These bottles are typically found buried under front doorsteps or under hearths and seem to have been most popular during the 1600s.

As written evidence suggests, witch bottles were thought to protect the makers from the evil preying of witches or evil kill the witch. In the 1600s writer and orators turned to the supernatural world to explain and confirm events that were happening at the time when paranoia, fear and witchcraft plagued the minds of many. The book Saducismus Triumphatus, published in 1681, details how a witch bottle was to be made and used an example of how a man made one to help treat his suffering wife.  

In the book, the man was instructed to fill a bottle with his wife's urine and some pins and needles then cook it over a fire. When he did so, the cork popped out of the bottle and the contents flew out and his wife remained sick. As that was unsuccessful, the man was instructed to make a new bottle and bury it. But this time, his wife got better and later, he reported a woman he did not know came to his house and claimed that the man had killed her husband. Stories like these perpetuated the existence and malicious works attributed to witches and demons.  

While witch bottles have been found throughout the UK, only eight possible witch bottles have been found in the US. One was found during archeological excavations on Great Tinicum Island, here in Delaware County. For more information on this witch bottle visit: An American Witch Bottle

Water, eh?
Other items used to ward off witchcraft that are found in houses are worn out children's shoes which were commonly built into chimneys and the remains of dead cats. "Concealed shoes" are found commonly in both the U.S. and the U.K. There is even a museum collection of them at Northampton Museum and Art Gallery in England. The shoes were thought to trap witches attempting to enter through the chimneys and it was thought that the dead cats would be a bad omen to any evil or witches trying to enter a residence.

As with witch bottles, these items typically leave homeowners scratching their heads and are an uneasy reminder of how real witch craft and superstition were to some people in a time where suffering was rife and explanations scarce.   

Happy Halloween everyone! If you'd like to read a bit more, check out How to Identify a Witch According to Cotton Mather.

October 30, 2013

October Sketchbook Challenge

As per my original intentions, I promised I would share things from my sketchbook in order to make me use my sketchbook for drawing more rather than just writing in it.

This is my drawing for October's Sketchbook Challenge. The theme this month was "animal companions."


It isn't anything fancy but it is a sketch. I've been so busy this month. I'm still trying to get back in the habit of sketching things just for the fun of it. 

October 22, 2013

Homemade Apple Cider Recipe

Colonial Recipes
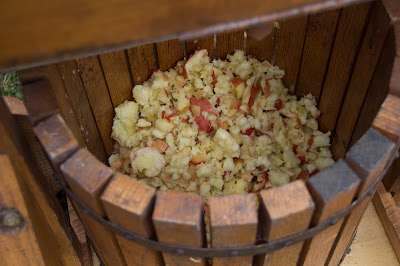
This weekend I finally got to use the cider press at work. It has been out of commission for a while and I hadn't seen it in action.

I love pretty much everything about fall. I love all of the fun activities that come with fall. But after making cider, I'm starting to believe it might just be the quintessential fall activity. Or at least should be included among the classics, such as watching the leaves change colors and enjoying bonfires at night.

Making cider sounds difficult but is actually surprisingly easy and the smell is amazing. With a cider press, all you have to do is grind up the apples then press them and you're done. At home you can do it the same way or you can cook the apples first to make them easier to press.  

Colonial Recipes
Colonial Recipes
Colonial Recipes
Revolutionary War Reenactor

Homemade Apple Cider

Ingredients:

- 10-15 Apples of mixed sorts
- 3 Cinnamon sticks
- 1 teaspoon whole Cloves
- 1 Nutmeg, whole
- 1 Orange
-  1/2- 3/4 Cups of Brown Sugar
- Water

Instructions:

Wash your apples and orange then core and cut them into quarters. If you are not planning on using the pulp for anything, you do not have to worry about removing the core or seeds. Put your apple chunks into a large pot and add enough water to cover the apples. Wrap your Cinnamon, Cloves and Nutmeg in cheese cloth and add to the pot. Add the sugar to taste. Bring the contents to a boil then reduce heat and let simmer for an hour or more, covered.

Let the pulp cool. Once cool strain it through a doubled piece of cheesecloth over a bowl. Squeeze the pulp to make sure you get out all of the juice. If you want you can strain the juice a second time.    

The pulp does not look appetizing but can be used in apple bread or apple muffins. You can also make pectin for jelly from it.


October 18, 2013

Any Day I Get to Touch a Llama is a Good Day; or, Cherry Crest Farm's Amazing Maize Maze

“A determined soul will do more with a rusty monkey wrench than a loafer will accomplish with all the tools in a machine shop. ” -Robert Hughes
  
Last month Andy and I took a trip that I didn't get to post about. I had been begging to go to a corn maze every fall since we met. It's been awhile but we finally made it and had a blast. We went to Cherry Crest Farm in Lancaster, PA. There was a llama, the cutest little goats that were playing with kids and newly hatched chicks. 
We went on Talk Like a Pirate Day and the theme of the maze was "set sail." So the maze was shaped like a ship, the riddles we had to answer were ship related and nautical themed music played while we meandered. If you get a chance to visit a corn maze this year, they are fantastic! 


Mazes are about choices. I have always been bad at making choices. I have a huge problem when I go on trips. I can never decide what camera I want to bring. My nice camera is great for certain things, however it's bulky and I have to decide what lenses I want to carry and what extras I want to bring. It used to take about 20 minutes in the morning before a trip just to decide what to bring and I never ended up being happy.

The camera was such a pain sometimes that I bought a smaller camera for  trips when I just wanted to take snapshots and not anything special.  That would solve my lens problem. For fun trips, I'd just bring my new, little compact. Nope, it ended up just being another choice.

You may be wondering what the quote at the beginning of this post has to do with anything. I find that the more I bring the less I use just because it's too much of a pain. I likewise get nothing  done if I have too many choices, but find I can get very creative if I am limited.


I freeze up when the world is at my command, but give me a small pebble and I can make it a world. I work best and most creatively when I put limitations on myself. A good trick to try if you are ever having creative or productivity problems is to limit yourself to a few things. Don't try to paint a painting using everything you have, try painting on a selected piece of paper and only one brush and see what you can make of it. It might expand to more things or morph into something else or you might make something brilliant with something very simple.


When I'm having camera issues, the best thing for me to do is pick one thing and make the most of it. Which sometimes means just taking photos with my phone. A lot of times it's good enough. I am constantly striving to do more with less in every area of my life.

Has anyone gone to a corn maze this fall or done something else fun?
     

October 16, 2013

How to Make Faux Leather Book Covers

In an earlier post, I mentioned how I'm trying to get along artistically using up my stash and not buying anything new if I can help it. Just like most artistically inclined people my stash can get overwhelming as we keep acquiring materials with a lot of potential but never get to as many projects as we wish we could. It's my goal to use up my stash.

This was a project I did with other people so not all of the photos are of the same book but they should do good enough for illustrative purposes.  The original instructions can be found here: Creepy Books.


We were making books for Halloween so I chose to make a new cover for the first Harry Potter book and a second smaller book, intending to serve as "Tom Riddle's Diary," which I plan to make into a sketchbook. I decided to make a dust cover instead of working directly on the cover.

Supplies:

-Cardboard or bristol board. 
-Paint: I used a cheap glossy acrylic.
-Paper Towels or Tissue Paper. I used paper towels with a lot of texture to give it a snakeskin look.
-Craft Glue that dries clear.
-Water

1. Open your book, making sure there are an even number of pages on each side to ensure the spine lays flat. Trace around your book leaving a 1/4 inch border around it at the top and bottom and 2-3 inches extra on the sides to make the flaps.  


2. Cut out cardboard shapes and  glue them to your cover. I used a tacky glue designed for use on t-shirts so the glue/water mixture in the next step wouldn't dissolve it.

3. Mix your glue with an equal amount of water. Tear up your paper towel into 3 to 4 inch pieces. Make sure you overlap your pieces and paint over them with the glue mixture.


4. Place a piece of paper towel on your cover and use a large paintbrush to brush your glue mixture over the paper towel piece. Overlap paper towel pieces and work until the cover is filled, making sure to leave 1/2 inch around the outside to overlap to the inside of the cover. If you want wrinkles in you book make sure to scrunch the paper towel pieces a little. Dry with a hairdryer or leave to dry overnight.


5. Turn your cover over and use the glue/water mixture to wrap the extra paper towel over the top and secure it to the inside. Let dry again.


6. Apply your paint. The original instructions stated to paint while the paper towel was still wet. I had much better luck letting it dry and applying a glossy paint to mimic a leather shine. Let your paint dry. If you want to include gold or silver elements, spray paint can be sprayed on plastic plate and applied with a cotton swab.


7. When dry, you can use something pointy to trace gently around your cutouts to make them stand out more against the background. 


I'll do a separate post when I finish the Harry Potter book. This is an incredibly easy project and looks great. This also might have reenacting uses an alternative to the covers I normally use while reenacting.
 

Copyright © 2008-2020 Stephanie Ann Farra. All rights reserved.

All materials posted on this site are subject to copyrights owned by Stephanie Ann Farra. Any reproduction, retransmissions, or republication of all or part of any document found on this site is expressly prohibited, unless the author has explicitly granted its prior written consent to so reproduce, retransmit, or republish the material. All other rights reserved.