April 17, 2019

WWI Era Maple Fudge Recipe 1905, 1916


This morning my friend Eva sent me this video, from Imbrandonferris on Youtube called "Making Fudge from the 1900's!" with the caption "I started a fire!"


Sometimes I get distraught that no one reads my posts or that no one cooks anything I post. I wonder why I bother. Old recipes and foodways are so important to me and I believe it's a skill that needs to be passed onto future generations, especially in an era where meals come frozen and vegetables are unrecognizable to many.

 I started posting when I was young as a way to share the things I was learning. Every dish I cooked was an experiment. Maybe it would come out, maybe it wouldn't. I had a heck of a time transcribing measurements that sounded ridiculous. Pick the walnuts when they're the size of a squirrel's ear? Okay.

So many of the ingredients were foreign and needed research to decipher and effort to obtain. But now that I've been over 10 years into it, am a buttload of books more familiar with foodways over last 300 years and have studied under some of the best, some of that excitement when trying a new recipe has waned.     


This video made me laugh so much. It brought me right back to the days when I didn't have any clue. It's a great reminder of why I started cooking old recipes in the first place. I made a lot of friends along the way and I love running into people who love reading my blog.

So without further ado, here is "Fudge from the 1900s"  The recipe from a book called "A Little Cookbook for a Little Girl." First published in 1905, it was reprinted in 1916 and still being advertised in newspapers in 1921.


WWI Era Maple Fudge Recipe 1905, 1916


Ingredients:

- 3 Cups Brown Sugar
- 2 Cups 100% Maple Syrup
- 1 cup Whole Milk
- 1/2 cup water
- 4 Tablespoons Butter (the size of an egg which is actually a very common measurement)
- 1 Cup Walnuts or Hickory nuts, chopped

Instructions:

In a large pot, combine brown sugar and maple syrup. You can stir it at this stage. Heat until boiling. Once boiling add the milk and water. Boil for 2 minutes with the lid on.

Do not stir. Butter your thermometer and stick in the mixture, making sure it is not touching the bottom of the pan. Keep the mixture boiling until it reaches the soft ball stage (112 to 116 °C (234 to 241 °F). This will take about 10 minutes but can be longer.

Take an 8 x 8" pan and line with aluminum foil. Grease the foil with butter.

Do not stir. Remove from the heat. Add the butter. Let sit until it cools down to 230°C, 110°F. This will take about an hour. Do not stir. You want to move the fudge as little as possible during this time to prevent sugar crystals from forming too early and giving your fudge a gritty taste.

Once it has reached 230°C, 110°F it is time to stir. You will be stirring until it turns a lighter shade. It can take up to 30 minutes. Add the crushed nuts. Quickly pour it into your pan and smooth out the top with a spatula. Let look for 3- 24 hours. It's easier to cut the next day. Cut in 1/2 inch pieces.


Instructions with pictures:

In a large pot, combine brown sugar and maple syrup. You can stir it at this stage. Heat until boiling. Once boiling add the milk and water. Boil for 2 minutes with the lid on.


Do not stir. Butter your thermometer and stick in the mixture, making sure it is not touching the bottom of the pan. Keep the mixture boiling until it reaches the soft ball stage (112 to 116 °C (234 to 241 °F). This will take about 10 minutes but can be longer.


Take an 8 x 8" pan and line with aluminum foil. Grease the foil with butter.


Do not stir. Remove from the heat. Add the butter. Let sit until it cools down to 230°C, 110°F. This will take about an hour. Do not stir. You want to move the fudge as little as possible during this time to prevent sugar crystals from forming too early and giving your fudge a gritty taste.


Once it has reached 230°C, 110°F it is time to stir. You will be stirring until it turns a lighter shade. It can take up to 30 minutes. Add the crushed nuts.


Quickly pour it into your pan and smooth out the top with a spatula. Let set for 3- 24 hours. It's easier to cut the next day.


Cut in 1/2 inch pieces.


Hope you enjoy! If you liked this post, please share it!

March 30, 2019

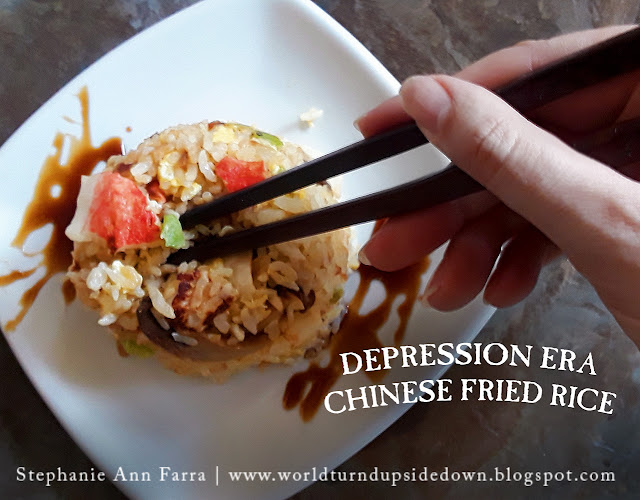
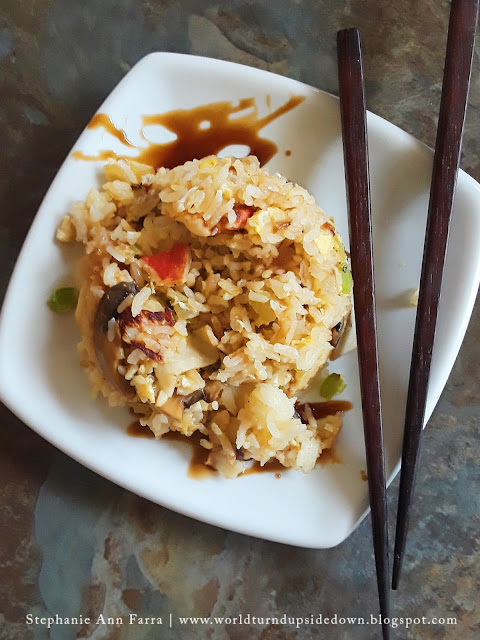
Depression Era Chinese-American Shrimp Fried Rice Recipe

Depression Era Chinese Fried Rice Recipe WWII

It's no secret that I love historical cookbooks and Asian food. I was ecstatic to find The Chinese Cook Book printed in Reading, Pennsylvania in 1936.

Historical Cookbook? Asian Food? Local Food History? Take my money! 

This book was in print from 1934 all the way until the 1970s. Man Sing Au was a Chinese-American born in 1910. She married Kam Chow Tom in 1928. In 1940s she was living in Honolulu, Hawaii with her brother in law Major, Man Sing Au. Not much is known about her life but she was widowed by 1940.


The Chinese Cook Book Man Sing Au


Depression Era Chinese-American Shrimp Fried Rice


Ingredients:

- 5 Cups leftover White Rice
- 1 Pound Shrimp, washed and peeled
- 1 medium sized Onion, diced
- 1 stalk of Celery, chopped
- 1/2 cup White Mushrooms
- 3 Tablespoons Soy Sauce
- 5 Eggs
- 3 Tablespoons Peanut or Cooking Oil
- 1 Teaspoon Salt
- Pepper to taste.

Instructions:

Clean and wash your shrimp.  Heat your cooking oil in a large frying pan on wok on high heat. Fry your protein until half done. Add the onions and celery until and fry about 5 minutes. Add the rice, soy sauce, salt and pepper. Stir with a wooden turner until well mixed. Crack 5 eggs over the rice and stir until firm. Serve warm.

Depression Era Chinese Fried Rice Recipe WWII


Breaking eggs directly over rice has been a point of contention in my family for years. My dad did this when he made Kao Pad (Thai fried rice) a recipe he became accustomed to during the Vietnam War. He insisted he cooked it perfectly, 15 year old me was sure he was doing it wrong. It definitely couldn't be the "authentic" way. It coated the rice and made it all sticky and didn't taste anything like any fried rice I got from restaurants.


I preferred to wait until the rice was cooked, make a divot in the center of the rice in the frying pan, add a little oil and scramble the egg in the divot in the pan until it was done, then quickly incorporating it into the rice. I've asked around to see which way is "most authentic" and, as you'd imagine, people do both.  But I was so sure as a kid that a separate egg must be the more authentic way. I cooked this while my family was away and have seemed to have forgotten to mention this discovery to my dad. :) 

 For this recipe, I ended up using some fake crab that I had on hand instead of the shrimp. The book mentions you can use bacon, ham, "Chicken, beef, pork, lobster or crab.. Also, any left-over meats, cut up in small pieces, can be utilized in the same manner and will make a very appetizing dish." It's a great way to use up leftover onion, celery, mushrooms and proteins that would otherwise go to waste. I will probably be cooking and sharing a few more recipes from this book. I've been eyeing up the Chop Suey and some of the tofu recipes.   

February 14, 2019

World War II Era Spaghetti Valentine's Day Recipe


WWII Spaghetti Recipe Mushrooms Olives 1944


A lot of my friends are amazing cooks and food enthusiasts but for this Valentine's Day dish I wanted something that even a beginner could feel confident about.  This is a one pot dish. No fancy cooking methods, no complex techniques or hard to find ingredients. Just everything in the pot and done in an hour. Cook with a loved one, for a loved one or just for something fun to do.

This is the final recipe of a full, simple WWII Valentine's Day dinner. Be sure to check out the period recipes for salad and dessert:


WWII Era Tomato Spaghetti 


This recipe is from The Searchlight Cookbook (1943)

Ingredients:

- 1/2 Pound of Spaghetti (1/2 a box)
- 2 Cups Canned Tomatoes, chopped (1, 28 Ounce Can)
- 1/2 Pound of Grated Cheese
- 1/4 Cup Oil
- 1/2 Cup Ketchup (Modern ketchup is really sweet so add a few Tablespoons of Vinegar if you want)
- 1 Cup Sliced Mushrooms (2 small cans)
- 1/2 Cup Sliced Olives (1 small can)
- 2 Teaspoons Worcestershire Sauce
- 1 Clove Garlic, Minced
- 2 Small Chili Peppers, Chopped


Cook and drain Spaghetti according to the package. Add remaining ingredients and let simmer for 1 hour. Plate it and top with extra cheese. You're done!


I'm particular about my pasta but this is a surprisingly fun one as the flavor sits between spaghetti and pizza due to the toppings and what kind of cheese you use. I used Parmesan but if you chose to use mozzarella it would definitely still be good. There are a lot of olives and mushrooms which my grandma would call "fluffing" a recipe when her mother did it: adding more veggies so you can stretch it out to feed more people.

If you want to save time, tomatoes with garlic already included can be bought and crushed red chili pepper can be used. If you're cooking the full meal, I won't tell if you get a salad kit at the grocery store and buy your candies. :)

Happy Valentine's Day! I would love to hear from anyone who cooks any of these recipes.   

February 2, 2019

WWII Era Valentine's Day Candies Recipe

World War II Era Candy Recipe for Valentine's Day


I'm posting some of these Valentine's Day ideas early so everyone has time to prepare if they want to make them. I thought it would be fun to post a whole WWII Era Valentine's Day dinner. I've already wrote about Cesar (Aviator's) Salad to start dinner, I will hopefully be posting a period spaghetti recipe and thought I'd start everyone off with dessert as you can make these in advance!

This recipe is from Making the Most of Your Servel Electrolux (1936). Just freeze them until you need them. Make sure you really like the person, this recipe is going to use 1/4 of your monthly US sugar ration. The recipe makes about 24 pieces.

I ended up making the Chocolate Peppermints and the Nut Cubes although the recipe suggested a bunch of different ideas that I'll include at the end of this post. The Chocolate Peppermints were pretty much peppermint patties. They are so good! The nut cubes taste like a square inch of Oreo cream filling dipped in chocolate, also not bad.


Fondant*:

- 1 Egg White
- 1/2 Tablespoon Water
- 3/4 Teaspoon Vanilla Extract (I recommend a little more)
- 2 3/4 Cups Powdered Sugar (plus extra for dusting)

Combine egg white, water and vanilla extract. Add powdered sugar until you get a dough that doesn't stick to your hands.

Divide dough in half. Make sure the half you aren't working with is sitting on a heavily powdered surface.

Options:

Melting Chocolate
Peppermint Oil
Crushed Nuts


Take one half of the fondant dough and at 4 drops of peppermint oil and knead in, being careful not to get it on your skin. Roll into small balls and flatten. Let dry a few minutes on a piece of wax paper.

Take the other half of the dough, work in the crushed nuts, leaving extra for garnish. On a sugared surface, roll out the dough into a rectangle and cut into cubes. Smaller are better. Let dry on a piece of wax paper.

Melt chocolate in a double boiler or microwave according to the package instructions. Skewer candy pieces and coat in chocolate. Place on a clean piece of wax paper, top with nuts if desired. Harden them quickly in the freezer.


*You can find modern recipes online if you'd rather not use a recipe made with raw egg. The end product is very similar. 


Why will your candies look better than mine?

You're going to pay the $3.49 and get melting chocolate and not think the chocolate chips on hand are good enough. You also will let your shapes chill in the freezer for a bit before you dip them in chocolate. :) Moving on.


I hope everyone has a great holiday and stay tuned for the Spaghetti post!

December 21, 2018

World War I Era Peanut Butter Cookie Recipe and Present Tags

***Humble plea from the web mistress: This time period is my favorite time period to cook from. It's also the time period I have the most recipes for. It's also the time period that gets absolutely no readers. So if you could like, share on facebook, cook and let people know how much you like reading about and cooking recipes from the time period, I would be very appreciative.*** 

World War 1 Peanut Butter Cookie Recipe


I was originally going to bake the peanut cookies from the Royal Baking Powder Company's Best War Time Recipes (1917) but ended up finding a fun article from 1914 in The Women's Magazine that gave ideas for a children's Christmas Party. It declared "Every child likes peanut-butter cookies," and how could I argue with that?

World War 1 Cookie Recipe

The article also described some Children's Christmas game ideas: Pin the hat on Santa, a similar game called "The Christmas Candle" where the kids would be blindfolded, spun around and would try to blow out a candle on a ledge in front of them in 6 blows. Another game had two children see who could throw more pieces of popcorn into a fake "stocking," and win a small prize tied into the toe of the stocking.

The article especially intrigued me because it was published in January, not December. Some people were still celebrating until January 5th, or the "12 Days of Christmas." In the 1700s, New Year's was the time of feastivities and Christmas was more of a solemn holiday. By the early 1900s, Christmas had its own festivities and traditions. I think this is a wonderful concept because I can't always see everyone on Christmas but 12 days is probably enough to meet up with everyone.. :) I was also entertained at the suggestion of ice cream in January, when everyone had the ice and temperatures to make it.   

The Women's Magazine also included the darling gift tags, which I've attached at the bottom in case anyone still has a few gifts they are wrapping and the recipe from Best War Time Recipes if anyone would like to try it. I might make those in the future to see how good the ration recipe compares to a recipe printed on the eve of war. 

World War 1 Peanut Butter Cookie Recipe


The recipe was in paragraph form though and I thought I would break it down for beginning cooks.

WWI Era Peanut Butter Cookies


Ingredients:

- 2 Cups Sugar
- 1 Cup Butter (2 Sticks)
- 2 Eggs
- 1 Cup Peanut Butter
- 1 tsp Vanilla Extract
- 2 tsp Lemon Extract
- 1 tsp Salt
- 3 tsp Baking Powder
- 5 Cups Flour
- 1 Cup Peanuts, chopped
- 1/4 Cup Boiling water
- Icing [Here's a basic Icing Recipe.]

Instructions: 

Preheat the oven to 375 degrees. In a large size bowl, cream the butter, sugar and peanut butter and boiling water. Let cool (so you don't cook the egg) add the extracts and salt. In a separate bowl, sift the flour and baking powder. Mix flour mixture into liquid mixture until it forms a firm dough. Knead for a few minutes with your hands until it is well combined. Roll 1 inch balls out of the dough and place on a cookie sheet. Bake for 9-11 minutes. Once removed from the oven flatten them down with a fork. Remove from cookie sheet to a cooling rack. Once cooled, ice and top with chopped peanuts.

The cookies do not spread in the oven at all so don't worry too much about crowding them. If you want spoon drop the cookies onto the sheet, that would work too.


World War 1 Peanut Butter Cookie Recipe


World War 1 Peanut Butter Cookie Recipe

Copyright © 2008-2020 Stephanie Ann Farra. All rights reserved.

All materials posted on this site are subject to copyrights owned by Stephanie Ann Farra. Any reproduction, retransmissions, or republication of all or part of any document found on this site is expressly prohibited, unless the author has explicitly granted its prior written consent to so reproduce, retransmit, or republish the material. All other rights reserved.